!! Post All Tutorials/PSD/Help/etc !! - Page 88

Created

Last reply

Replies

986

Views

174.4k

Users

192

Likes

3.9k

Frequent Posters

Deleted thumbnail
12th Anniversary Thumbnail Voyager Thumbnail Networker 2 Thumbnail
Posted: 10 years ago

4 Gloom Textures By ASR-KKG


Hey dearies,

Texture time! I hope you like this set.

> Show me your work if you use my resources, I'll fav it and I'd love to see it. (Just post the link even if its outside DA or IF)

> Credit me if you can otherwise I'm nice enough to say its alright.

> Link : Gloom Textures

Thank you,

-A
Edited by ...Ashley - 10 years ago
hemavidz thumbnail
16th Anniversary Thumbnail Voyager Thumbnail Engager Level 1 Thumbnail
Posted: 10 years ago
My new PSD


DL:http://hemavidz.deviantart.com/art/Coloring-PSD-11-You-ll-be-mine-by-hemavidz-482863856

Credits are not necessary but very much appreciated
desidillse thumbnail
Posted: 10 years ago
Hey

I have not made any banner or siggie but i wish to make. Can you please tell me which version of PS will be appropriate for me being a first timer. Plus can instruct me how to download that.

Thanks
Aditi
Deleted thumbnail
12th Anniversary Thumbnail Voyager Thumbnail Networker 2 Thumbnail
Posted: 10 years ago
How To Make PSD Colouring Tutorial By ...Ashley

Have you always wanted to make PSD coloring but didn't know how to? Fear not my friend, I'm going to teach you in quick easy steps how to make one along with some tips to improve (I dont know much but I'll teach whatever I've learned) Let's start.


Steps

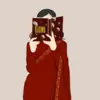
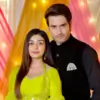
1a) Open some picture in your photoshop program (Any version you have.) We are going to make the coloring on the picture we selected. Choose any. I chose this.


1b) Look closely at this step. The red circled options are the main things you use to make a colouring. All you have to do is play with these and Tada, you made your first coloring. Let me go a little deep so you understand more better.

2a) Click on the folder icon to get a folder for your coloring. (See the circle marking A? Click it!)

2b) Click on the layer icon to make it easy for you to add things in the folder (See the circle marking B? Click it!)


You'll have something like this. Do you? If so, great!

3) Learn how adjustment panel works like. See the markings A, B and C.


A = Deals with the brightening, controlling amount of darkness and depth of the picture.

B = Deals with the Color adjustments of the picture. You can either eliminate a certain color or increase some colors in the picture.

C = Deals with the colors too but in a different way.

4) Play with the adjustments and they will keep adding to your folder automatically. Somehow like this. I used Brightness (A) Color balance (B) and you see the difference? See? Its that easy. Keep playing and observe the changing you create on the picture.


5) Save it by File>Save As > Save. Photoshop will automatically see the document as PSD file.

6) Upload and Share your PSD at deviantart.com so people can add it to their favorite, can download and can love you! :D

Tips.

1) Use these to add yellow color effect.


2) Always use HD pictures for excellent results.

3) Not every PSD coloring is going to work with every picture. Examine the pic closely. See if its a bright one or a dark one.

4) Use Blur or topaz to make the picture smooth and it makes the coloring on the picture look excellent.

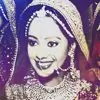
5) Fill the layer you add with some dark colour and set the layer to 'Lighten' blending mode. I filled my layer with Maroon so it looks something like this.


So that's all I know. I hope I was a bit helpful and you can now create your own colorings. Dont forget to show me what you make. I'll love to see it.

P.S If you're want the coloring I made in this Tutorial. Let me know :)

Ta Ta,
Love,
-A

Edited by ...Ashley - 10 years ago
soni19sweet thumbnail
12th Anniversary Thumbnail Sparkler Thumbnail + 5
Posted: 10 years ago
how to upload video and share in google drive

hello

first open your Google drive
for which you need a gmail account
to upload

click on upside arrow

see fist when you will start uploading processing will occur like this


then after is happened click on video link


it will open the video


then share


then advance and public


this will give your video access to public
now to get link of video to share

it is here

the first window open when you clicked on share

to close box and save changes click done
.

now to open file copy the link ,then paste it in address bar and remove s from https


then enter

your file will open


hope you got it


thanks

-chamkilli- thumbnail
13th Anniversary Thumbnail Trailblazer Thumbnail + 6
Posted: 10 years ago
Texture pack # 5


  • Texture pack requested by salooni for bokeh, light textures
  • This pack includes 20 random textures such as bokeh, paper, henna, nature, bird, moonlight etc..
  • I expect whoever downloads this pack atleast hits the like button!

Preview of all textures


Psd #65

Psd #66

  • Works all pretty much all images.
  • pastelish vibrant psd

**Open for requests psds and textures.

Edited by -chamkilli- - 10 years ago
pratsy thumbnail
16th Anniversary Thumbnail Stunner Thumbnail + 4
Posted: 10 years ago
woww
textures r so lovly <3
BitterBerry thumbnail
12th Anniversary Thumbnail Sparkler Thumbnail + 5
Posted: 10 years ago
Caps : Sarita

First ever posting in this thread !
Hope you all will like it!


-.serendipity.- thumbnail
13th Anniversary Thumbnail Sparkler Thumbnail + 3
Posted: 10 years ago
Created my very first PSD.


Credit is a MUST!

Do not recreate/repost/claim as yours!

Please PM me for the link, if you would like to use it!

Kiret (:
ournewboyfriend thumbnail
11th Anniversary Thumbnail Voyager Thumbnail + 2
Posted: 10 years ago

Coloring Tools - Photoshop (translatable)

  • Open the picture you want to color.
  • If you want to change the color scheme/ modify it, choose "Hue/Saturation" by pressing Ctrl + U.
  • To lighten or darken the graphic appropriately, use Curves.
  • Is it too pink? Use Color Balance to fix the colour ratio.
  • Selective Color can help you choose which colors you want seen more in the graphic.
  • Want a warmer/ colder effect? Use Vibrance.
These are the basics for coloring in Photoshop.

Edited by aciddaisies - 10 years ago

Related Topics

Top

Stay Connected with IndiaForums!

Be the first to know about the latest news, updates, and exclusive content.

Add to Home Screen!

Install this web app on your iPhone for the best experience. It's easy, just tap and then "Add to Home Screen".