Huewalker's Tutorials |NEW Gif Process - Pg 37|

Starwalkers thumbnail
11th Anniversary Thumbnail Rocker Thumbnail + 2
Posted: 8 years ago
#1
Hola peeps 🤗


I'm here with a tutorial gallery. If you have any doubts and stuff regarding Photoshop and the stuff I make please feel free to ask me. I'll try my best to answer.

You all know me, so making you all sit through another introduction would be nothing less than torture. 😆

So in case you want to read my intro or check out my creations here's my gallery

Recently I had a talent explosion inside me and my stuff went from crap to nice. I've learnt (more like discovered) a lot of stuff and I'm going to share some of them here. Why? Because the more you share, the more you grow.

P.S for pms buddy huewalker.

Xoxo,

Desto.

Edited by Starwalker. - 7 years ago

Created

Last reply

Replies

282

Views

21.2k

Users

38

Likes

609

Frequent Posters

Starwalkers thumbnail
11th Anniversary Thumbnail Rocker Thumbnail + 2
Posted: 8 years ago
#2
index


Signature + Motion Blur Text Effect Tutorial - Page 1

Dream Blend process - page 3

How To Use Textures Part 1 + textures links - Page 13


Texture tutorial part 2 + Wonder Woman Blend process - page 20

Fawad Khan Siggy Tutorial - page 25

textures & fonts sites - page 32


Image quality tips - page 7


Edited by Starwalker. - 7 years ago
Starwalkers thumbnail
11th Anniversary Thumbnail Rocker Thumbnail + 2
Posted: 8 years ago
#3
FAQ

Shoot your questions 🤣
Edited by Starwalker. - 8 years ago
Starwalkers thumbnail
11th Anniversary Thumbnail Rocker Thumbnail + 2
Posted: 8 years ago
#4
I feel I ought to talk about this before jumping to the tut. If you're a pro at PS please feel free to skip.

Blending

There are two types of blending out there - soft blending (soft cut) and hard blending (hard cut).

In soft blending the foreground (images of people and all that) don't have much contrast from the background. They're blended in, i.e, the boundary between the image and the background is not well defined.


In hard blending, the people images stand out. The boundary is clear and defined.


We're going to combine both these blending styles to create a simple signature.


How Do I Blend?

Layer masks all the way!

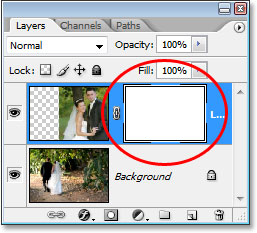
I don't know how many of you use layers masks. In fact I started off with the eraser tool. But then I stumbled upon layer masks. They are life savers. Period.


(^Cough, that image is from google)

So you click on that tiny button. You'll get a white rectangle next to your layer and if you want to erase any part of your image select that rectangle and pick a brush ( foreground color black color ) and paint over the areas of the image you want to erase. Basically it is the same as eraser tool but layer masks are reversible. If you want to get the original image back all you have to do is right click on the white rectangle and select disable layer mask.

The secret to this technique is to keep playing with the opacity of the brush. It might take some time to master this, but trust me, the end results are worth it.


Edited by Starwalker. - 8 years ago
Starwalkers thumbnail
11th Anniversary Thumbnail Rocker Thumbnail + 2
Posted: 8 years ago
#5
Signature Tutorial


(Doing this is for the one and only Rosh 😆)

It's pretty simple and I'm explaining like everything. You do not have to follow each and every step of this tutorial. Feel free to improvise and experiment.


Step 1: Open a 600*300 canvas.

Step 2: Fill it with a color of your choice. I'm going for #d49ba8.

Now I'm going to use two images of Shay Mitchell. I've already cut them from the background. (You can also search google for pngs.)

Step 3: I placed the first image.


(Cough, now comes the blending)


Now I'm gonna add a layer mask. Foreground color is black (it's gonna stay the same for all the masking in this tutorial). Brush around the corners of the image. It looks like this.


Go here if you want to see my exact mask.


Step 4: I'm using this image of pine trees (found it from google).


I add it between the big image and the small, resize it a bit. I turn it into black and white (Alt+Shift+Ctrl+B). Now I place it like this. Layer Mode is color burn, opacity 55%.


Step 5: Now I'm gonna add a layer mask. Then I pick a soft round brush around 200 px. I change the opacity to 80% and paint. I paint over the edges. And also on the shoulder because it looked quite ugly.


My exact mask can be found here


Step 6: I add another image.


Step 6: Create a new layer. Fill it with a lighter shade of the same hue. I'm using #ead9dd.


(More Blending)

Step 7: Pick a soft round brush. (200px). I paint over my layer so that her face is visible. It approximately looks like this.


My layer mask looks like this


Now we're gonna learn a cool text effect. That's in the next post.


Edited by Starwalker. - 8 years ago
Starwalkers thumbnail
11th Anniversary Thumbnail Rocker Thumbnail + 2
Posted: 8 years ago
#6
Motion Blur Text Effect

I'm going to add text to the siggy I just made.

Step 1: Create a text layer. My text is "mitchell". Font I'm using is Gladifilthefte. The size is 60 px. My color for the text is #86061d (almost the same color as her dress).

Step 2: Duplicate the text layer. Go to Filter-->Blur-->Motion Blur

Angle - 90
Distance - 50 px

Now place the filtered text layer below the original layer.


Step 3: Add a layer mask to the original text layer. Basically I've used a 30px brush with 92% opacity and placed some random dots. You know just play around.


Again if you want a look at my mask.


Now if you want to make the text a bit more interesting then merge both the text layers and add a wrap. Edit - Transform - Warp- flag bend at 20.


I add my subtext - "Embrace what you were born with because it's beautiful." My font is calibri 8 px. The same color as the main text.


That's it. Now I'm gonna add a coloring. I'm using my 2nd PSD Autumn Light at 80% opacity.

(Optional )

So basically I just do these steps for a finishing. I merge all layers together into a new layer by pressing Ctrl+Shift+Alt+E. I'm sharpening the layer. Filter - Sharpen - Smart Sharpen. My settings are shown below:


Now I set the sharpened layer to softlight with 38% opacity.

Final Product:


That's it. If you have any doubts, go ahead and ask!
Edited by Starwalker. - 8 years ago
huewalker. thumbnail
Posted: 8 years ago
#7
For pms buddy this account.
annihilation thumbnail
15th Anniversary Thumbnail Stunner Thumbnail + 3
Posted: 8 years ago
#8
THIS PLACE IS A BOON! Those techniques are HEART EYES (makes sense from a PS-er's perspective, right? 😆) and YOU, you are BRILLIANT. Went through all the tutorials and they're so well explained and all these techniques are actually quite useful. Defo going to try your tutorials sometime on my stuff. Thank you for sharing your knowledge with us all and inspiring us all to learn and improve. 🤗
Edited by .annihilation. - 8 years ago
Phir_Mohabbat thumbnail
Posted: 8 years ago
#9
Present teacher ji😆

Finally the tutorial gallery is here!🥳 Thank you so much for this! You are one of the people who makes siggies using very unique styles and as a learner I was very curious as to how you make them. The tutorial was very detailed and I am definately going to try that. Loved the text style too, very chic.

Can you post a tutorial about use of textures? Your style is very similar to Devianart guys and they use crazy amount of textures and cuts. Would love to get few tips on them.

Once again thank you so much for the gallery, hoping to get frequent tips from you teacherji😛 do PM me from next time.
Edited by .Avengers. - 8 years ago
panchan thumbnail
11th Anniversary Thumbnail Rocker Thumbnail + 2
Posted: 8 years ago
#10
edited.
Okayyy so finally i unres my post 🤣

You have no idea how amazing of you it is to open a tut's gallery *_*
This is defo the best thing ever and im gonna stalk this forever and ever and ever for tips.

I loveee you for this and i will keep pestering you for more and more tuts 🤣 I think the first few tuts are gonna be half filled with my reqs only cz i blurted out a a big list on your mention of opening a tuts gallery 🤣

And and the first tut on being dedicated to me 😆 I LOVE IT <3 Now i know ur secret 🤣 But still don't worry, im never gonna be able to reproduce it as you do reyy. See what i did of this acchi si do pics 🤣 Ruined em :3

Btw this was me being tremendously fast at doing this plus i was too lazy to find another stock so used urs 🤣

So this gallery is gonna keep inspiring me till the end so dont you dare even think of shutting it ever. Coz even my bhoot will keep pestering you.

Okay, enough of me.
Tata byye

Oh yes, Im your faaan. <3
You know that but nevermind 🤣

Loads of lou,
Rosh
Edited by panchan - 8 years ago

Related Topics

Avatar and Signatures Shop Thumbnail

Posted by: Leenaaa

21 days ago

˚➶ 。˚Arcanum Tutorial Shop | Gif Tutorial + YouTube Video ˚➷ 。˚

Hey there! I'm Leena, and along with my trusty sidekick (my PS :p), and give you a warm welcome to Arcanum Tutorials. After a lot of...

Expand ▼
Avatar and Signatures Shop Thumbnail

Posted by: Sutapasima

4 years ago

Sutapa's new horizons

======== ========

Expand ▼
Avatar and Signatures Shop Thumbnail

Posted by: Quantum-Dot

7 months ago

🎨 SimPixel Palette 🎨 ~ New Update 3 Pg 7 (24-6) 🎨 SimPixel Palette 🎨 ~ New Update 3 Pg 7 (24-6)

W E L C O M E to W H A T I M A K E? • Signatures ~ Book Cover ~ Banners ~ Tags ~ Gifs ~ VMs \\ Both non animated and animated stuffs// C O P Y R...

Expand ▼
Avatar and Signatures Shop Thumbnail

Posted by: PriyaArshiSarun

1 years ago

❤️ Silent Girl|Priya Arshi Creation ❤️ New Update pg5

Hello! Welcome to my shop on A/S forum. I'm Priya Arshi Sarun you can call me Priya or pri. I'm Arshi as well as Wangxian (The Untamed) Lover. I...

Expand ▼
Avatar and Signatures Shop Thumbnail

Posted by: Koeli

6 months ago

New DT in the house… please welcome QD

Please welcome Quantam-Dot as there new viewbie of Avatar and Signatures Forum. She is going to be the first point of contact in this forum....

Expand ▼
Top

Stay Connected with IndiaForums!

Be the first to know about the latest news, updates, and exclusive content.

Add to Home Screen!

Install this web app on your iPhone for the best experience. It's easy, just tap and then "Add to Home Screen".