
Kyunki Saas Bhi Kabhi Bahu Thi 2: EDT # 6

DANCE DANCE🕺💃 20.12

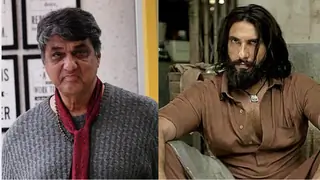
Dhruv Rathee to bring another 100cr for Dhurandhar
New Entrant - Swati Sharma of YHC fame
BANTWARA CUT 21.12
Such an insult!!!
How Alia got her role in Gangubai
NDTV Indian of the year awards- Janhvi Vicky Kapil Ahaan Aneet Ananya
“Akshaye Khanna overshadowed Ranveer in Dhurandar”

🏏India U19 vs Pakistan U19, Final ACC Men's U19 Asia Cup 2025🏏
Meethichuri Bani Vamp
Kangana Ranaut Praises Dhurandhar
B Praak And Wife Announce Birth Of Baby Boy

how to blend 2pics together in psp hope u guys like this tut
Ill b using these 2 pics
u can copy n paste these two sigs into psp.
1. open a new document set the followin settings.
2. copy n paste the 2 pics on to tht document it will look like this
3. To blend the pics together.. take the eraser button
then start erasing like this...
4. erase it out makint he sigs blend in toghetr like this.
5. Merge all the pics together by...
6. at this point u have merged the sig togheer u can write watever u want to write on.
7. additional steps.
copy this pic n paste it over the blended sig like this
8. it will now look like this
dont wrrythe sig will b back :)
9. go to Layers ----> Properties u will get this back set ur settings like this
10. Now ur sig will look like this
11. to add text- once ur done addin the text jus to to Layers ---> merge ---> Merge visible
11. You can also add brushes...
12. Heres my final result
Dont forget to post ur final results. If you have ne questions u can ask me here or pm me :)
Fantabulous tutorial 👏 👏 👏 👏
Bcoz of you I have learnt blending pics 😊 😳 👏
I have tried it out but unfortunately I don't have any text brushes or the brushes which u used
But here's the siggy
Thanks a ton for such a wonderful tutorial..👏By me plz credit me thankx hope u gys like the tut if u get confused somehwere let me knw... This is made in PSP
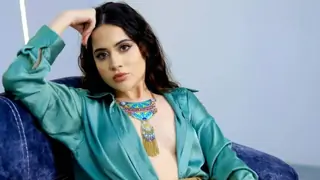
1. I will use this pic to colorize it.
2. Copy n paste the pic into psp.
3. go to Layers----> New raster layer n make the settings like this...
SKIN: we will do the skin color first
4. click on the paint bucket tool n select a orange kindaa nude color n pour it on to the picture n it will look like this
5. go to Layers--->merge--->merge all flatten
6. Go to layers---> Duplicate
7. go to Layers--->properties--->blend mode:: screen---> set opacity to 30.
8. go to Layers--->merge--->merge all flatten
9. Go to layers---> Duplicate
10. go to Layers--->properties--->blend mode:: soft light---> set opacity to 40.
11. 8. go to Layers--->merge--->merge all flatten
Now we are done with skin herez how the pic should look now.
EYES:
1. Make a new raster layer n set the blend mode to color legacy
2. select the eye color u wish to have... select a round brush and color the eyes in like this
3. you can either lighten or darken the eye color by goin to properties and changing around the opacity.
4. merge the layers n flatten thm
5. with final eye color:
now we are done with eyes.
LIPS:
1. layers n make a new raster layer. set the blend mode to soft light
2. color the lips like this
3. change the opacity to where u like the lip color . final lip pic.
EYE SHAdOW:
1. make a new raster layer set the blend mode to soft light
2. you can use the color of ur choice but use something tht goes with the skin like how u do ur own makeup.
3. follow my settings at the upper top witht he opacity of the brush around 25..
4. u can also do her eye liner jus select a black color n paint it on the bottom eye liner.. like this..
FInal eye make-up:
CHEEKS:
1. make a new raster layer set the blend mode to softliiight
2. go ahead n select a dark pink plummish color for blush put it on the cheeks change the opacity color at the top to something in the lows where it looks good. like ths...
go to layers--->properties--->opacity change it tto 70-75 clik ok merge layers flattn all
final blush pic:
Color the Clothes:
we will color her tank top.. choose the color u want
1. make a new raster layer n set blnd mode to color legacy
2. color in her tank like this
3. now go back n fix it with an eraser if went outside the tank lines.. after erasing go to properties n set the opacity levels to 75
final result with tank color:
NOw go ahead n copyright ur name to it...
my Final result:
show me urs too plz thankx i hope this tut helped u guys..

Hi
Can anyone tell me if a tutorial has been put up or if anyone can put a tutorial up of how you put borders on video avi's
Ive tried alot but failed😭
I want to end up with something like this
with the white border around it😕
Hi
Can anyone tell me if a tutorial has been put up or if anyone can put a tutorial up of how you put borders on video avi's
Ive tried alot but failed😭
I want to end up with something like this
with the white border around it😕
There is a tut on this on Page 42 , by me ! Hope it helps you. 😳
how can I send or post photos and siggies.
when I post like pictures it comes cancle in the little box.
please help me out.
u have to first upload it from here then copy the link
then in ur IF page..follow these:-
Step 1 - Click on Setting on the top right corner
Step 2 - Click on Edit Profile
Step 3 - Scroll down to till you find a Signature Box
Step 4 - Put the image code that you have with the IMG Codes with Brackets around them. If needed click on Yes for your signature to be on every single post of yours.
hope this helps😃
Alot of People have asked me how to Outline your brushes. So I am posting a tut for it 😊
To outline brushes
* Create a New Ratser layer
*Stamp on ure Brush
* Edit --> Copy
* Open a new transparent Layer and fill it with the colour u want ure outline to be
* After u done that, Edit --> Paste as new Selection
* Selections --> Modify --> Expand --> And set the Number of pixels to 2
* Edit --> Copy
*Go to ure sig, Edit --> Paste as New layer
And your done!
If u dont get anything let me no 😉
And I'm sorry there are no screenshots 😳


This is a thread where you all can share everything anything, be it be a Tutorial, PSD, Suggestions, Textures, Animations, etc Try and avoid too...


 Geet - Hui Sabse Parayee
 Celebrity Fan Clubs
 Anupamaa


850