Post all Tutorials HERE :D - Page 30

Created

Last reply

Replies

921

Views

325.9k

Users

278

Likes

581

Frequent Posters

zinny.xo thumbnail
18th Anniversary Thumbnail Sparkler Thumbnail + 2
Posted: 17 years ago

Supplies Needed: PSP , Animation Shop ! :)

Okay , This is a tut , on how to add two video avi's together !

Lets start off with how to make a video avi !

Follow this link , to help you teach how to make a normal video avi !

(Just scroll down) http://www.india-forums.com/forum_posts.asp?TID=504625&T PN=5
^^This , is thanks to Nabibah ! For the Great Tut , and letting me use this , to inform other people of this wonderful tutorial ! :)

Now: How to add Border's , and text , to each frame !

Step One: Open a new image , of these dimentions in PSP !

Step Two: Go to Image>>Add Borders. Now a window will appear ! Change your setting as mine !

Step Three: Okay , Now ! Follow Step Two , but , fill in these dimentions !

Step Four: Repeat Step Two !

Should look like this now !

Step Five: Launch Animation Shop !

Step Six: Now copy your Border image , and paste it into Ani Shop , and follow this !

Step Seven: Resize Animation !

It should look like this now !

(But , with the background erazed)

Step Eight: Use this button to duplicate , duplicate this to 27 Frames (atleast) !

Step Nine: Now Select All of your pictures , and select all of your duplicated border , and drag the border onto the first image of the vid avi , and let go , when u have the position , you want it in , and it will automatically be posted in all of the frames !

It should look like this now !

Step Ten: Now , do the same for text , exceot for adding border's , add text !

Step Eleven: Now open a new image (in ani shop) with these dimentions !

Step Twelve: Now duplicate your new image , like you did with your border , with the number of frames you want ! And , now , press ctrl+a , and then drag your vid avi !

Like this:

Step Thirteen: And , now , you can repeat ! for the second avi ! :)

After you're done , Go to View>>View Animation !

And , if you're satisfied with your result , go to File>>Save As>>Save it as a .GIF File ! :)

And , you're done ! :)

Need any further information , of help , please ask !

Regards ,

- Zinu ! :)

Edited by Zinu29 - 17 years ago
HobbitButt thumbnail
19th Anniversary Thumbnail Rocker Thumbnail + 2
Posted: 17 years ago
^In first few steps you forgot to mention that it's in PSP, and then in Animation Shop. 😳

Thank You for the tutorial, it's great. I am sure it helped a lot of people.

😃
HobbitButt thumbnail
19th Anniversary Thumbnail Rocker Thumbnail + 2
Posted: 17 years ago

This is a basic tutorial on how you can record your actions of color effect on your creations and save them in a script file.

You will need to have:

Corel Paint Shop Pro

I am using the 10th Version, which is PSP X. This may or may not work in other Versions.

Let's Start!

1st of all you need to know that this script should recorded in the Scripts-Restricted Folder. You see a script on the toolbars below, just click on it and go to scripts-restricted in the "Category Bar".

Step 1: Open up your PSP.

Step 2: You have to remember all our your steps you are going to take while recording a script. If you are ready to being then open up a random picture, and click on the circle button where I am pointing at to start recording:

If you don't already have a bar like this than, go to View>Toolbars>Script. A box similar to the one above will pop-up.

Step 3: As soon as you have clicked on the recording option, start with the steps you will be taking. NOTE: If you are working on a particular part of picture and bluring it or sharpening it, it will not work in the script. It simply won't work.

Step 4: This is a option step, you don't need to take it if you don't want to. This is in case you forgot something and want to pause or stop your script from recording:

Step 5: After done with your steps, its time to save your script, it's the last button on the toolbar:

Step 6: A box will pop-up and will ask for your information. Fill in what you want to name it and check if you want any other options. If you want to name the copyright of your script by your name then click on Descriptions.

Step 7: When done with everything, then open up another picture and test the script to see if it came out right:

If it works how to want it, then HURAYY!! You're done!

Hope that helped you with doing your effects on a picture, over and over.0

Love,

Yams

zinny.xo thumbnail
18th Anniversary Thumbnail Sparkler Thumbnail + 2
Posted: 17 years ago
Thanks for correcting yummys ! And , lovely Tutorial ! Will try adn let you know how it worked ! Thanks so much ! 👏 😳
-dramaholic- thumbnail
18th Anniversary Thumbnail Sparkler Thumbnail + 6
Posted: 17 years ago
wwow thanks! 😃 i will try it l8er 😉
Nosh007 thumbnail
20th Anniversary Thumbnail Dazzler Thumbnail
Posted: 17 years ago
can someone please tell me how to download Adobe photoshop cs2 i tried but it didn't work
@bCd thumbnail
18th Anniversary Thumbnail Navigator Thumbnail
Posted: 17 years ago
hry how to dwnload PSP through limewire plz help me!
Pinkzi thumbnail
17th Anniversary Thumbnail Navigator Thumbnail
Posted: 17 years ago
Thanxs everyone for the usefull tutorials. 😳
oOoasiangrloOo thumbnail
Explorer Thumbnail
Posted: 17 years ago

Originally posted by: adorablegurl

hey guyz lots f ppl ask about the glow effect that khushi di have on her s but i found something similar to thaty its only for phothosp i will post it up right here


Step 1. First of all I opened this photo in Adobe Photoshop. I used the command Image ->Adjustments -> Levels ( or in layer palette the fourth one button from left *create new fill or adjustment layers) to make the image brighter.


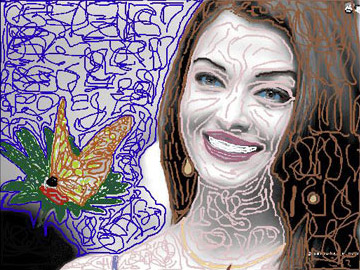
Step 2. Then I call the command Filters -> AKVIS -> Coloriage. Here I start to color my photo. I use the color pencil to color my photo. I try my best to draw very accurate border lines to give a very accurate color to my photo (as shown below).
I gave gray color to her hair and blue to eyes and white to her teeth and light pink to her lips (lips, eyes, teeth and eyebrow, necklace are circled with skin color).

It was a very hard to color the butterfly and flower but I did my best to mark the edges of them.


Step 3. Then I pressed the play button to see the result of my all work and here is the result.


Step 4. The colorization result is applied and the plug-in's window is closed.
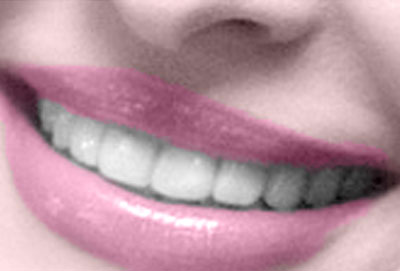
Step 5. But I found that the teeth are not white.


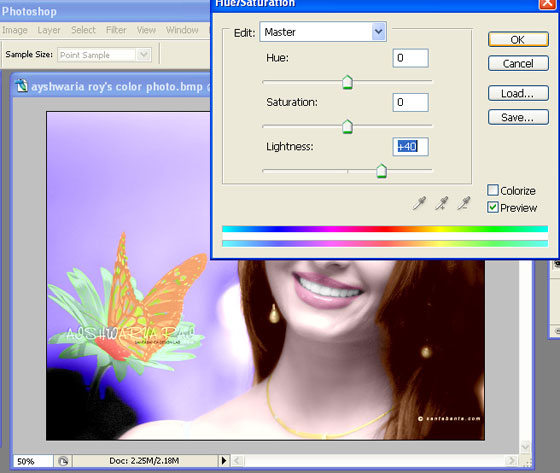
To brighten her smile, start by going to the Layers palette and clicking on the Background Layer to make it the active layer. Then use the Lasso tool (or any selection tool you're comfortable with) to put a selection around her teeth (as shown). Once selected, we'll need to soften the edges of the selection so our retouch isn't obvious, so go under the Select menu and choose Feather. When the Feather dialog box appears, enter 2 for low res images, 5 for high res, and click OK to apply this edge softening. Then go under the image menu and choose Adjustment and then choose Hue/Saturation. And in my case to reduce the darkness I increase the value of Lightness, and press enter.


Step 6. This photo was a little much noised (as shown below), so here I reduced the noise by using AKVIS Noise Buster (Filter -> AKVIS -> Noise Buster).

http://akvis.com/img/examples/coloriage/ayshwarya-ray-photo/ noise-buster.jpg

And there is my final color photo as shown below.


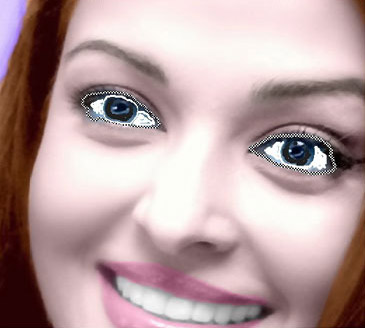
Step 7. Now the Picture is Good but Her Eyes are too Blue,
Sclera Must be White: Now my aim is to white the sclera and to change eye color. So i started from here again with Akvis Coloriage Filter for making these changes.

Again I went to the filter Menu (in Adobe Photoshop) AKVIS Coloriage. Here I started with keep color pencil to draw a very close border around her sclera and I gave it white color. I also gave a black (natural color) to eyeball.


Here Is The Procedure For Making Brown And Light Greenish Eyes.

The thing is to choose the color, mean to say that which is perfect color for your job. And it is very easy in Akvis Coloriage. Just give color and then press the run button .

If you are not satisfied with this just press Before and use eraser tool located in control panel and give another color to it. As I told you before that Akvis Coloriage Filter is on of the easiest and best solution for you complicated problems which you have with your Black & White Photos.


hope this will help u guyz
luv
tina

thnxx so much can you do this tut for paint shop pro 8 please anyone...

thnxxx in advance!

Edited by oOoasiangrloOo - 17 years ago
*Fiza* thumbnail
19th Anniversary Thumbnail Rocker Thumbnail Engager Level 1 Thumbnail
Posted: 17 years ago

Originally posted by: Zinu29

Supplies Needed: PSP , Animation Shop ! :)

Okay , This is a tut , on how to add two video avi's together !

Lets start off with how to make a video avi !

Follow this link , to help you teach how to make a normal video avi !

(Just scroll down) http://www.india-forums.com/forum_posts.asp?TID=504625&T PN=5
^^This , is thanks to Nabibah ! For the Great Tut , and letting me use this , to inform other people of this wonderful tutorial ! :)

Now: How to add Border's , and text , to each frame !

Step One: Open a new image , of these dimentions in PSP !

Step Two: Go to Image>>Add Borders. Now a window will appear ! Change your setting as mine !

Step Three: Okay , Now ! Follow Step Two , but , fill in these dimentions !

Step Four: Repeat Step Two !

Should look like this now !

Step Five: Launch Animation Shop !

Step Six: Now copy your Border image , and paste it into Ani Shop , and follow this !

Step Seven: Resize Animation !

It should look like this now !

(But , with the background erazed)

Step Eight: Use this button to duplicate , duplicate this to 27 Frames (atleast) !

Step Nine: Now Select All of your pictures , and select all of your duplicated border , and drag the border onto the first image of the vid avi , and let go , when u have the position , you want it in , and it will automatically be posted in all of the frames !

It should look like this now !

Step Ten: Now , do the same for text , exceot for adding border's , add text !

Step Eleven: Now open a new image (in ani shop) with these dimentions !

Step Twelve: Now duplicate your new image , like you did with your border , with the number of frames you want ! And , now , press ctrl+a , and then drag your vid avi !

Like this:

Step Thirteen: And , now , you can repeat ! for the second avi ! :)

After you're done , Go to View>>View Animation !

And , if you're satisfied with your result , go to File>>Save As>>Save it as a .GIF File ! :)

And , you're done ! :)

Need any further information , of help , please ask !

Regards ,

- Zinu ! :)

thankyouuuuuuuuuu so much for this wonderful tutorial zinu!!!!!

Related Topics

Avatar and Signatures Shop Thumbnail

Posted by: ExoticDisaster

1 years ago

Shiri'z Tutorials *Rain Effect* Page 7

Hello Lovely People! I am here with my first tutorial channel. I have decided to post photoshop tutorials on this thread . Whenever you would...

Expand ▼
Top

Stay Connected with IndiaForums!

Be the first to know about the latest news, updates, and exclusive content.

Add to Home Screen!

Install this web app on your iPhone for the best experience. It's easy, just tap and then "Add to Home Screen".