Post all Tutorials HERE :D - Page 41

Created

Last reply

Replies

921

Views

326.1k

Users

278

Likes

581

Frequent Posters

Tessa_ox thumbnail
18th Anniversary Thumbnail Navigator Thumbnail
Posted: 17 years ago
&&u can get cool brushes frm deviantart.com 😊
*sweet-soni* thumbnail
18th Anniversary Thumbnail Voyager Thumbnail
Posted: 17 years ago

A lot of people are posting about were do you get good brushes ext. so here's sum links for brushes ~

paint shop pro brushes -

http://www.inxplicable.org/design/mybrushes.html

http://www.ftmagic.com/brushes.html


http://www.geocities.com/Heartland/Ranch/9969/brushes/brushe s.html

http://www.autumnweb.com/Roxys/Tubes/Brushes.html

http://search.deviantart.com/searchcraft/?section=browse& ;qh=boost%3Apopular+age_sigma%3A24h+age_scale%3A5&q=psp+ brushes&offset=48

Photoshop brushes -

http://search.deviantart.com/?section=browse&qh=boost%3A popular+age_sigma%3A24h+age_scale%3A5&q=photoshop+brushe s

http://www.misprintedtype.com/v3/goodies.php

http://www.itsuji.net/brushes/index.php?x=featsets.php

http://www.psbrush.com/

Great site for ps brushes -


Edited by *sweet-soni* - 17 years ago
*sweet-soni* thumbnail
18th Anniversary Thumbnail Voyager Thumbnail
Posted: 17 years ago
Tut on how to save photoshop brushes ~

http://www.photoshopbrushes.com/tutorials/saving-brush-sets. htm

Edited by *sweet-soni* - 17 years ago
*sweet-soni* thumbnail
18th Anniversary Thumbnail Voyager Thumbnail
Posted: 17 years ago
How to work with scripts - (tut)

First we're going to use any little icon for this tutorial. Just to show you how it works.


Now, you should see something weird looking that looks like this:


If you don't see that, go to view>toolbars>script

Now, you should see a little circle button. Click it.


Now it's beginning to record your steps. So, make a new raster layer layers>new raster layer
Now fill it with the color #FCA204 and set it to multiply and lower the opacity to 32.
After that, make another new raster layer, fill it with the color #043FAC and set to exclusion and lower the opacity so it's 28.

Now, go back to your script panel and click the little disk and it should ask you for your desired script name. I named mine ashlee.


Now we are going to test the script! I'm going to use a different picture now. This one:


Go back to your script program and then go through the drop down menu and look for your script, I named mine Ashlee so I'm going to look for that. When you find it, select it and press PLAY.


You should immediately see the script take action! If it still doesn't work them tell me. or if your confused somewere. 😳
Edited by *sweet-soni* - 17 years ago
*sweet-soni* thumbnail
18th Anniversary Thumbnail Voyager Thumbnail
Posted: 17 years ago
How to add borders to your creations in photoshop -

Step 1) When you open Photoshop, pull up the picture or creation you want to add the border to. On the vertical menu bar, choose the color you want to work with. If you want to work with black and white, you'll see on the vertical menu bar there are two boxes with colors in them (the default is black and white). If you want black and black is on the top box, switch it to the bottom. If it is on the top, click the two little boxes on the left side and this will switch them. (Do the same for white so it's on the bottom, if you want white).

You can choose a color by going to Windows on the top horiztonal menu and then checking the box "Colors" on the drop-down menu. If this box is checked, uncheck it, and then recheck it again. In Photoshop this will take you right to the colors menu box. Now choose the color by sliding the cursors along the three different bars. Once you find the color you like, go on to the next step.

Step 2) Now we're going to make the border. On the horizontal menu bar go to Image and then down to Canvas Size. This will now pop-up a selection box. Firstly, make sure the Relative box is checked. Then we're going to decide how large of a border there should be around the picture or photo. Make sure the two right boxes are on Pixels. For my picture, I chose to do 40 pixels on each side (Width and Height). When you decide how many pixels of a border you want on each side, click OK.

And there you go!

if you sitll don't understand then pm me or post it below 😊
Edited by *sweet-soni* - 17 years ago
zunaira thumbnail
20th Anniversary Thumbnail Explorer Thumbnail
Posted: 17 years ago
can sumone post a tutorial for putting videos in siggies plz?
Tessa_ox thumbnail
18th Anniversary Thumbnail Navigator Thumbnail
Posted: 17 years ago
ok this is a tut on how to save siggy/vid avi!

ok right click on the siggy/vid avi u want to save and
click on "SAVE PICTURE AS"

u can change the file name but DON'T change the "SAVE AS TYPE" especially when its gif.image.

now go to tinypic.com

and upload ur siggy/avi.

Uploding avtars on india-forums.

go to Setting>edit profile
scroll down and stop when u get to SELECT AVATAR


on tinypic

upload ur AVATAR not sigy and copy the url


on india-forums

paste the url onto the white rectriangular box


and den click on "PREVIEW"
u'll see ur avatar.


now i m gonna show u guys how to save siggys and put it in ur signature box.

ON TINYPIC
upload ur siggy and copy the url


and paste it onto the big box


and then click on the signature preview.if u like it den scroll down and click on UPDATE PROFILE.and ur done!

if u r confused jus pm me !i 'll reply to ur msg.

NOTE;;if u use these tut pics made by me plz do creadit me! 😃


*sweet-soni* thumbnail
18th Anniversary Thumbnail Voyager Thumbnail
Posted: 17 years ago

Originally posted by: zunaira

can sumone post a tutorial for putting videos in siggies plz?

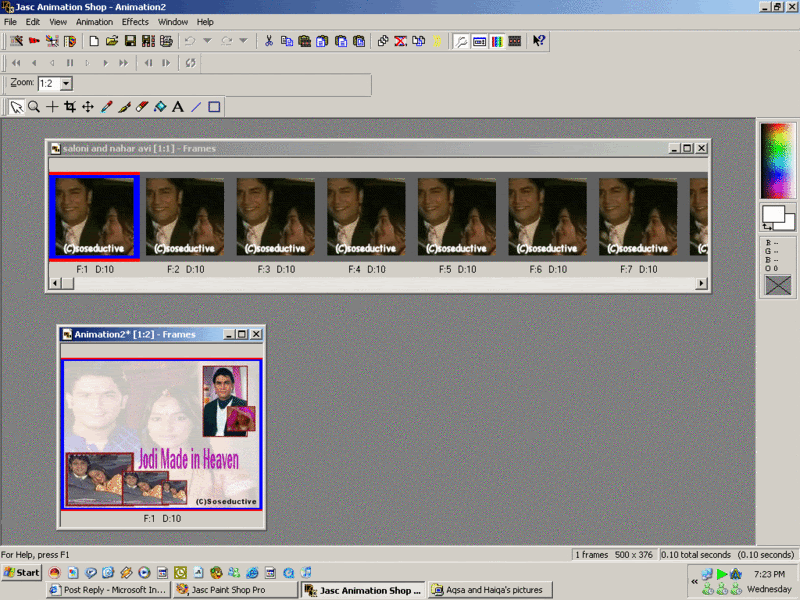
Originally posted by: soseductive

1)u open up the siggy seperate and avi seperate in animation shop

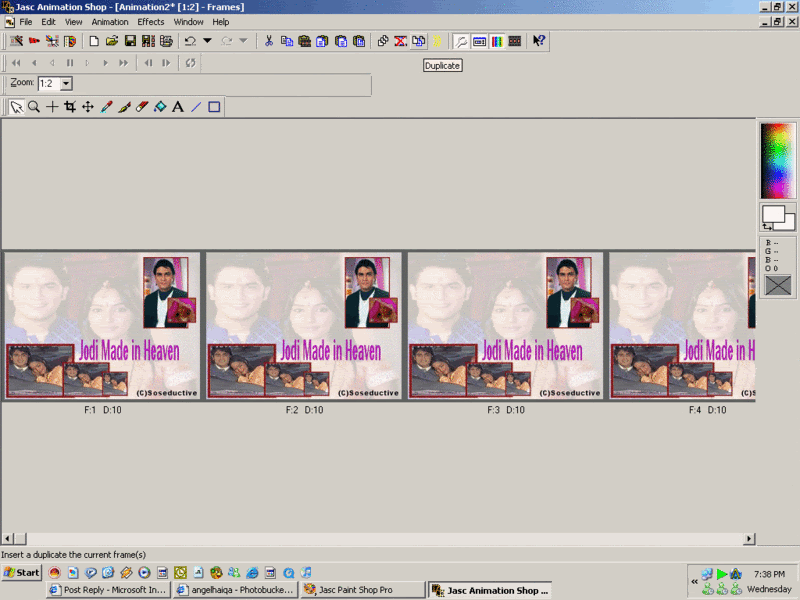
2) Then u duplicate the siggy into how many ever frames u have i have 74 frames so ill duplicate my siggy to 74 frames (To see how many frames are there below the avi it will be written as F1)

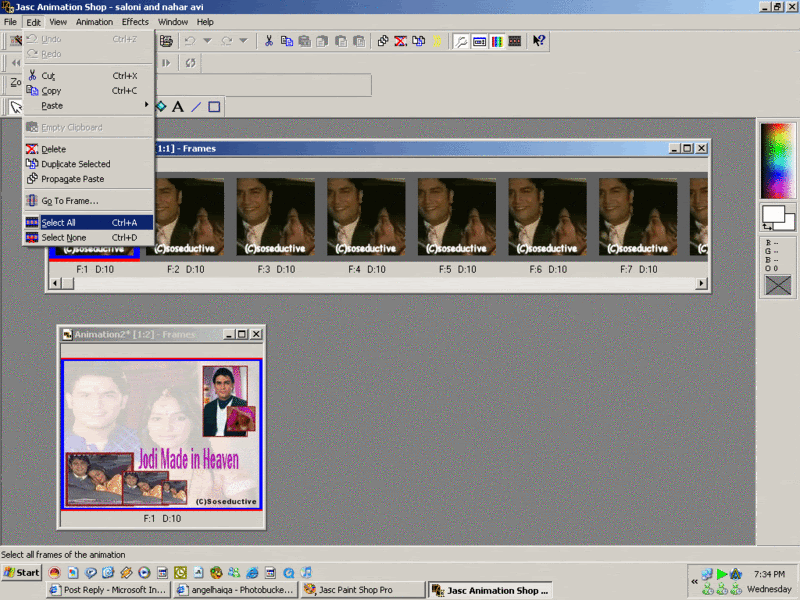
3)After duplicating u click on ur Avi and then click on edit>>> select all>>>and go on edit again and click on copy

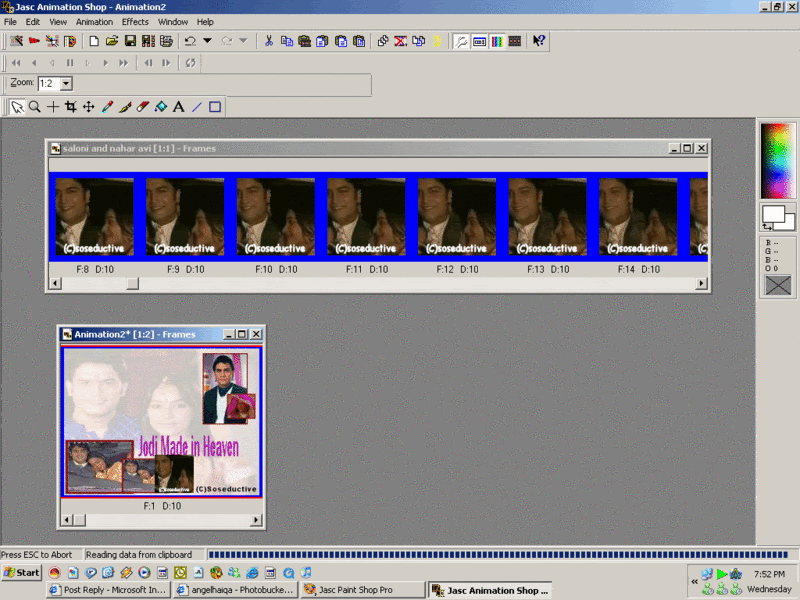
4)Then click on ur siggy and press>>>edit>>>select all.Go on edit again and press paste>>> into selected frame

5)then u can place ur avi anywhere on the siggy u want

6)And then ur done u need to save it and this is how my siggy has turned out to be:-

Before:

After:

HobbitButt thumbnail
19th Anniversary Thumbnail Rocker Thumbnail + 2
Posted: 17 years ago

Originally posted by: *sweet-soni*

How to work with scripts - (tut)

First we're going to use any little icon for this tutorial. Just to show you how it works.


Now, you should see something weird looking that looks like this:


If you don't see that, go to view>toolbars>script

Now, you should see a little circle button. Click it.


Now it's beginning to record your steps. So, make a new raster layer layers>new raster layer
Now fill it with the color #FCA204 and set it to multiply and lower the opacity to 32.
After that, make another new raster layer, fill it with the color #043FAC and set to exclusion and lower the opacity so it's 28.

Now, go back to your script panel and click the little disk and it should ask you for your desired script name. I named mine ashlee.


Now we are going to test the script! I'm going to use a different picture now. This one:


Go back to your script program and then go through the drop down menu and look for your script, I named mine Ashlee so I'm going to look for that. When you find it, select it and press PLAY.


You should immediately see the script take action! If it still doesn't work them tell me. or if your confused somewere. 😳

Please give credit to originaly posted this tutorial, because it was original posted by Swimchick not you.😳

*sweet-soni* thumbnail
18th Anniversary Thumbnail Voyager Thumbnail
Posted: 17 years ago

Originally posted by: yummys

Please give credit to originaly posted this tutorial, because it was original posted by Swimchick not you.😳

i knwo that thats why i didn't say it was done by me or i didn't say it was done by swimchick becuase i edited a few things cuase they didn't make sense !!

Related Topics

Top

Stay Connected with IndiaForums!

Be the first to know about the latest news, updates, and exclusive content.

Add to Home Screen!

Install this web app on your iPhone for the best experience. It's easy, just tap and then "Add to Home Screen".