Post all Tutorials HERE :D - Page 2

Created

Last reply

Replies

921

Views

328.9k

Users

278

Likes

581

Frequent Posters

~*manai*~ thumbnail
19th Anniversary Thumbnail Rocker Thumbnail + 2
Posted: 18 years ago
#11

Hi to all my creative siggy makers!!!!!!!!😊

I saw that alot of people want to know where other people got textures in their sig!!!!!! i have found sites and i have made some textures too!!

HOW TO USE A TEXTURE!!!

1. first you copy and paste it in to your psp

2. then you paste it on your sig as a new layer

3. after that you go to properties and go to either lighten or overlay or soft light (those come out the best) you can also do which ever property you want

i hope that helped if it did not then you can surely pm me for further queastions

SITES

https://www.freewebs.com/hiral_creations/goodies.htm

https://www.swimchick.net/index.php?x=visitors/textures/newte xtures

https://meleada.livejournal.com/tag/light+fx

https://meleada.livejournal.com/32397.html

go to https://www.devaintart.com/ and search Abstract textures

HERE ARE SOME THAT I MADE THAT YOU MAY USE!!!!

Edited by ~*manai*~ - 18 years ago
kvashishat thumbnail
19th Anniversary Thumbnail Voyager Thumbnail + 3
Posted: 18 years ago
#12
hey guyz herez a tutorail by me. some ppl usually want o change eye color so here a psp8 tutorial.
- open an emage and zoom in so u can see the eye ball clearl;y.

- then go to ur tool box on lefthand side and select free hand select and set in on poin to point opetion.

- them make a circle round the eye ball carefully .

-u shud seea flottin round lise around the eye ball .

-go to adjust on top of ur psp and and then go to hue and saturaion select colorize.

-choose ur fav colo and click ok.

and wallha ur eye color is changed and then u deselct it.

i hope it will help u guyz if u didnt get anything just let meknow

luv'
tina
kvashishat thumbnail
19th Anniversary Thumbnail Voyager Thumbnail + 3
Posted: 18 years ago
#13
hey guyz lots f ppl ask about the glow effect that khushi di have on her s but i found something similar to thaty its only for phothosp i will post it up right here


Step 1. First of all I opened this photo in Adobe Photoshop. I used the command Image ->Adjustments -> Levels ( or in layer palette the fourth one button from left *create new fill or adjustment layers) to make the image brighter.


Step 2. Then I call the command Filters -> AKVIS -> Coloriage. Here I start to color my photo. I use the color pencil to color my photo. I try my best to draw very accurate border lines to give a very accurate color to my photo (as shown below).
I gave gray color to her hair and blue to eyes and white to her teeth and light pink to her lips (lips, eyes, teeth and eyebrow, necklace are circled with skin color).

It was a very hard to color the butterfly and flower but I did my best to mark the edges of them.


Step 3. Then I pressed the play button to see the result of my all work and here is the result.


Step 4. The colorization result is applied and the plug-in's window is closed.
Step 5. But I found that the teeth are not white.


To brighten her smile, start by going to the Layers palette and clicking on the Background Layer to make it the active layer. Then use the Lasso tool (or any selection tool you're comfortable with) to put a selection around her teeth (as shown). Once selected, we'll need to soften the edges of the selection so our retouch isn't obvious, so go under the Select menu and choose Feather. When the Feather dialog box appears, enter 2 for low res images, 5 for high res, and click OK to apply this edge softening. Then go under the image menu and choose Adjustment and then choose Hue/Saturation. And in my case to reduce the darkness I increase the value of Lightness, and press enter.


Step 6. This photo was a little much noised (as shown below), so here I reduced the noise by using AKVIS Noise Buster (Filter -> AKVIS -> Noise Buster).

http://akvis.com/img/examples/coloriage/ayshwarya-ray-photo/ noise-buster.jpg

And there is my final color photo as shown below.


Step 7. Now the Picture is Good but Her Eyes are too Blue,
Sclera Must be White: Now my aim is to white the sclera and to change eye color. So i started from here again with Akvis Coloriage Filter for making these changes.

Again I went to the filter Menu (in Adobe Photoshop) AKVIS Coloriage. Here I started with keep color pencil to draw a very close border around her sclera and I gave it white color. I also gave a black (natural color) to eyeball.


Here Is The Procedure For Making Brown And Light Greenish Eyes.

The thing is to choose the color, mean to say that which is perfect color for your job. And it is very easy in Akvis Coloriage. Just give color and then press the run button .

If you are not satisfied with this just press Before and use eraser tool located in control panel and give another color to it. As I told you before that Akvis Coloriage Filter is on of the easiest and best solution for you complicated problems which you have with your Black & White Photos.


hope this will help u guyz
luv
tina
Soniya_89 thumbnail
19th Anniversary Thumbnail Navigator Thumbnail + 2
Posted: 18 years ago
#14
Hi, friends!!!
The last time many guys asked me how I make my signatures. That's why I've decided to make a new tutorial. I hope you like it and It helps.


Today I will show you how you make a siggy like this one.


It's my example.

For the siggy I need those pictures:

(1)

(2)

(3)


~ resize the pictures ~

for our signature we don't want the text, that is shown of the pictures (guru, glamsham….),
that's why we cut the pictures.
I start with pic (1)…..it's supposed to be our background.
Go to the selection tool on the left side and click on it….
Click on the picture and draw a line around the picture
then click on the arrow, go to your picture/ right-click/copy/paste it as a new image


now our picture should look like this one:


do the same with picture 2 and 3, that they look like my ones:


the pictures are to big for the signature. Now we will resize them.
I start again with pic 1:
Click on the picture and go to image at the upper line. Go to resize. Then appears a window where you can choose the size of your picture…enter in pixel size 500 widh x 300 high.

Now your picture should look like this:


for picture 2 and 3 enter: 120 widh x 150 high
now they should look like these two:


~ blend picture 1~
now we will blend picture 1:


click on your picture and go to flood fill on the left side – click on it - then go to the color palette on the right side and choose a grey shade. Right click on flood fill, then appears a window where you click on tool options….then there appears a new window like this one:


choose screen for blend mode and click on picture 1.
Now you picture should look like this:


~ add a border ~

back to picture 2 and 3:
to make a border around pic 2 and 3 u click on pic 2, go to image/ add borders, but before you do it choose again the color at the color palette for your border. I choosed black and blue ( I made 3 borders around the pix)
repeat this step with pic 3
now your pictures look like this:


then open a glitter fill, I take this one:


go to magic wand on the left side and then click on the border of pic 2
then click on flood fill and go to your color palette. Choose your glitter fill and click again on the border:


your pic look now like this:


~ put the pictures together~

now we will put them together
right-click on pic (2) / copy
go to pic (1)/ right-click/ paste as new selection
put the pic somewhere u want
I rotated pic 2…..go to image/ rotate
go to selections/ select none
Repeat this step with pic 3

Now your siggy should look like that:


~ add a text ~

to add a text go to text on the left side ( the big A)
click on your siggy and enter the text:


right-click on your siggy/ copy merged/ paste as a new image.
Now it should look like that:


if you want you can add some butterflies or hearts, like I did. You put them on you siggy by using the picture tube….

I've decided to put some butterflies on it, now my siggy looks like this:


~ animate your siggy ~
to animate you siggy you have to copy your siggy 3 times. Now you should have 3 siggys on your desktop.
Now we need again the picture tube on the left side. Click on it and choose some nice sparkle.
put your sparkle on your signature by clicking on it. Put your sparkles on different places on your signatures:


add again a border around the siggys:


open animation shop:
copy and paste all 3 siggys in animation shop.

go to the right edge of the first signature where the double arrow appears – left click and move right so that emty fields with rasters next to the signarure appear.


left click on the second signature hold the click and move to the empty field next to your first signature.

--- repeat this step with the last signature---

now you just have to click on view/ animation and you should see your sparkles moving on your signature---save it.


you are done!!!

for questions feel free to pm me 😊
~Sonya~ thumbnail
19th Anniversary Thumbnail Voyager Thumbnail Engager Level 1 Thumbnail
Posted: 18 years ago
#15

Hi i made this tutorial on how to resize your avatar to an avi size, this took me ages so if you use it please credit me. Thanks

First of all make a Block about 100 x 100 in paint shop pro or photoshop and make sure you save it as a .jpg

Example:

Then when u open ur video avi in animation shop,open ur block in a seperate window too
like this:

After that drag your block to an empty space at the end of your video avi

like this:

Then get your crop tool which is located at the top in your tools bar

and go to ur block and create a square around it perfectly using the crop tool and you should see that it makes the same square on each of your video avi's frames.

like this:

After that move the created square from one of your FRAMES not THE BLOCK to your desired position

It should look like this:

Then just crop it:

It should look like this:

Then delete the extra frame at the end that contained your block:

and then save your avi and your done😃

Here is your finishing result

I put my name on it too which you can do too😊

zinny.xo thumbnail
18th Anniversary Thumbnail Sparkler Thumbnail + 2
Posted: 18 years ago
#16

Supplies Needed: PSP , Animation Shop ! :)

Okay , This is a tut , on how to add two video avi's together !

Lets start off with how to make a video avi !

Follow this link , to help you teach how to make a normal video avi !

(Just scroll down) http://www.india-forums.com/forum_posts.asp?TID=504625&T PN=5
^^This , is thanks to Nabibah ! For the Great Tut , and letting me use this , to inform other people of this wonderful tutorial ! :)

Now: How to add Border's , and text , to each frame !

Step One: Open a new image , of these dimentions in PSP !

Step Two: Go to Image>>Add Borders. Now a window will appear ! Change your setting as mine !

Step Three: Okay , Now ! Follow Step Two , but , fill in these dimentions !

Step Four: Repeat Step Two !

Should look like this now !

Step Five: Launch Animation Shop !

Step Six: Now copy your Border image , and paste it into Ani Shop , and follow this !

Step Seven: Resize Animation !

It should look like this now !

(But , with the background erazed)

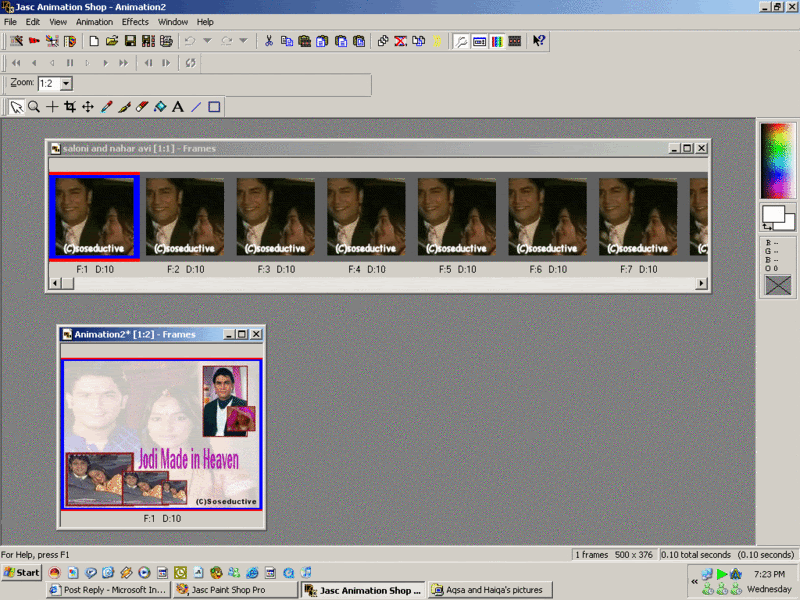
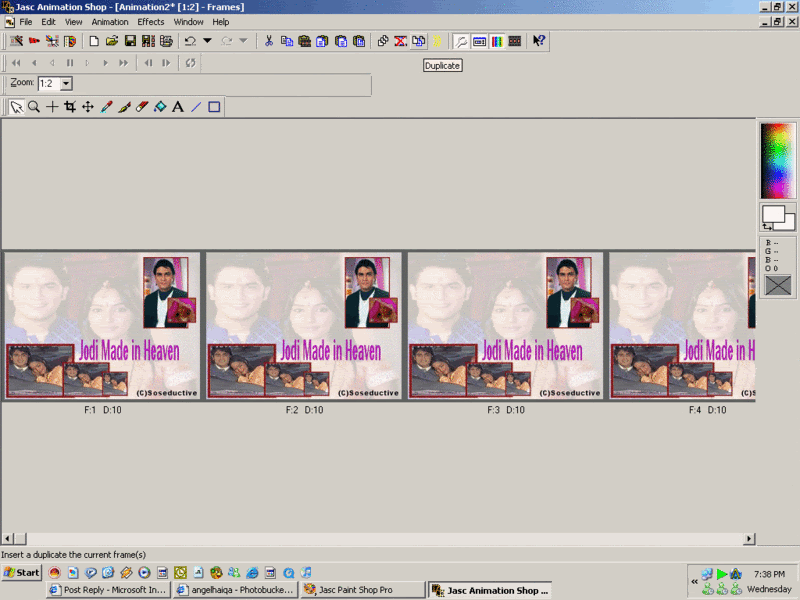
Step Eight: Use this button to duplicate , duplicate this to 27 Frames (atleast) !

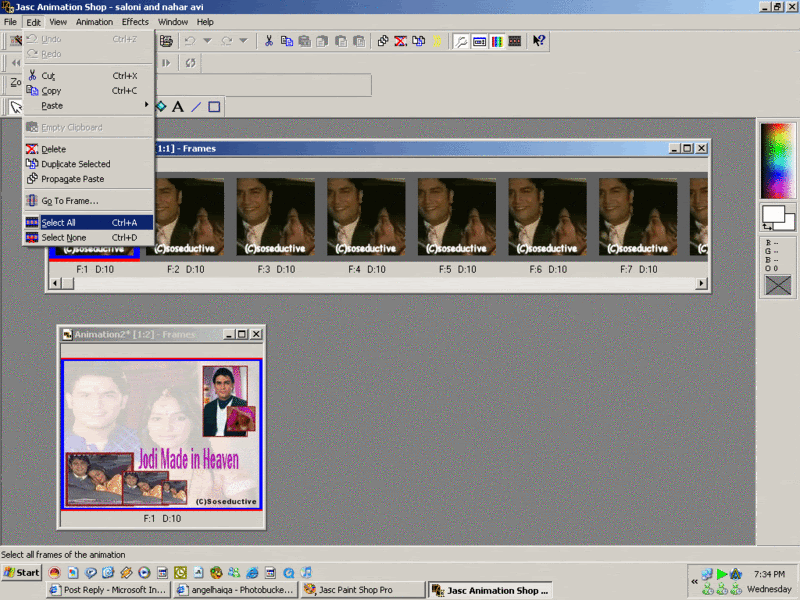
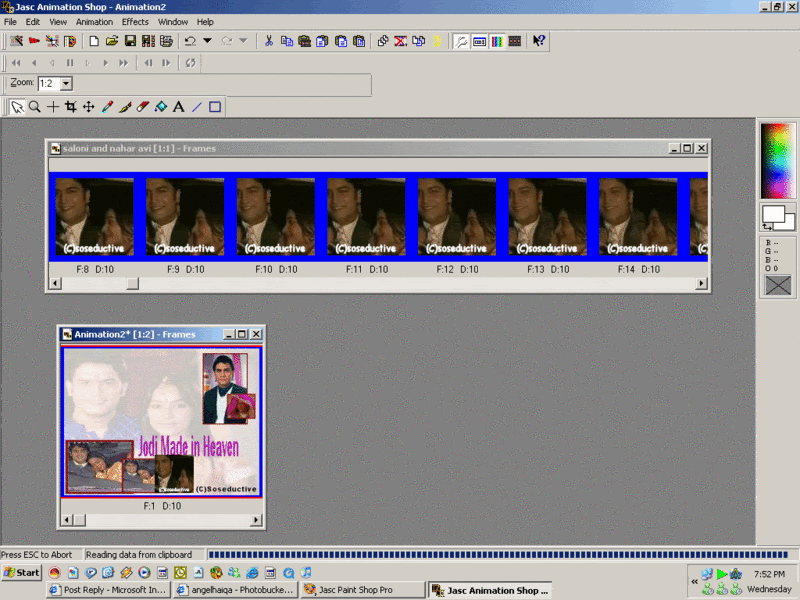
Step Nine: Now Select All of your pictures , and select all of your duplicated border , and drag the border onto the first image of the vid avi , and let go , when u have the position , you want it in , and it will automatically be posted in all of the frames !

It should look like this now !

Step Ten: Now , do the same for text , exceot for adding border's , add text !

Step Eleven: Now open a new image (in ani shop) with these dimentions !

Step Twelve: Now duplicate your new image , like you did with your border , with the number of frames you want ! And , now , press ctrl+a , and then drag your vid avi !

Like this:

Step Thirteen: And , now , you can repeat ! for the second avi ! :)

After you're done , Go to View>>View Animation !

And , if you're satisfied with your result , go to File>>Save As>>Save it as a .GIF File ! :)

And , you're done ! :)

Need any further information , of help , please ask !

Regards ,

- Zinu ! :)

Edited by Zinu29 - 18 years ago
*sweet-soni* thumbnail
19th Anniversary Thumbnail Voyager Thumbnail
Posted: 18 years ago
#17
Hey guys i posted a tut her like a month ago and i can't ind it anywere and ppl were askin me to post a tut on how to add a copyright or text to your video avi's so here's a tut -

How to add a copyright to your video avi -

1. First open up your animation

2. then go to Edit > select all

3. Now go to Effects > apply text effect

4. Now a box should come up type in your text you wish to be on the avi.

5. on the right there it should say canvas color or custom colour. It should be on custom color then the left side it says Elasped time and Frame index. It should be one Elasped time

6. Now on the right side there should be a button thats says font click it and choose the font and size. If u want it bold italic ext.

7. then click ok

8. now on top of the font button there should be a box with a color inside of it for example white click it and choose the color you wish.

9. Now on the left below it should say backlight or change it to watever you want but for copyrights and other text backlight is the best. so we will go with that.

10. Now click customize. a box should come up. See in the black box you will see a wight tiny box like this:


11. now move that box were ever you want and thats were your text will be. After your done click ok.

12. then after they will show a preview of your avi and were the text is goning to be. then click ok.

13. save it and Wallah your done!!


If your still stuck tell me or if u need sum help and please don't give out my tuts to anyone or post it on other sites becuase its made by me and it takes a long time to make tuts !! 😃
Edited by *sweet-soni* - 18 years ago
*sweet-soni* thumbnail
19th Anniversary Thumbnail Voyager Thumbnail
Posted: 18 years ago
#18

Originally posted by: zunaira

can sumone post a tutorial for putting videos in siggies plz?

Originally posted by: soseductive

1)u open up the siggy seperate and avi seperate in animation shop

2) Then u duplicate the siggy into how many ever frames u have i have 74 frames so ill duplicate my siggy to 74 frames (To see how many frames are there below the avi it will be written as F1)

3)After duplicating u click on ur Avi and then click on edit>>> select all>>>and go on edit again and click on copy

4)Then click on ur siggy and press>>>edit>>>select all.Go on edit again and press paste>>> into selected frame

5)then u can place ur avi anywhere on the siggy u want

6)And then ur done u need to save it and this is how my siggy has turned out to be:-

Before:

After:

-Sharona- thumbnail
18th Anniversary Thumbnail Sparkler Thumbnail + 3
Posted: 17 years ago
#19
here is a tut by me
there is no copyright on it so pls don't claim it as your tut

it's a tutorial on video avi's with the background stacking


after that it's done and you can save it 😊 😊
muqualp thumbnail
20th Anniversary Thumbnail Sparkler Thumbnail + 2
Posted: 18 years ago
#20

than khushi i'll post mine soon

***edited***

ok so alot of ppl were asking me on how to make cicirles with powerpoint so i decided to just post a tutorial

now i have PPT Beta but this works with normal PPT too

step 1- open a powerepoint screen and post ur picture...whichever picture u want

step 2- then click on picture tools

step 3- then click on picture shape and click on the shape of a oval or circle

it will turn out like this

now if u want to add a border click on picture border...and pick whatever color u want then go down to border weight and make it however thick u want

this is ur finished project-

here is what it should look like than u can just copy it onto ur siggy and put whatever changes u want on that

if u have any further Questions PM me or post it in this topic thanks

~Muqu

i hope it helped!

Edited by muqualp - 18 years ago

Related Topics

Avatar and Signatures Shop thumbnail

Posted by: .StarryPhoenix · 10 years ago

This is a thread where you all can share everything anything, be it be a Tutorial, PSD, Suggestions, Textures, Animations, etc Try and avoid too...

Expand ▼
Top

Stay Connected with IndiaForums!

Be the first to know about the latest news, updates, and exclusive content.

Add to Home Screen!

Install this web app on your iPhone for the best experience. It's easy, just tap and then "Add to Home Screen".