


🏏South Africa tour of India 2025: India vs SA - 5th T20I, Ahmedabad🏏
NAKLI RINGG💍
DANCE DANCE🕺💃 20.12
Kyunki Saas Bhi Kabhi Bahu Thi 2: EDT # 6
What is happening in Bangladesh?
To me, Saiyaara was the biggest win of 2025
Shahid Kapoor on how DP & RS played PR games to make him look smaller
New Entrant - Swati Sharma of YHC fame
Such an insult!!!
NDTV Indian of the year awards- Janhvi Vicky Kapil Ahaan Aneet Ananya
Dhruv Rathee to bring another 100cr for Dhurandhar
DHURANDHAR is not a film , it is a QUANTUM LEAP in INDIAN CINEMA
âAkshaye Khanna overshadowed Ranveer in Dhurandarâ
How Alia got her role in Gangubai
B Praak And Wife Announce Birth Of Baby Boy
Hey everyone, i have got requests and ques on How to make a siggy...so i thought i wud make a tutorial...and ofcourse if you need further help...feel free to pm međł So here it goes..and please do tell me if you thnk this is help fullđ
"How To Make A Simple Siggy Tutorial (using PSP 8)"
1. Open a new image (ctrl+n) about (w)500x(h)200. Click ok

2. You should see something like this:

3. Choose about 2-3 pictures you want in your siggy. I will choose these for the tutorial:

4. Drag the pictures into PSP 8.

5. Click on the blue bar of the 1st picture (to get that picture)
6. ctrl+a (selct all) and ctrl+c (copy) that 1st picture
7. Go to your blank new image and click on the blue bar of that blank image
8. ctrl+e (paste - doNOTdo: ctrl+v)
9. That image shud appear onto your blank siggy:

10. click on the deform tool:

11. Click on that picture and a message like this shud come up. Click ok. this will make a Promoted layer for you. This is very important. Check you layers palette to see if you have now two layers: Backround and Promoted Layer.


12. You can change the place and size of your 1st pic w/ the deform tool...do this if you want before you go onto the second pic.
13. Ok, now go to your second picture: repeat the same things that you did with your 1st picture. (add the pic to ur siggy basically the way u did with your 1st pic)
14. Now you should have 3 layers in your layer palette of your siggy

15. Now Add your 3rd pic the way u did with ur 1st and second pic
16. Now you should have 4 layers in your layer palette.

17. Now your siggy looks kinda unblended right? well i have a little secret i use to blend...i use the eraser tool: So selct this tool. Make the settings like mine (second pic) (but ofcourse you can adjust the settings urself to fit ur preference)


18. then selct your topest layer in ur layer palette. (ur4th layer)
19. Erase a bit of your 3rd pic on ur sigy with the tool so it looks kinda blended with the pics below it. Like this:

20. Now repeat the eraser tool if you want with your 2nd and 1st pic if you want. But i thnk that im done with that part.
*****You dnt have to do this******
21. I will add some brushes now.
22. Select your brush tool:

23. Choose your brush color from your materials palette (i will choose white)

24. Choose your brushes from here: (i added most of my brushes..if u r a starter u probably have the normal brushes that PSP came with. You can use those.)

25. Add your brushes. where you want..this is what i got using the brushes i added...as i said b4 u can use the strters ones too. (i put a copyrite brush on there i made)

26. Now i will add text: choose your text tool:

27. Type you text..selct the text and choose he text color and font and font size...click apply...you can also move ur text in different places...u can slant it etc...

28. press f12 or save as under file and save it: type ur name...but change the file type into a ----.jpg... (there are two jpg choices , choose the one i highlighted....

29. đAND YOUR DONE!!! CONGRADULATIONS! YOU HAVE MADE YOUR 1st SIGGY!đ
30. Now upload your siggy and share it with me and everyone here!
Tips:
1. You will definately improve as you make more sigs just like me!đł
2. Brushes are a little bit more for advanced and experienced PSP users...beginers can use it after they are a little more familiarized with PSP
3. Dont care that much about the appearance of the siggy! its the effort that counts!!!!!
4. ALWAYS! ALWAYS! add ur copyright sign either using text tool or brush!
Palette/Toolbar tips:
how to see your layer palette: view>palettes>layers
how to see your toolbar: view>toolbars>tools
how to see overview: view>palettes>overview
Have FUN!
did this help?
p.s. this tutorial is copywrited so please dont claim it as ur own!
~Nabihah...
Hey guys some ppl were looking for a how to make a vidoe avi tutorial...so i thought of making one...here is how:
How to Make a Simple Video Avatar:
1. Open Windows Movie Maker (shud come with all computers or you can download it for free at )

2. Import the video you want in your video avi (ctrl+I) choose the file and click import. something like the second pic shud come up


3. then find the part you want in your avi. click on that clip

4. now click this button: and save your pic (keep the name they give you)

5.then click this button only once

6....and click that camera button to save that picture.. (same you did with step4)

7. Repeat steps 5-6 until you get all ur videoshots
8. You can close windows movie maker if you want now
9. Open animation shop

10. Drag the 1st pic of your video avi onto the animation shp screen

11. It shud come up like this:

12. now maxamize that animation by clicking this:

13, shud come up like this:

14. now go to animation>insert frames>from file

15. then something like this shud come up: click add files.

16. add all the pix u captured from the video except the one you dragged
17. then go to insert frames after: and chnge it to 2

18. click ok
19. view ur animation

20. Save it
AND YOUR DONE!!!!!
Tips:
1. How to open windows movie maker if you dont know how:
my computer>C drive>program files>movie maker> moviemk
WMK shud opn now. If it still doesnt thn download it from
2. You can add text and borders and animation effects to ur avi but i wud suggest not to if you are a beginner .
3. you cna resize your animation by pressing shift+s (not ctrl)
4. Ask me for n e ques...đ
~Nabihah
many of you dont know so here you go
pelase do not copy because i have made the screenshots and all for an hour
here you go
first go to www.dafont.com (or any site which you know for downloading fonts)
select ur font (i am going to select umm bip but you can select any )
see in this screenshot at the right of the font bip somewhere must be written 'Download PC/Mac Os x (saw it )
Now click on that 'download PC/Mac Os x (at the right of every font ) some pop-up should open and say 'open,save,cancel (click on save ) and save it on ur desktop
something like this
click on save ..and save it on ur desktop (please make sure you dave it there only )
then when the donwload it complete then you go to ur desktop you will see therecently downloaded font right click on that and then go to extract all (but make sure you have winzip on ur computer ...it cant import it when there is no winzip )
here is a screenshot for extracting
then a pop-up menu should come up click next till the end then it will be extracted
when it will be extracted some window must come up
soemthing like this
then go to start>>conrtol panel>>Fonts
then click on fonts and then all fonts on ur computer will be shown on
then drag ur font (this font which you donwloaded recently nd extracted )
this one (bip)
and drag it to ur fonts
hope you understood it ...
sandeepđ
Here's a tutorial by me on putting a picture/signature in your signature box. Since some people didn't quite understand.
Step 1 - Click on Setting on the top right corner
Step 2 - Click on Edit Profile
Step 3 - Scroll down to till you find a Signature Box
Step 4 - Put the image code that you have with the IMG Codes with Brackets around them. If needed click on Yes for your signature to be on every single post of yours.
Hope this help some of the members.đ
Hey!
Firstly I'd Like to Know How Tumhari_Kushi did this effect of brightening the picture up so much and it looks so beautiful!
I'm using PSP 7 so can someone posta tutorial and tell me how to do this:![]()
Secondly, I'd like to know how this user has put on the light shining effect on the text? Is it some brush on tube? Please tell me where I can get it from:![]()
Thanks in advance Ill be waiting for a reply!
the ans to the first one i dont know if this is similar or not but ill try it
Ill b using this pic of rani http://gallery2.efanguide.com/~rani/albums/userpics/10006/ra niiii.jpg
1. Copy and paste that pic into psp.
2. Go to Layers, and Duplicate.
3. Go to Adjust, Brightness and contrast, and clik on threshold.
4. Set your Threshold setting to 128.
5. Go to Adjust, Blur and then clik on Gaussian Blur.
6. Set the Radius to 5.0.
7. Go to Layers -> Properties -> Blendmode -> Soft Light.
8. Go to Layers and Merge All.
and you should be done with the glow now.
herez wat the final pic looks like
if you get confused somewhere just ask đ
I made a tutorial to separate images which do not have a solid background...its for photoshop,dunno if it has been posted b4 or not..anyways,here it goes-
I'm going use this pic of priyanka...

if u notice...it doesnt have a solid background n if wud be difficult to delete the background with the magic wand,so i'm going to delete it through the quick mask mode.
2.On your toolbar click the Quick Mask Mode button (the one stroked with black)

3.Using the solid round brush tool (or press "B" on your keyboard) color in the image that you want to keep. Zoom In (Ctrl and +) to
brush more precisely. Once you're done, it'll look something like this:

4.Exit the quick mask mode...to do tht select the standard mode button(the one stroked with black)

5.Now u'll see ants(black n white lines) running around,lyk in the pic below-

6.Press "delete" on your keyboard,n ur final result will be sumthing lyk the one below-

its my first tutorial..i hope its easy enough 4 u guys to understand,feel free to PM me if u have any probz.
cupcake
hey guys,
this tutorial is made by ddddd,i'm just posting the links in this thread,it has 4 tutorials.
1. making non-animated siggys with photoshop CS2
2. making animated siggys with photoshop CS2
3.Making Video Siggys with Adobe Imageready
4.making video siggys with Jasc Animation Shop
http://www.india-forums.com/forum_posts.asp?TID=286849&K W=ddddd
cupcakeđł
List of ALL Tutorials in This Topic:
Plz Make sure your tut isn't already here b4 posting it...we don't want multiple tuts explaining the Same Thing.
If Your Tut is Missing Then Plz PM me with the Page Number That it's on and I'll Add it here.
How to download a font:
http://www.india-forums.com/forum_posts.asp?TID=504625&T PN=1
Adjusting Colors w/Curves in Photoshop
http://www.india-forums.com/forum_posts.asp?TID=504625&T PN=1
Making Blinkies:
http://www.india-forums.com/forum_posts.asp?TID=504625&T PN=1
Making a White Transparent Stripe:
http://www.india-forums.com/forum_posts.asp?TID=504625&T PN=2
Circle Border in PowerPoint:
http://www.india-forums.com/forum_posts.asp?TID=504625&T PN=2
Uploading A Pic as your Signature:
http://www.india-forums.com/forum_posts.asp?TID=504625&T PN=2
http://www.india-forums.com/forum_posts.asp?TID=504625&T PN=3
Improving Pic Quality w/Ani Shop:
http://www.india-forums.com/forum_posts.asp?TID=504625&T PN=4
Making A Simple Siggy Tutorail:
http://www.india-forums.com/forum_posts.asp?TID=504625&T PN=5
Making a Simple Avi:
http://www.india-forums.com/forum_posts.asp?TID=504625&T PN=12
Make A Simple Video Avi:
http://www.india-forums.com/forum_posts.asp?TID=504625&T PN=5
http://www.india-forums.com/forum_posts.asp?TID=504625&T PN=31
Making non-animated siggys with photoshop CS2
http://www.india-forums.com/forum_posts.asp?TID=286849&K W=ddddd
Making animated siggys with photoshop CS2
http://www.india-forums.com/forum_posts.asp?TID=286849&K W=ddddd
Making Video Siggys with Adobe Imageready
http://www.india-forums.com/forum_posts.asp?TID=286849&K W=ddddd
Changing Eye Color in PSP:
http://www.india-forums.com/forum_posts.asp?TID=504625&T PN=6
Textures:
http://www.india-forums.com/forum_posts.asp?TID=504625&T PN=7
http://www.india-forums.com/forum_posts.asp?TID=504625&T PN=28
Creating Metallic Type:
http://www.india-forums.com/forum_posts.asp?TID=504625&T PN=7
Creating Rain Drops in PS:
http://www.india-forums.com/forum_posts.asp?TID=504625&T PN=7
Glow Effect 1:
http://www.india-forums.com/forum_posts.asp?TID=504625&T PN=8
Glitter Text:
http://www.india-forums.com/forum_posts.asp?TID=504625&T PN=9
http://www.india-forums.com/forum_posts.asp?TID=504625&T PN=10
Uploading Avis:
http://www.india-forums.com/forum_posts.asp?TID=504625&T PN=11
Adding Outline Around a Person:
http://www.india-forums.com/forum_posts.asp?TID=504625&T PN=11
Glitter Text in Photoshop:
http://www.india-forums.com/forum_posts.asp?TID=504625&T PN=13
Using Mask in Photoshop:
http://www.india-forums.com/forum_posts.asp?TID=504625&T PN=14
Brighten and Colorize pics in PS:
http://www.india-forums.com/forum_posts.asp?TID=504625&T PN=15
Using Floaties:
http://www.india-forums.com/forum_posts.asp?TID=504625&T PN=17
Making a Transparent Image:
http://www.india-forums.com/forum_posts.asp?TID=504625&T PN=18
Rotating Brushes in Photoshop:
http://www.india-forums.com/forum_posts.asp?TID=504625&T PN=18
Circle Border in PSP:
http://www.india-forums.com/forum_posts.asp?TID=504625&T PN=19
Masking in PSP:
http://www.india-forums.com/forum_posts.asp?TID=504625&T PN=21
Animated Siggy PSP:
http://www.india-forums.com/forum_posts.asp?TID=504625&T PN=21
Tubes in PSP:
http://www.india-forums.com/forum_posts.asp?TID=504625&T PN=22
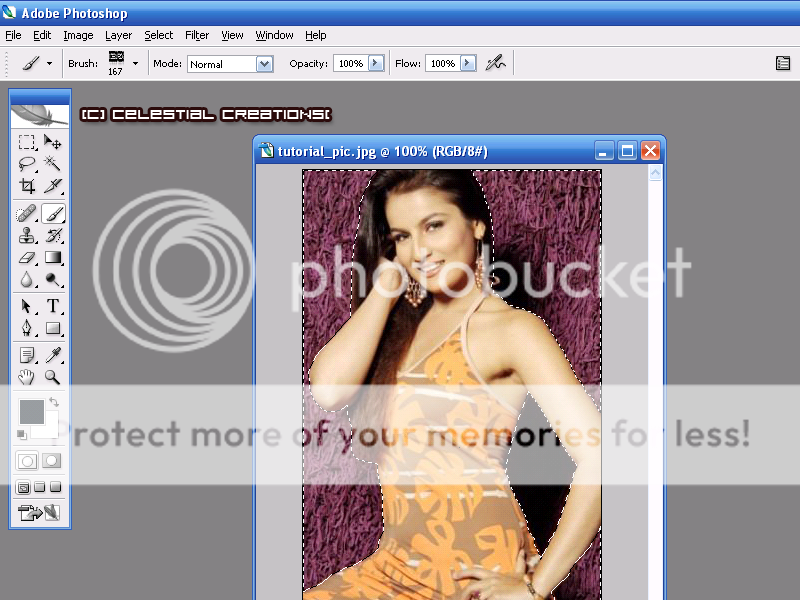
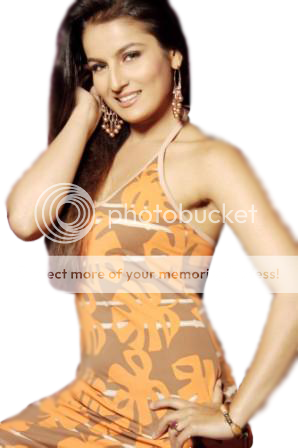
Removing Bkground in Photoshop:
http://www.india-forums.com/forum_posts.asp?TID=504625&T PN=24
Installing Brushes in Photoshop:
http://www.india-forums.com/forum_posts.asp?TID=504625&T PN=26
See Thought Text and Shapes:
http://www.india-forums.com/forum_posts.asp?TID=504625&T PN=26
Circles in Photoshop:
http://www.india-forums.com/forum_posts.asp?TID=504625&T PN=28
Blending in Photoshop:
http://www.india-forums.com/forum_posts.asp?TID=504625&T PN=28
Butterfly Icon Tutorial:
http://www.india-forums.com/forum_posts.asp?TID=504625&T PN=30
Get Paint Shop Pro/ Photoshop Free:
http://www.india-forums.com/forum_posts.asp?TID=504625&T PN=31
http://www.india-forums.com/forum_posts.asp?TID=504625&T PN=32
Resizing Video Avis:
http://www.india-forums.com/forum_posts.asp?TID=504625&T PN=32
Importing your Old psp7 Brushes to psp9
http://www.india-forums.com/forum_posts.asp?TID=504625&T PN=36
Selective Coloring in PS
http://www.india-forums.com/forum_posts.asp?TID=504625&T PN=36
Colorization in PSP
This is a thread where you all can share everything anything, be it be a Tutorial, PSD, Suggestions, Textures, Animations, etc Try and avoid too...
850