Post All Tutorials Here #2 - Page 13

Created

Last reply

Replies

1k

Views

207k

Users

131

Likes

3.8k

Frequent Posters

pree4ru thumbnail
17th Anniversary Thumbnail Stunner Thumbnail + 4
Posted: 14 years ago
hey sri hav doubt hw did u do this one can give tut for this


RadiantTreasure thumbnail
16th Anniversary Thumbnail Dazzler Thumbnail + 5
Posted: 14 years ago

Originally posted by: preksha_naksh

hey sri hav doubt hw did u do this one can give tut for this


Preksha its similar to making ANIMATED SIGGES..read that tut..u will understand..😃
But still telling for you!!

Open photoshop..
File>New>300*100>Transparent.
Fill blue color and added some effects with filters (I don't remember which one🤔) and added some brushes on it(stars) and Text and Credit.
Now merge..Layer>Merge visible(Make sure layer is unlocked after it)..I know u now till here 😆.

Then goto tool Marquee (M) tool - Rectangle tool and drag mouse and selected a part on left and right click >feather >5 (i think) then press "delete" button (or Edit>cut)..u will get transparent section on left..now selected to the right>feather> and cut in same manner..
Then..duplicated it to equal as number of frames in avi here - 18 frames.
And then copied both avi's on top of it and moved to transparent sections above
And lastly dragged the bottom (effects )layer to top of both avi's..so that avi's appear beneath..u can move the avi's using "V" move tool..
Check out Animated sigge tut 2. with screen shots u will understand more!😃
Sri:-)

Edited by Xx.Sri.xX - 14 years ago
MasoomaBukhari thumbnail
16th Anniversary Thumbnail Achiever Thumbnail + 4
Posted: 14 years ago

Originally posted by: Xx.Sri.xX


GRADIENT FILL ANIMATION
(In Photoshop)


oh God yar... i always wanted to know this😃... thanks alot for helping😃... infact there shud be something more than a thanks 😃


wese this is wat i made
not neat bcz its the first time 😳... thanks again 😃
Edited by Masooma Bukhari - 14 years ago
AS.. thumbnail
17th Anniversary Thumbnail Stunner Thumbnail + 2
Posted: 14 years ago
PSD coloring

give credit to me if u used


http://aishasenorita.deviantart.com/art/Photoshop-coloring-psd30-208720732


http://aishasenorita.deviantart.com/art/Photoshop-coloring-psd31-208720955

senorita
achieve1 thumbnail
Explorer Thumbnail
Posted: 14 years ago
hi, is there a tutorial on how to make stacked video avi's (for an avatar)? I know how to make just 1, but not sure how to connect them...thanks
swathy3 thumbnail
16th Anniversary Thumbnail Explorer Thumbnail
Posted: 14 years ago

Originally posted by: achieve1

hi, is there a tutorial on how to make stacked video avi's (for an avatar)? I know how to make just 1, but not sure how to connect them...thanks

please mention which software are you using ? and you can ask your questions in questions and quiries corner . as this topic is for tutorials .
and if you are using animation shop 3 then please pm me i will give you link for video tutorials for stacking avi's that i have made
-Nightingale- thumbnail
18th Anniversary Thumbnail Stunner Thumbnail + 5
Posted: 14 years ago
hi
i liked the signature...which u r using...
can u tell me how can i make it for myself
BammySammy thumbnail
19th Anniversary Thumbnail Rocker Thumbnail + 3
Posted: 14 years ago
This is a old Tuts of Mine - Re-Posted
Tutorial on making Video Siggie (My Way)
[c]BloodLustDesigns/SamPari at India forum.com

DO NOT CLAIM as your work
it has taking me over A DAY to put this all together

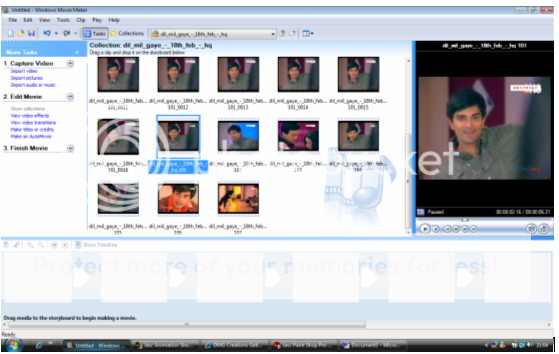
First of all to make your Video Avatar in Where Ever you make it in.


I make it on Movie Maker 2.6.

To make your movie upload it from your files

I Usual find Vid of UTube and then upload it with utube converter etc


{Mine looked like this.. below} will all the frames.. As u can see I?m making a Armaan One or a DMG One...looollz As soon as u got all the different frames for this your scenes of the clip from 5 ? 100 frames in can be... Depending on how long you will like your Video to be.

Once u got all your frames uploaded to will need this button

And step by step you take the shots you need by pressing the arrows and then pressing

The camera to capture the shots

So now after you think to got all your shots and saved them. You can close the movie maker if u like or leave open if u want to make another later..

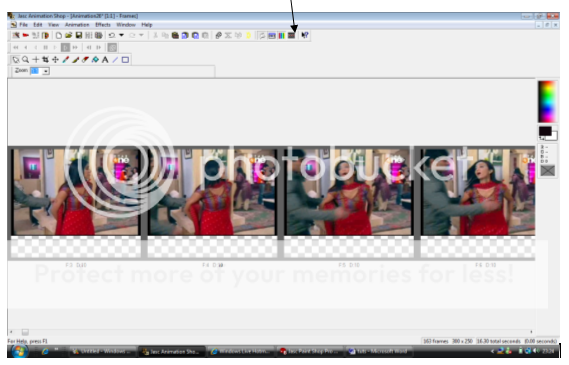
You then open up your animation shop 3 .. And press file new.. And adjust to what size you like your animation to be like for example from 100x100. I?m gonna be using
300x 250 {see image below}

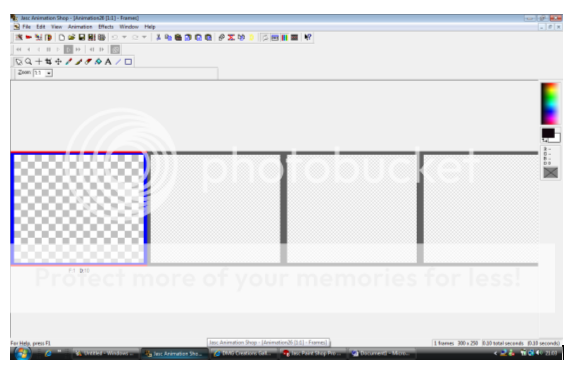
Now once to done this above you now need to add all your frames that to made in the movie maker so now go to animation and insert frames, then from files and this box should come up.{below}


Press ADD FILES and select all the picture frames from the movie fillz you want.

Now your animation shop frames should look like this press animation to see if the video it playing right. BY pressing the film strip.

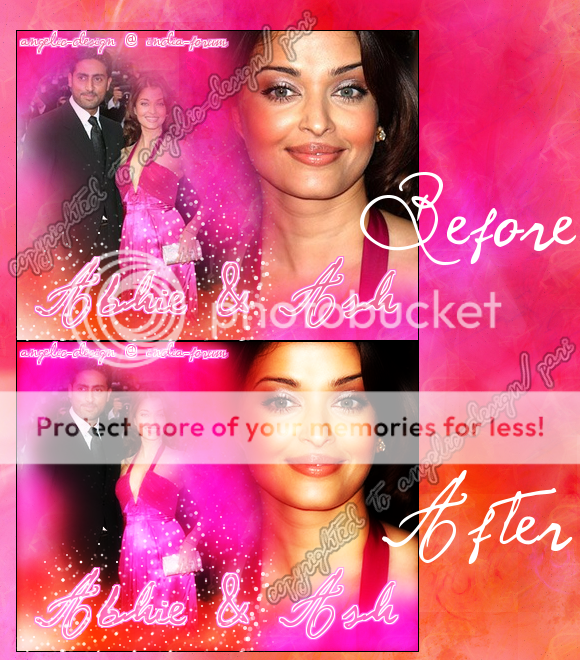
So this is your Video Avatar Done.. to can save and use like this if u like but if u wan to add effects to can like background texts brushes etc..

...

To add a layer effect to your video avatar

Now that u your video Siggie or avatar is done and you want

to make it look nicer then ere is what you do...
So you open your PSP or PS and open a new layer

so say ur avii is 100x 100

open a new one like that

so say u wan to add text.. type the text u want

COPY AND PASTED IN TO ANISHOP..

AND Duplicate to how many frames to need...

Like how make Video slides to have to make the same amount..

So if u had 60 film slide of ur DMG PIC

You duplicate the text one until to have 60 slides...

once you done that select all for text one and copy.

Now select all the movie one and paste on to the vid layers. And ur done..

Hopefully u get something like this style - mine a lil different..

100x100
i know its not the same but as tiny-pic is no more for us..
i post a similar one and how it will turn out..


PM Me if u stuck on anything..

after all this explaining I hope I haven't confused you .. =[

Nuff LOVE SamPari x.x.

Edited by -SamPari- - 14 years ago
BammySammy thumbnail
19th Anniversary Thumbnail Rocker Thumbnail + 3
Posted: 14 years ago
My 2nd Tutorial by BloodLustDesign
Was known as Angelic.sampari creation

Soft dreamy effect

do not claim as ur own TUTz and No copying and pasting

my TUTS Anywhere else.. this is for I.F Viewerz


Step 1

Open your PSP.. I sure all PSP will have the same function I will be using.. Now paste the image you would like to edit.. Ill be using this one {above}

Now let get started..

Step 2

Click on Adjust then Add/Remove Noise then Edge Preserving Smooth and change the Amount of Smoothing to which ever suit you.. Ill be doing 10 now click OK..

Step 3

NOW go to Layers and Duplicate

Step 4

Then go to Adjust again but this time GO to blur and click of Gaussian blur now change the Radius to 5.00 and click OK

Don't get shocked that Your Picture has gone Blurry that was supposed to happen. If u see that you're on the right track if your picture isn't blurry then u gone wrong somewhere..

Last Step

Now this is the Final Step

Click on LAYERS again and Properties and CHANGE the BLEND MODE to OVERLAY.. You can change the Opacity if u like but Im sticking to a 100.

Then Press OK of course and last go to LAYER --> MERGER and MERGE VISBALE and you're DONE..

Now u can add whatever u like .. TEXT .. BRUSHES Etc

Hope this helped you all ..

Thx for looking..

Do PM Me if Ur stuck

Take Care
Nuff Love SamPari
Edited by -SamPari- - 14 years ago
BammySammy thumbnail
19th Anniversary Thumbnail Rocker Thumbnail + 3
Posted: 14 years ago
My 4th Tutorial by Angelic-Design
Was known as PariCreationz

My Famous Dollii Tutz

Do Not claim as ur own TUTz and No copying and pasting else where

my TUTS Anywhere else.. this is for I.F Viewerz Onliii

From a doll without text with text..
will post an example if i can find any
lost all of them on tinypic grrr


Step1

Open up Animation 3.. And from your file open up animated doll {Say club} would be better... As there are nice small type dolls. Then open a new frame preferable a lil bigger like 200x220 so the dolly can fit and text you would like to fit...

Step2

Now my dolly has 14 frames... so with the new frames duplicate it too 14 frames


Step 3

Too put the dolly in the new frame select all and copy click on the new frames and select all and paste into where its suits you..

Step 4

Now open up paint shop if u want to add outline text or if not to can add text from ani shop 3...

2 Outline text:

Open a new frames.. in PSP' Chose a text color like black and fill the frames with white then click selection -> modify -> expand and stick with at least 2 pixel and press OK

HOPE I HAVENT LOST YOU..

Step 5

Cut and paste into ani shop and duplicate into to get 14 frames and select all copy and past into the big frame with the dolly..

And I think ur done..

Just save as... and upload it to ur image server of ur chose and Use..

=D

All Done
u know where u find meee..
Tc
Nuff Love

SamPari

Related Topics

Avatar and Signatures Shop Thumbnail

Posted by: ExoticDisaster

1 years ago

Shiri'z Tutorials *Rain Effect* Page 7

Hello Lovely People! I am here with my first tutorial channel. I have decided to post photoshop tutorials on this thread . Whenever you would...

Expand ▼
Top

Stay Connected with IndiaForums!

Be the first to know about the latest news, updates, and exclusive content.

Add to Home Screen!

Install this web app on your iPhone for the best experience. It's easy, just tap and then "Add to Home Screen".