
Bigg Boss 19: Daily Discussion Thread - 21st Oct 25

DO PHOOL DO MALA 21.10

Deepika and Ranveer wish diwali with Dua
Yeh Rishta Kya Kehlata Hai Oct. 21, 2025 Episode Discussion Thread
DIWALI AT PH 22.10

Book Talk Reading Challenge & Book Bingo, November '25 || Sign-up OPEN

Indian tv Blockbuster ! Parvati & Tulsi : The OG Bahus Mahasangam Epi
Bill Gates To Appear on Kyunki?!
Veteran Actor Asrani Passes Away
The Parth Bombshell

🏏IPL 2026 Schedule: Time Table, Teams, Match List, Fixtures🏏
Mihir is a loser
No appreciation threads?

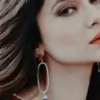
So Ri wanted to know how i did this hence posting this tutorial 😆
Tutorial#2
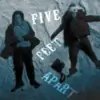
How to do icons like


So these icons are all about the cropping of the subject. Im gonna show you how to do the Captain America icon here. And i dont have the original PSD so im remaking the icon so it would be an exact copy but would be similar.
Step 1: Prepare your subject i.e crop your image
So i used this image for the icon. Now this is an already cropped image. You could either crop the images yourself (like i've done for the rest of the icons) or you could used already cropped pngs, which is easier! Saves half your work 😆
Step 2:Create a new file
My icons are 120x120 in size. You could make them of 100x100 too. Make sure you set the 'Background Content' to Transparent.

Step 3:Positioning your subject(original image) in the new file.
Resize your image to fit it in your new file. So, the positioning of the image here is important. I have kept it in the center.
Step 4: Colour your background.
So now its time for background. Create a new layer and place it below your subject wala layer. In this type of icon the main focus is the subject and your text. Hence it is best if you use a plain coloured background or at the most a single coloured gradient.
I used the colour #44fafe here.

And then if you wanna add a lil bit of gradient you can. Goto adjustment and select grradient, a black and white one. Now position it above your background layer and set it to overlay. If you feel it doesnt give any effect duplicate it. If the effect is too much then play with the opacity and balance it.

Here's how it looks now. Not much difference in the bg though.

Step 5: Add your psd.
Add your psd on the icon. Even a simple brightness, curves, levels, vibrance layers would do.
Step 6: Time for text.
Now text would be w.r.t how you have positioned your image.If you are positioning your image to the left, you can position your text to the right and vice versa. Here, all my subjects are in the center. Hence even my text is in the center. Also you must make sure you place your text properly. It is okay for some of your letters to be hidden. But people should be able to make out what you've written. So place your text wisely. Play with the sizes.
Place the text layer below your subject and above your background.
The main idea is to fill your background with the text. Filling doesnt mean that you use paragraphs 🤣 Use just a word or max 2-3.
It like making a box and filling the box edge to edge. So that the overall text fills the box evenly and can also form a box. I think im not being able to explain it clearly here. Lemme try with some eg. If you guys have any doubts do ask.
This is what i've done for this icon. First let's talk about the composition then about the effect.

^ See in the above image the starting and ending of captain, ame and rica match. The whole text forms a complete box

You can achieve this by playing with the sizes and adjusting the distance between the letters.

In my icon,
'Captain' is of size 24
'Ame' is of size 50
'Rica' is of size 44
The colour of the text is #3325ee and it has been set to 'Hard Light'. Font i've used is 'Intro Regular'.

Your icon is now ready!

This was long gosh 😆 If you guys have any kinda doubt please do ask me.

It is free to use. credit is not necessary but will be apperciated😳
Download- https://www.mediafire.com/?ecdu280quxa905d


Hey friends Welcome to Questions Queries Corner Please post all your questions queries here instead of making new topics. If any "help" topics...
Are you new to Avatar and Signature Shop Forum? Then this is the right place to know about this forum and it's activities. Next few posts will
Hey there! I'm Leena, and along with my trusty sidekick (my PS :p), and give you a warm welcome to Arcanum Tutorials. After a lot of...
Anim a t e d N o nAn i m a t e dR e qu e sts Wanna get your request done without waiting for too long? Well then this is the place to place your
This thread is "Creations Exhibition #5 " where you can show off your latest work. And it is for everyone including members who have a...


 Suggestions / Comments
 Current Affairs
 Anupamaa
 Cricket


357