


Posted:
Originally posted by: ...shruti...
well i made one here it is
HOW TO MAKE SHAPED GIFS http://aadhaaishq.tumblr.com/post/43880713400/how-to-make-shaped-gifs

Bigg Boss 19: Daily Discussion Thread- 1st Dec 2025.
Bigg Boss 19: Daily Discussion Thread-2nd Dec, 2025

FAKE FIGHTS 2.12

Samantha Ruth Prabhu And Raj Tie Knot
Yrkkh gen 3 feud - new low 📯
Dhurandhar - Advance Bookings Open

📚Book Talk Forum, November 2025: Reading Challenge Results📚
Era defining superstar Vicky Kaushal!
Ranveer Singh Apologises
Downfall Of Govinda
🎄 Elves of the Bookshelves 🎄 | BTRC • December 2025
Journalist talks about experience interviewing Kriti Sanon
🎅🏼 Santas Of Storyland 🎄Dec 2025 Book Talk
🌟Gingerbread Page Turners 🎄BTRC December 2025🌟
FAMILY TREE 3.12

2nd December episode Discussion thread

The days of friendship and love Season4 SS IshVi RishRee
Originally posted by: ...shruti...
well i made one here it is
HOW TO MAKE SHAPED GIFS http://aadhaaishq.tumblr.com/post/43880713400/how-to-make-shaped-gifs
Originally posted by: Mohabbateinn
My first tutorial !!!
Want to learn how to make this in less than 2 minutes?
Originally posted by: Trouble.
Tutorial As Nelo had asked me on a tut for merging pics or rather make a sig in Photoshop CS5,I made a tutorial.So here's a quick one. To make something like this Go to File >New.A box will appear,fill in the height & width[take 500*350?]. And then.open the pictures you want to make the signature with. We need to erase the part to merge both the pictures. Use the eraser too[Marked] & erase the part. Add more pictures if you wanna & then do the same thing with the rest[erase :P] Add textures/PSDs to make it look beautiful [LOL! :P]
How to add motion Blur to Gifs. I saw this amazing tut on tumblr and I loved it and its totally amazing and helpful! I thought of sharing it with you people P.S: THIS TUTORIAL ISN'T MINE! CREDIT GOES TO THE ORIGINAL OWNER.
This is the end result!
how to make something like this [x]
this is my end result:
note: this isn't a basic gif tutorial so if you don't know how to make gifs, make sure to learn before trying to do this
step 1: make your gif
step 2: once you have your gif ready add 3 frames onto the gif and duplicate the last layer of your gif 3 times -make sure that for the first added frame the first duplicated layer is visible, and same for the second and third
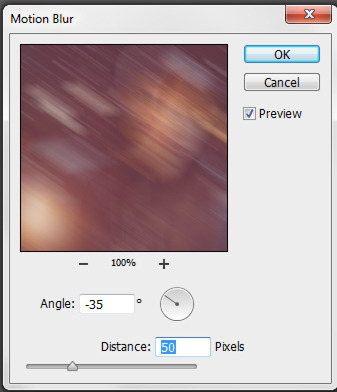
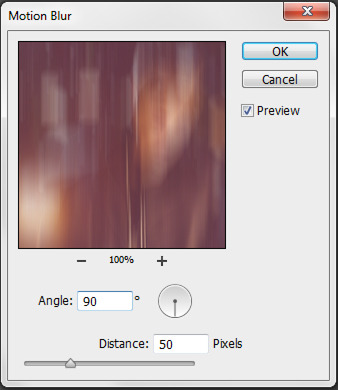
step 3: next you need to add motion blur to the 3 added layers. select the first frame and the first duplicated layer and add a motion blur. i used these settings:
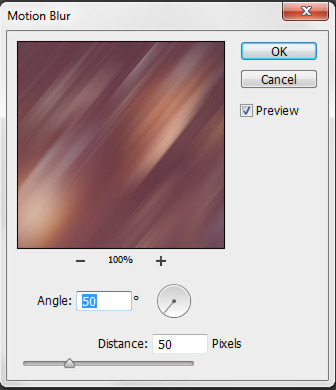
step 4: do the same thing as the previous step, select the second frame and layer and add motion blur but this time it will be different settings. i used this:
step 5: again you do the same for the last frame and layer. these were my settings:
and you're done. very simple.
please like/reblog this post if it helped you. i'm always open to make any other tutorial so don't hesitate to ask me if you need help :)
NOTE:
- you don't have to use the same settings i have, you can make the distance further if you like and you can change the angle
- if you want the motion blur effect to go slower/faster just change the speed of those 3 frames to your liking
Originally posted by: AfflicteD
How To Make Textures Hello guys :)Here I'm gonna show how we can make some simple yet nice and very basic textures on our own. No, they don't look like the lovely textures we download from deviantart and tumblr etc. They are quite simple and can be coupled with other textures..I'm gonna use some (pre loaded) features of PS like filters, gradients, patterns, etc. (I'm using ps cs6)If you have questions like what is a gradient? What is a pattern? How do I apply a gradient? Then please google your question.. trust me www.google.com is an awesome and fabulous website😛 Or else, you can always PM me!ps. It has many images..let it load😳Texture 11) Open a new image of size 3px*3px (yes it should be that small :P)2) Zoom it to maximum (3200% in my PS. don't know about yours!) so that you can see what you're doing clearly.3) Fill in with white color.4) Using rectangular marquee tool (settings shown), select the 3 diagonal boxes only as shown in the screenshot below.5) Fill in those selections with black color.6) Go to Edit>Define Pattern. Save it with any name you want.7) Now open your sig, get the paint bucket tool, select pattern from the I-don't-know-which bar, fill in your sig and set it to darken.Final:The awesome texture which many of you guys keep searching for is made!If you think that the lines are way too close for your liking, then you have 2 options:-- reduce the opacity-- when u make the texture, instead of a 3*3 px image, open a 5*5 or 6*6 or any size image and fill the pixels aong the diagonal. Here's what a 6*6 will look like:An example where I've used this texture (I've reduced the opacity and have most probably used the 6*6 one I don't remember exactly :P):Texture 21) Open a new image of any size and fill it with a dark gray color (not black). I've used #1513132) Duplicate the layer (Shortcut: Ctrl+J)3) Select the top layer, go to Filter>Pixelate>Color Halftone...4) Then set that selected layer to darken.And your texture is ready. To use one your sig, set it to screen.Used here..Opacity is very less and I've erased a lot of parts(^Look at the lest side below 'Maan' or look to the right of the red heart. That's the texture)Texture 31) Open a new image and fill it with some color u want. I've used #362f2f2) Filter>Filter Gallery3) Play around with the filters and you'll get some really pretty results. Some are shown below.
I've used this herein the background: The color is white and the filter applied is Texture>TexturizerTexture 41) We're gonna use the gradient tool. See my settings below.2) Next, make another layer and fill it with another gradient.3) Change the blending to anythings you like, eg lighten, screen, etc. I've set it to Exclusion.4) Merge all the layers. This make a nice texture by itself. But we can add more details to it too.5) Go to the filter gallery and help yourself with the filters. Examples:Texture 5This is not exactly but somewhat similar to the rain effect..1) Open a new image and paint it black.2) Go to Filter>Noise>Add noise (settings shown).3) Go to Filter>Blur>Motion Blur (setings shown).Texture 61) Open a new image and paint it black.2) Make a new layer. Select a round brush. I've set the settings as radius=52px and hardness=50% and the color is #b3b127. Dab the brush randomly on it.3) Now to the brush layer, apply outer glow with the settings shown.Another example:We can download brushes for these textures or download the textures themselves but this is just what you can do when you have only photoshop without any extra brushes or anything!And your textures are ready! Any questions, ask me :)
Originally posted by: -AshaNegi-
..TUTORIAL ..someone had asked me how to give a gifs like this...i want to say that is my first tutorial and sorry if you doesn't understandStep 1 : open a new file in photoshop... dimension that i use is 530* 380 pixelsStep 2 : open two video like me one with aliya and one with zainand go to image - resize to 700 pixelsStep3: drag the aliya video and put in the new file like thatand then video with zain like that
Step4: and then create on zain video a new layer mask ang go to the brush the color will beblack ... like thisStep5: and then remove part like thisStep6: and the sharpen all two video i use a sharpen action for gifsStep7: use a psd color , i use kainat psd in here 😊Step8: and then is over , go to File - Save for Webthis is ur final resultand use any texture you like and added some text 😊I'm very bad at explaining things..hope u can understand these steps...:)🥱
Originally posted by: Preet.Kc
TUTS & TIPS How to give glow or ligheten your picsOriginal picVersion oneVersion TwoStep 1: apply the smart sharpen filter, I prefer don't sharp it too much, just the necessary
Step2: duplicate your pic now. And from now on you have to work only on your copy layer.
Step 3: go in edit--> adjustments select brightness/contracts. Here I normally just increase the brightness till 40/45, but sometimes I also decrease or increase the contrast too, it just depends on the pics. And click on okay.
Step 4: from the same list select hue/saturation increase a little bit the saturation and also the lightness bar, once done press okay.
Step 5: now again from the same list select the option threshold and keep it to 128 level and press okay.
Step 6: go to Filters--> Blur--> Gaussian Blur and keep the radium more than 4. Something between 5 and 6 will be okay.
Step 7: change the mode of you layer copy layer from normal to soft light and marge both the pics together.
--- this is what I have done to get the first version.
Step 8: from Filters--> Blur--> select Surface Blur and keep de Radium less than 10, 7 will be okay and the Threshold around 19/20.
^^ this is the step that I have added to the first version.
P.S. you can brightened you pic even with the curves, or use both of them because with the curves you can decide which part to lightened and which not, while with the brightness effect you are lightening the whole pic, but since my pic was okay on its own I used only the brightness effect.
P.P.S. you can do other changes too like put a little bit of Vibrance effect but whatever changes you do remember to do it before putting the Threshold effect, because after that I don't think they work properly.
P.P.P.S. Maybe there are other ways to get this effect which maybe can be more easy but till now I know only this one.
NOTE: the same thing work also to darken the pics, but for that you have to work with the black and white effect.
With different picture more darken Original PicWhat you get if you use the first method explained aboveWhat you get if you use another effectStep 1: apply the smart sharpen filter I prefer not to sharp it too much just the necessary
Step2: duplicate it
Step 3: go in edit--> adjustments select Curves and adjust your curves in a way that the face of the leads are more visible from the rest of the pic. Once done click okay
Step 4: from the same list select black and white. Here you need to be a little careful and patience, you need to increase the colors that are lightening/brightening the faces of your leads, in my case I have increased the Red and the Yellow (yellow is one of those colors that you always need to increase) and decrease all those colors that just bright the background, in this way the attention will just go on the leads. In my case I have decreased a lot the magenta and a little bit the Green and Cyans.
Step 5: now again from the same list select the option Levels adjust them in away the face of you leads are more brighten then the rest of the pic. In my pic I have moved the middle little arrow from the right side toward the middle of the graphic, like in the pic.
Step 6: now select the option Threshold you need to increase the threshold here, you can't keep it 128, the pic will not came good with the level 128. You have to increase it in a way the that the white part is visible only on the faces of your leads and the rest it's black or almost black. My threshold level in this pic is 181.
Step 7: go to Filters--> Blur--> Gaussian Blur and keep the radium more than 4. Something between 5 and 6 will be okay.
Step 8: change the mode of you layer copy layer from normal to soft light and marge both the pics together.
Step 9: from Filters--> Blur--> select Surface Blur and keep de Radium less than 10, 7 will be okay and the Threshold around 19/20.
TIP: if you are scared and want to know how it is coming then you can change the mode of your copy later just after duplicating it, it will help you.How to make this type of gif This is really easyopen the gif (this is a liquid gif, you can downnload it from here http://i.minus.com/ii5tGpUDShywH.gif)It has 88 framesnow open a new document of the same size of the gif.Now make your siggy in the way you want to make it, but it should be in the center since the liquid is in the center.once you are satified with your siggy, go in the timeline/animation box and duplicate your siggy frame for 88 times, which means at the end you should get 88 frames in your siggy document just like the gif.Now go in the gif, click on the little arrow at the end of the animation box, select all the frames, click again on the arrow and click on copy framesgo in your siggy document, click on select all the frames and then click on paste frames, a window will appear select these two optionsPaste over selectionand tick the square near link all the layerstip: before doing anything group all the layers of your gif, it will make easy for you to do few settings.Select all the layers of your gif, how to do it? it's simple:click on the first layer of your gif and than go the last layer of your gif and while clicking with the mouse keep pressed the shift bottom of the keyboard. it will select all the layers of your gif. Than go in Layer-->gourp layers and insead of seeing your layers you will see a folder.^^you can do it even before copying your gif in the document.Now with all the frames select move your gif in a way that when the liquid moves your siggy is visible, once done change the gif mode from normal to screen (click on the folder that contains the gif layers and than select the option screen, but make sure your frames are always selected, if you see it doesn't apply to all the layers click for 2 times on the little eye near the gif folder)P.S. i will make a tut for it too but it will take a little 😃P.P.S. check this tuthttp://www.india-forums.com/forum_posts.asp?TID=3777034&PID=100976376&#p100976376you need to work on the opposite way, instead of putting the gif beneath the siggy you need to put it on top of it, for the rest the basics are the same.
Originally posted by: Preet.Kc
How to make the lines/boders around the banners my siggysince i have selected just a little part so i got the boders all around the picHow to use Mask tool and how it works How to use Motion Blur RESULTmethodWith the Lasso Tool or even with the Rectanguler Marquee tool, select the part on which you want to put the effect. (I prefer the lasso tool because the emotion effect cames out really lovely and blended)Now go to Filers-->Blur-->Motion Blur and put the angle to Zero (0) and the distance as per your likes.P.S. don't increase the distance too much because at a certain point your pic lost the motion/moving effect, and it looks like a plain color, the details disappears completely.Second Way (faster)RESULTmethodThe first thing that you have to do after opening your pic is to click on the "Quick Editing Mask Mode" after than select a brush, it's better if it is round. And start brushing the part of the pic on which you DON'T want to apply the motion blur effect.As you are brushing on it, it will become red, that means you are selecting the area correctly.Once you are done click on the Quick Editing Mask Mode button again and you will get something like this^^ The area that you want to blur is selected and it is the background.Now you can apply two type of effects.Filters-->Blur-->Motion Blur and with Angle Zero set the distance and click okay and your work is done.With the backgound selected in this way you can instead of the Motion Blur apply the Radial Blur, as in the following picRESULT^^Radial Blur on the backgound looks like motionP.P.S. to get rid of the selected area which sometimes doesn't go away, just create a frame in your animation box and click on play it will disappear 😆P.P.P.S. there is another way too but i really don't feel like making a tut for it, it's really too much irritating and long you need too much patience for it 🥱


This is a thread where you all can share everything anything, be it be a Tutorial, PSD, Suggestions, Textures, Animations, etc Try and avoid too...
Hey friends Welcome to Questions Queries Corner Please post all your questions queries here instead of making new topics. If any "help" topics...
This thread is "Creations Exhibition #5 " where you can show off your latest work. And it is for everyone including members who have a...
Hello all and welcome to Saher Mrina's shop! This is our first collab creation gallery since both of us are now busy but still want to be...
Are you new to Avatar and Signature Shop Forum? Then this is the right place to know about this forum and it's activities. Next few posts will


 Ek Duje Ke Vaaste 2
 Cricket


849