


Posted:
Hey can someone post a Tut for making a Transparent siggy in PSP..The one with pics and all..Not text alone?
Plzzz..Thanks!😳
Plzzz..Thanks!😳

BHAI & FAMILY 10.12

Paresh Rawal blasts Anupama Chopra over Dharundar Review.

🏏South Africa tour of India 2025: India vs SA - 1st T20I🏏

6 year leap promo : Tulsi-Mihir separation
negative reviews being pulled down 😭
Jatinder from PV calls out Harminder from BoI for bias against Ranveer
BoI aka Harminder ka tune change start hogaya!!!!
Deepika in Mahavatar
Kritika Kamra Gaurav Kapur Confirm Relationship
Alia Bhatt at the Red sea Festival
Aditya Dhar and Yami paid to troll
Hrithik ‘praises’ Dhurandhar but he also disagrees with its politics
Shah Rukh Khan new video launching Danube property
CHACHI vs CUTEY 11.12

December Reading Challenge & Christmas Reads- BT Page Log Thread

Kasam Se Banta Rishta ~ Ssharad Malhotra x Shivani Tomar SS
Paresh Rawal deletes his distasteful tweet on Anupama Chopra
Film Critics Guild issues statement
Originally posted by: -SamPari-
This is a old Tuts of Mine.. as IF Changed etc..
Tutorial on making Video Siggie (My Way)
[c]PariCreationz/Angelic.SamPari-Designs at India forum.comDO NOT CLAIM as your work
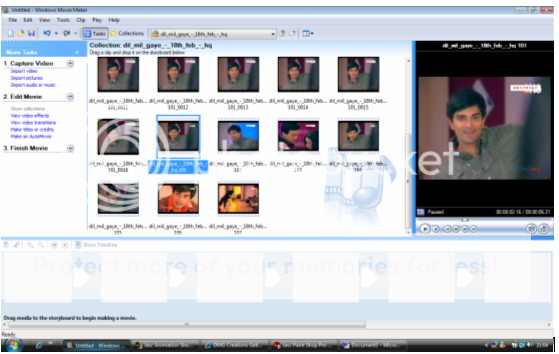
it has taking me over A DAY to put this all togetherFirst of all to make your Video Avatar in Where Ever you make it in.
I make it on Movie Maker 2.6.To make your movie upload it from your files
I Usual find Vid of UTube and then upload it with utube converter etc
{Mine looked like this.. below} will all the frames.. As u can see I?m making a Armaan One or a DMG One...looollz As soon as u got all the different frames for this your scenes of the clip from 5 ? 100 frames in can be... Depending on how long you will like your Video to be.
Once u got all your frames uploaded to will need this button
And step by step you take the shots you need by pressing the arrows and then pressing
The camera to capture the shots
So now after you think to got all your shots and saved them. You can close the movie maker if u like or leave open if u want to make another later..
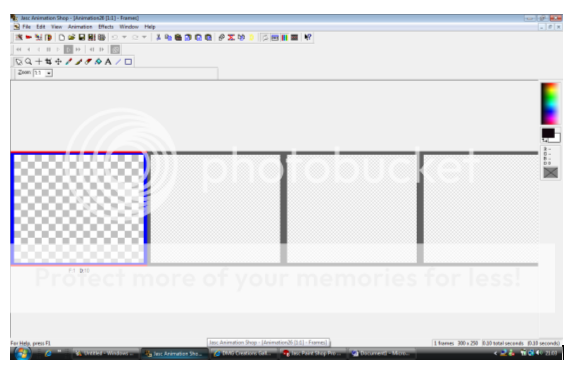
You then open up your animation shop 3 .. And press file new.. And adjust to what size you like your animation to be like for example from 100x100. I?m gonna be using
300x 250 {see image below}
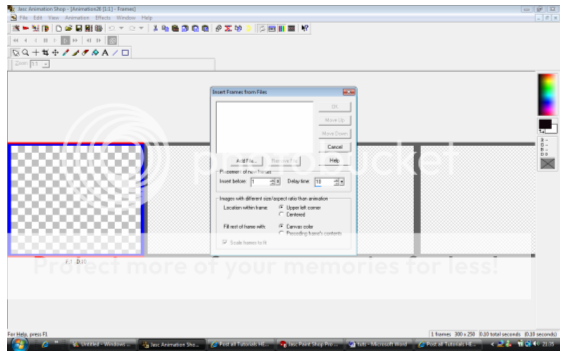
Now once to done this above you now need to add all your frames that to made in the movie maker so now go to animation and insert frames, then from files and this box should come up.{below}
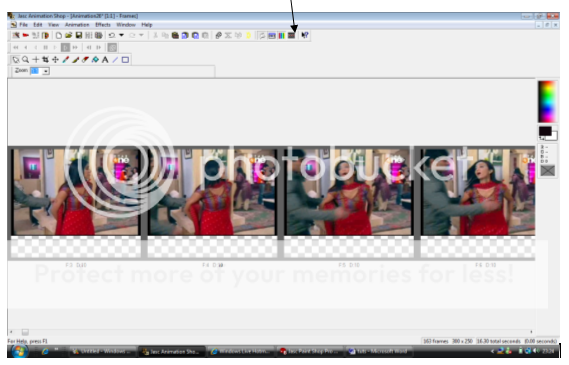
Press ADD FILES and select all the picture frames from the movie fillz you want.Now your animation shop frames should look like this press animation to see if the video it playing right. BY pressing the film strip.
So this is your Video Avatar Done.. to can save and use like this if u like but if u wan to add effects to can like background texts brushes etc..
...................................................................................................
To add a layer effect to your video avatar
Now that u your video Siggie or avatar is done and you want to make it look nicer then ere is what you do...
So you open your PSP or PS and open a new layer the same size as your Video Siggie..So I opened 2 same sizes layer one for my border and one for my text.
Now I find a texture to fill in the empty layer. {Above} and below I filled it in with the texture
Once filled erase the area not needed to Fit the Video in. and add whatever you like.. I?m sure I don?t need to explain do I.. Like text brushes.. Once u think u finished maker sure u merge layer to visible.. LAYER >> MERGE >> VISABLE.
COPY AND PASTED IN TO ANISHOP.. AND Duplicate to how many frames to need... Like how make Video slides to have to make the same amount.. So if u had 60 film slide of ur DMG PIC You duplicate the border one until to have 60 slides... once you done that select all border one and copy. Now select all the movie one and paste on to the vid layers. And ur done..
Hopefully u get something like this style..
100x100like this
this is the 100x100PM Me if u stuck on anything.. The white box is for your text to put on your video.. to get a outline text .. after all this explainin I hope I haven't confused you .. =[
Nuff LOVE Pari x.x.
Originally posted by: Karanian
Hey dere...
here is a tutorial for creating a brush in PS..
i m posting it here cuz i had sooo much trble with the same thing n i even asked it here but dint get the answer and aftr sooo much searching i found this .. so dat no body else can suffer lyk me .. 😊
here it goes. ...
Credit: Swimchick ..Creating a brush
Note: This tutorial was made for Photoshop CS3, but it should work for previous editions.
- Open the file containing the image you want to make into a brush, or make a new file and paste in the image you'd like to make into a brush.
- Select the image (this can be done either with ctrl + A, if it's the only thing in the file, or the lasso tool or something similar if there are other parts you don't want to include).
- Go to Edit Define Brush Preset and give it a name; click OK. Alternately, you can select the brush tool (shortcut: b) and click on the small arrow next to the preview of a brush. Next to the Master Diameter option, there's another small arrow. Click it and select New Brush Preset' You're all done! :)
Installing brushes
- Download the brushes from your source, save them in an easy to find place, and unzip them if necessary to get the .abr file(s).
- Navigate to C:/Program Files/Adobe/Adobe Photoshop XX (XX is your edition)/Presets/Brushes and move the .abr to this folder. Technically, at this point your brushes are installed. If you want to use them immediately, continue on to the next step.
- Open Photoshop, select the brush tool, and and click on the small arrow next to the preview of a brush. Next to the Master Diameter option, there's another small arrow. The name of the .abr file you moved should be included in the menu; select it and click OK to replace the current brushes (which you can always reload by selecting them) or append to add them to the end of your current brushes.
Making a brush set
A brush set is a .abr file containing multiple brushes. This makes it much easier to organize your brushes (for example, you could put all grunge brushes in one set, or all brushes by a specific person in a set), especially if you want to offer them as a resource.
Luv
- Open the brush menu by selecting the brush tool and clicking on the small arrow next to the brush preview.
- Make sure that only the brushes you want to combine into a set are displayed. If there are other brushes shown, you'll have to delete them individually (right click, Delete Brush).
- Click the small arrow next to the Master Diameter option and choose Save Brushes' Pick the name and location to save them (the best place is probably the default brushes folder, mentioned in the above tutorial) and you're all set!
Sehrish
Originally posted by: -SamPari-
guys this was a tutorial i came acrosss here...can someone pls clear my doubts abt some points in it.(C)Angelic-Design
DON'T CLAIM AS UR OWN..
DON'T DISTRIBUTE AROUND OF I.F
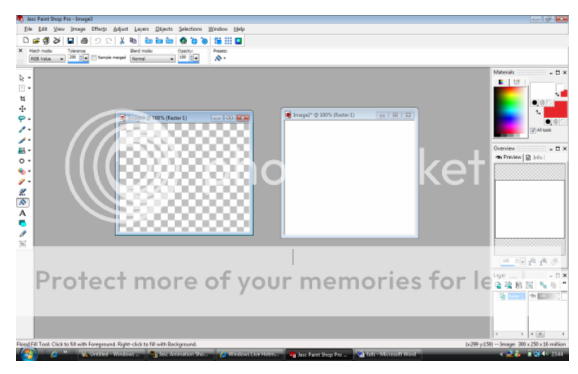
Making texture Tuts 4My simple way in PSP.
1. Open up a reasonable size layer... Mine is 500 x 400
2. Fill it any colour u like...
(Image below)
1.how to do this...i always get a white coloured layer???3. Get your paintbrush out and randomly paint random line or swiggles of different colours on the layer,
(Image below)
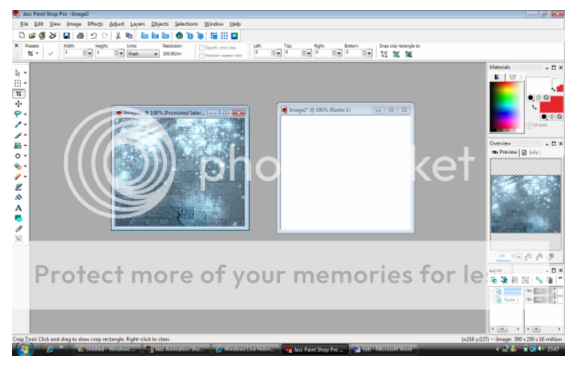
4. Then go to adjust blur and motion blur and repeat at least one or two more times until its texture looking.
Mine come out like this..
That Ur layer/texture and now u can use it...
my result on using it on a pictoo get this result below paste as a new layer on the pic then go to
again here guys can someone pls tell..once we have created d above layer how will we paste dat on our pic???
layers>properties>lighten or screen or Darken ..
U can change the opacityNuff Love Pari xx


This is a thread where you all can share everything anything, be it be a Tutorial, PSD, Suggestions, Textures, Animations, etc Try and avoid too...


 Bigg Boss 19
 Ganesh Kartikeya


850