


 This tutorial was written using Paint Shop Pro 9 and Animation Shop 3. Things you will need for this tutorial: 1) Paint Shop Pro and Animation Shop To download a 30 day trial of Paint Shop Pro 9 and Animation shop click here Free Trial 2) A glitter fill  You can use mine or use your own. If this is your first time doing this I suggest using mine. Right click on the glitter and select "save as". Save it somewhere that you will remember. Okay so if you have your PSP, Animation Shop, and glitter saved, we are ready to begin. 2) In Animation Shop, click file>open, and find your glitter. It should appear in three frames like this.  3) In Animation Shop go up and click edit and then click on select all. All three frames of your glitter should be highlighted like in the picture above. Then go back up to edit and click on copy. 4) Go into Paint Shop Pro and click on edit and then click on paste then on paste animation as multiple images 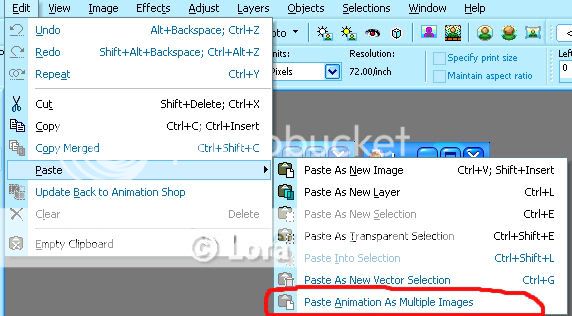 5) You should now have 3 separate glitters in PSP like below  6) In Paint Shop Pro go up and select file and then select new. Use these settings. This will give you plenty of room to work.  6) Select the Text tool, which looks like this  , and click on your blank image. A text box should pop up. Type whatever you want to be glittered. I usually make my text size about 55pt-60pt. But you can make it however big you want. Select what font you want. Make sure antialias is turned off. At this time crop your image so that you don't have all that empty space. , and click on your blank image. A text box should pop up. Type whatever you want to be glittered. I usually make my text size about 55pt-60pt. But you can make it however big you want. Select what font you want. Make sure antialias is turned off. At this time crop your image so that you don't have all that empty space. 6) Once you have your text on your "paper", you need to make 3 copies of it since that's how many frames of glitter there are. So go to Selections then to Select All. Then go to Edit>Copy, then Edit>Paste as New Image. Do this so that there are 3 frames like this. 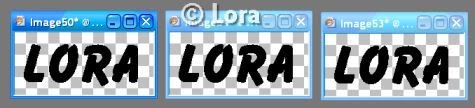 7) Now click on your fill tool which looks like this  . Consult the picture below and click where the red arrow is pointing. . Consult the picture below and click where the red arrow is pointing.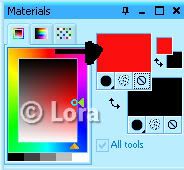 8) A box like the one below should pop up  Make sure you are on the "Patterns" tab which is circled in the picture. Then click where the red arrow is pointing. 9) A bunch of patterns should appear. Your 3 glitters should be among them. Select the 1st glitter and click ok. Use your fill tool and fill in the first frame of your text by clicking on each letter. Then go and select the 2nd glitter from the patterns box. Fill in your 2nd box of text. Select the 3rd glitter and fill in the 3rd box of text. 10) Once all of your text is glittered, click on the first frame of glittered text. Go to selections> select all. Copy the frame. Then go into Animation shop. Go to edit>paste>as new animation. 11) Go back to paint shop pro. Select your second frame of glittered text. Go to selections> select all. Copy the frame. Then go into Animation shop. Click on the glittered text that you already pasted into there. Go to edit>paste>before current frame. Go back to paint shop pro. Select your third frame of glittered text. Go to selections> select all. Copy the frame. Then go into Animation shop. There should be two of your glittered texts there already. Click on the first one. Go to edit>paste>before current frame. It should now look like this.  12) All 3 of your glittered text frames should now be pasted into animation shop. You can click on view>animation to see what your creation looks like. Now click file>save. Here is what my finished product looks like.  |
____________________________________________________________ ___________
MORE
Une bannire brillante avec glitter. Pour raliser cette bannnire, vous allez avoir besoin d'un glitter, Vous pouvez le tlcharger clic droit ---> enregistrer l'image sous ******************** Fabrication des imagesFICHIER ---> NOUVEAU  Avec la couleur d'arrire plan en blanc #ffffff vous faites: IMAGE ---> AJOUTER UN CADRE  Maintenant vous avez une bannire de 468x60 Avec l'outil texte crire ce que vous voulez, choisissez une police que vous aimez mais avec les configuration de la capture.    Surtout ne pas dselectionner FENETRE ---> DUPLIQUER ou MAJ+D vous le faites 2 fois Maintenant vous avez 3 images identiques Ouvrir animation Shop FICHIERS ---> LOGICIELS JASC SOFTWARE ---> LANCER ANIMATION SHOP Ouvrir votre glitter FICHIER ---> OUVRIR  et faites ce qui est not sur la capture  La premire image du glitter se trouve maintenant dans PSP  Remplissez la slection avec le pot de peinture   Quand toutes les lettres ont t remplies SELECTION ---> DESELECTIONNER ou CTRL+D Prenez la baguette magique et cliquez dans le cadre blanc Reprenez le pot de peinture et remplissez ce cadre  |
____________________________________________________________ _____________________
MORE
NOTE: This tutorial was written for Photoshop CS. Users of other versions of Photoshop should be able to follow it easily. For the PaintShop Pro version of this tut, click here.
FOR THIS TUTORIAL YOU WILL NEED TO DOWNLOAD MY GLITTER AND GOLD OUTLINE PRESETS, WHICH YOU CAN FIND ON THIS PAGE.
1. Open a new RGB image with a white backgroun, 500 pixels wide by 150 pixels high (make it longer if you have a long name). Type in your name in whatever font you wish to use (I'm using Script MT Bold at 150 pt). Go to Layer, Rasterize, Type. Name your text layer "tag 1". Delete the background layer. Create two copies of this layer just above it. Name them "tag 2" and "tag 3".
2. Control-left click on the "tag 3" layer to select it. Apply one of the glitter presets to it. Your image should now look like this:

3. Turn off the "tag 3" layer, and click on the "tag 2" layer. Apply the same preset, but rotate the environment bitmap one turn. Turn off the "tag 2" layer. Apply the same preset, but rotate the environment bitmap two turns. You now have three copies of your text, each with the glitter in slightly different positions.
4. Create a new layer just above the "tag 1" layer. Go to Edit, Stroke, and use these settings, with white as your color:

Name your new layer "stroke". Control-left click on the "stroke" layer to select it, and apply the gold outline preset to it. Go to Select, Deselect. Your image should now look like this:

5. Go to Layer, Merge Down. Click the button at the bottom of your toolbar to switch to ImageReady. Make sure you are in Full Screen Mode (click the middle button on the toolbar just above the bottom (Switch to Photoshop) button, and make sure that Animation is checked under the Window menu. You will see the first frame of your animation at the bottom of your screen. It should look like this:

6. Click the arrow to the right of "0 sec." under your frame, and select a delay of 0.1 seconds. Then click the icon at the bottom of your animation just to the left of the trashcan. This will duplicate your first frame. In the layers pallette, click on the "tag 2" layer and turn it on. Your animation should now look like this:

7. Click the icon to the left of the trashcan again to duplicate your second frame, and in the layers pallette click on the "tag 3" layer and turn it on. Your animation should now look like this:

8. Test your animation by clicking on the "play" arrow (the third one from the left). Click the "stop" button to stop (the square one). Make any adjustment you like on the delay of each frame. When you are satisfied, go to File, Save Optimized As, and name your animation. That's it!

____________________________________________________________ ______________________________________
MORE
Well bust my buttons...you thought i quit writing tutorials???
yeah...well...um...ya know how life sort of sneaks up on ya and ya
just have to leave the puter..bummer! ROFL!!!
Hey...this one was inspired by a web-tv tut from
Stinky Wet Dog. (i love that SN!! ::giggles::)
This is
How To Tri-Glitter Your Fonts Tutorial!
Bemymind June 2005
Written in Paint Shop Pro version 7.4
(don't grumble at me, perty please, i don't have a new puter yet!)
This tutorial is Bemymind's own creation.
Please respect the copywrite.
For this tutorial you will need:
Paint Shop Pro
Animation Shop (comes with PSP)
Choice of a plump font (i prefer Storybook.ttf)
Choice of 3 glitters (preferably 3 frames in length)
Here are the three i'm using for this tutorial:
................
Right click and save to your puter:)
Just in case, i've also set-up the pattern files
for all three of the glitters used in this tut. They can be
extracted to your "Patterns" folder in PSP. That way you
can load the frames easier. .
calculator or pen, pencil and paper
math skills (playing Jimmy Buffett's "Math Sucks" helps :)
Coffee or beverage of choice.
Patience with yourself and me, please:)
oh no!...have i scared you off already? COME BACK HERE!!
Please, Please, Please Come Back!!! :)
it's not THAT bad, really!
Open Paint Shop Pro.
Set your foreground to pattern.
(Don't need to choose a pattern yet)
Then set your foreground to null.
Set your background to white.
Go up to the top of your color palette and click the
double arrow once. (also known as 'toggle')
Then set your background to black.
Notice at the top of your color palette bar that both black and white boxes are up there.
We're gonna do a toggle here in a bit.
Okies. Now...i've been glittering a looooooonnnnggg time,
so all my glitters are already loaded into my patterns folder
in PSP. For those of you who don't want to load the pattern
files into the program, you can open all nine pattern .bmp files
in Paint Shop Pro and will be able to choose them into
your pattern when the tut calls for them:)
open them all and move the to the lower left hand corner
so you can see 'em:) if you like.
All set? Lets get to tri-glittering!!
Open a new image:
400x300 pixels 72.000 resolution (best for web)
transparent background, 16million colors.
Big space for now, we will re-size down later.
Toggle to make your background color white.
Keep the foreground to Null.
Go to Layers>Add New Raster Layer. Name it 01.
Choose your text tool button and click
somewhere towards the middle and to the left
inside your new image window
to get the text box to come up.
A.Choose your font.
B. Your font size.
C. Auto Kern checked on.
D. Stroke is Null and Fill is white.
E. Click Standard Text to get a nice even fill.
F. Choose floating and antilias.
G. Type your text.
H. Click OK:)
While your text is still floating move it to the center of your canvas.
Go to Selections>Select None (or Ctrl+D) to de-select.
Click on your majic wand button and then click anywhere on your
canvas BUT NOT ON THE TEXT.
You'll have marching ants all over the place...LOL
Now go to Selections>Invert,
and the ants will be around your text only.
Go to Selections>Modify>Expand
Expand by 1. Click OK.
kewl beans, you're doing good!
Now go up to Image>Crop to Selection.
Now we have our main working area for tri-glittering!
Here's where the pencil and paper come in..time to make some notes!!
Go up to Image>Image Information:
Make a note of the Width and Height.
Mine is:
265 pixels wide by 47 pixels high.
Click ok to get out of that window.
Now is a very good time to save your file in .psp format.
And it is also a very good time to take a break and refresh
that coffee:)
Are you back yet? No? ok...i'll empty the dishwasher....
I've emptied, re-filled and come to 2 conclusions...
1. if my family brings home any more plastic anthings
to drink out of, i'm gonna hurt 'em! ROFL
and
2. I need a new dishwasher as this one is sounding
sort of like a small freight train and vibrating like
a California quake!
Anywho...let us continue...
One constant will be the width of your image.
mine is 265 pixels...
Your height is what we are gonna fiddle around with a bit:)
Take your height measurement and divide by 3.
ok, so 47 (my image height)
doesn't divide so evenly...so i decided to make
the top and bottom both 16 pixels and the middle 15 pixels.
so on my paper i have written:
Top: 16
Middle: 15
Bottom: 16
Choose your Selection button . Look at your tool options
and choose rectangle and clear the box next to antilias.
Then double click the selection
button to get the Select Area window...
we get to choose exactly where we want the selections to be.
We are gonna set 3 different selections and save
to our puters to load later.
This first selection will be our top.
Remember, your width height may be different than mine.
Fill in your numbers to fit your image.
Here's how mine will look:
My Left will always be 0 and my right will always be 265.
My Top is 0 for now and my bottom is 16 for now.
Now, click ok and see how just the top area
of my image has marching ants:
kewl beans huh?
Go to Selections>Save to Disk and name it 01top.
PSP will save it in .sel format for you.
Go to Selections>Select None and then double click
the selection tool button again.
Here's where we might get a bit confused. Oh Well! i live confused! LOL:)
Now, in our Select Area window...our
right and left stay the same, but now our
top becomes 16 (yep, the previous selections bottom number)
and our bottom becomes
16 plus 15(our middle number on our note paper) to equal 31.
here's a lookie:
okies?
kinda kewler...
Again do:Go to Selections>Save to Disk and
this time name it 02middle.
PSP will save it in .sel format for you.
Go to Selections>Select None and then double click
the selection tool button again (last time...er...maybe).
Now, in our Select Area window...our
right and left stay the same, but now our
top becomes 31 (yep, the previous selections bottom number)
and our bottom becomes
31 plus 16(our middle number on our note paper) to equal 47.
here's a another lookie:
kewl stuff...
Again do:Go to Selections>Save to Disk and
this time name it 03bottom.
PSP will save it in .sel format for you.
Go to Selections>Select None.
If you'd rather have more of one color and less of another.
when you make your selections give more pixels to the sections
you want. just make sure the totals add up the the exact height
of your image:)
Whew!! ok, great job!!
Now we are going to set up the layer palette and
get ready to glitter!
Your layer palette should look like this right now:
all the way to the right hand side, see that red X over
a lock?
On Layer Named 01 -click the lock to remove the red X.
Then move your cursor back to the layer 01 and right click.
Choose Duplicate.
Click on Layer named 01 again and then right click again
and choose duplicate..again :)
Right click over each copy and choose Rename.
Rename each copy, one named to 02 and the other named to 03.
and here's what your palette will look like:
Click on Layer1 to highlight it.
Go to the toggle arrows at the top of the color palette
and and click them. this will make your background color black.
Now, click those little arrows next to your background and
foreground boxes to toggle the black to the top and
become the foreground color.
Choose your flood fill tool button and click anywhere
on your canvas making sure you do not
touch the text. (this only makes sure you do not accidently
move the text out of alignment.)
Your base layer is black so that you can easily see the
fills we are about to do.
Toggle your black back to the background and change the
null to pattern.
Now, click on the pattern box and choose 01red as the pattern.
Scale(%) 85 -- Angle 45
Make sure layer 03 or your top layer is highlighted
then go to Selections>Load from disk and choose
01top.sel.
This is the kewl thing about unlocking the layer
(removing that red X over the lock)
You will be able to fill without ever turning off a layer!
Go to your image and click once inside the area that is
selected making sure not to touch the text.
You will see the top part of your text fill with the red.
Do not de-select !!! :)
Go to your Layer palette and click on layer named 02.
Change your pattern to 02 red.
Click inside the selected area of your canvas.
You will not see the fill this time...but it will have filled.
Go to your layer palette and click on layer named 01.
Change your pattern to 03 red.
Click inside the selected area of your canvas.
And the third glitter will be filled.
Now, Selections>Select None.
File>Save.
If you want to make sure your layers filled
You could go to your layer palette and turn off each
layer and see each layer.
In your layer palette, click on your top layer to hightlight it.
Go to Selections>Load from Disk, and choose 02middle.sel.
Follow the same procedure for filling like before
only use the 01silver, 02silver and 03 silver.
And click inside the middle selected area, making sure
not to touch the text.!
Now, Selections>Select None.
File>Save.
In your layer palette, highlight your top layer again.
Go to Selections>Load from Disk, and choose 03bottom.sel.
Follow the same procedure for filling like before only
use the 01blue, 02blue, and the 03blue.
And click inside the bottom selected area, making sure
not to touch the text.!
Now, Selections>Select None.
File>Save.
Go to your layer palette and right click over
the layer named 'Layer1" choose Delete.
File>Save.
Your layer palette should look like this:
Before we do one final save, click on each layer and
go to Effects>Sharpen>Sharpen for each layer.
This will bring out the sparkle!
and your image should look something like this:
Close out the image in PSP and open it in Animation Shop.
In Animation Shop, click on View>Animation.
and see how it goes! :)
Like what you see? kewl beans! Close out the
running preview and go to File>Save.
In the Animation Quality window click the
customize button and use these settings
per tab.
Click OK.
then click 'next' on the next 3 windows. then click finish.
and you are done!!
I hope you enjoyed this tutorial:)
Bemymind June 2005.
did ya thinks i wouldn't do platthand demo font?
::giggles::
____________________________________________________________ ________________________
MORE
How to make Glitter Signatures
(with psp7)
Haha now you people can make your own and stop pestering me. Just kidding i love my fans and they can pester me all they want! Anyways a lot of people have been asking on how to make glitter signatures so i decided to make a tutorial for you guys!!
1.get a tile of glitter. You can go here for some.
2.Once you have picked out your tile save it. I picked this one.
3.now open psp now depending on how long you want your glitter signature to be, but click on new and make it about 400X100 which should give you plenty of room.
4. open animation shop, and then open you glitter tile.
5.Go back to psp and add text to your image. Make the stroke and filling close to the color of your glitter title. Here's what mine looks like
6.ok now once you have the text copy and paste it 3 times or how many tiles your glitter has (mostly likely 3).
7. now cut each of the glitter tiles out of the animation (1 by 1) paste them into psp and then go to Select tool and select one image double click so it only selects the text.
8.Then select the fill tool
9.Patterns and then pick the glitter tile and fill the text.
10.Continue this until you have no more glitter titles.
11.You then need to save the images and open them in animation shop together ( go to animation wizard) and once there open together save them and there you go you made your first Glitter Signature!!
Here is what mined turned out like:
____________________________________________________________ ______________
MORE

Glitter Heart Flower

This Glitter heart flower is a result of me trying to update my Glitter Heart tutorial, but it turned out different, so I thought it deserved a tutorial of its own :o)
Please leave the tutorial where it is.. on my site
The result is yours to do with as you please..:o)
You are welcome to print it for your own personal use
Group moderators please link back to my page for your members
Needs for this tutorial :
* PSP you can download a free trial here
* SPARKLE TUBE you can download the one I have used here
Save to your PSP- tubes folder
* GLITTER TILE you can left-click and save the one I used below
or visit this great glitter site AYLANA'S 
Note: this .gif is not glittering in PSP,
that is ok.. I'm only using it as background!
1) Open a new file in PSP make it 200x200 transparent
Open pink-02.gif, and minimise
Set your Styles palette.. background to #C00072
and Foreground to Pattern and find the pink-02 settings like this:
2) Click your shapes-tool  and in tool options find Heart 2
Set options as follows: 
3) Draw your heart to fit the image
and move into place by the nodes
4) Layers/Convert to Raster Layer
Magic wand.. click anywhere on the background
Selections/Invert
Now Effects/3D/inner bevel.. with these settings:
5) Selections/Modify/Contract/10
and apply same inner bevel as in step 4
Selections/select none
6) Layers/New Raster Layer
Paintbrush  with Foreground solid #F5B7E6
and set options like this:
and paint a boomerang shape in one of the heart corners
Effects/Blur/Gaussian Blur/6.00
Layers/Merge/Merge Visable
7) Now we are going to change the canvas size
Image/Canvas Size/ fill in 400 in both boxes at the top
and Vertical & Horizontal both CHECKED
Move the heart with the mover tool to center top of the image
Edit/Copy and Edit/Paste as new Layer
Go to Image/Flip and with mover tool place the two hearts together like an hourglass
8) Layers/Merge/Merge Visable
Edit/Copy and Edit/Paste as new Layer
Now Image/Rotate/Right/90 with all layers UNCHECKED
Move over middle of other hearts, and your graphic should look like this 
(yours is much bigger.. )
Layers/Merge/Merge Visable
9) Go to Image/Resize/55%/all layers checked
Effects/Sharpen/Sharpen
Edit/Copy and Edit/paste as New Layer
Image/Resize/60%/all layers UNCHECKED
Image/Rotate/ with these settings
and Effects/Sharpen/Sharpen
10) Edit/Copy and Edit/Paste as New Layer
Image/Resize/60%/all layers UNCHECKED
and Image/Rotate/ same settings as step 8
Effecs/sharpen/sharpen
Move the opacity slider in your layerpalette to 60
and Layers/Merge/Merge Visable
11) Edit/Copy
Now open Animation Shop
Right-click anywhere in Animationshop screen and choose Paste as New Animation
Duplicate this frame once (click on this: )
)
Now click on Frame 1 and export it to PSP by clicking 
This brings us back to psp, now click you picture-tube tool and find sparkle white
Scale=70 and Step=100 Place the sparkles random on the outer edges of the biggest hearts 
Change the Scale to 50 and place sparkles random around the middle hearts
Close the frame and click YES to update before closing question!
12) Back in Animation Shop, click Frame 2
and repeat step 11, making sure you alternate the sparkles just a little
Close it, and answer yes!
Back in Animation shop you can now view your glitter heart flower
and if you're happy with the result.. Use the optimise wizzard to save your graphic
_____________________________________________________
MORE
Adding An Image to A Glitter Frame
glittery frame is basically a 2 step process, as in
many graphics creation, using PSP and Animation Shop.
The first step is to find a good image you want to use
for your frame.Open up PSP, and then open Animation Shop.
Open your glitter frame in A.S. and it will open in 3
connected frames. Hold your control key down and click
on all three frames, then right click and select copy.
Click on psp to bring it up from your taskbar, and
then right click anywhere on the workspace,
and select 'paste as animation as multiple images".
All three of your frames will appear disconnected.
Put them in order, 1 across to 3. (I am assuming
your glitter image has only three frames.) (see below)
excess unused area in the images.
Click on your magic wand and click in an area in
image one outside the frame, and holding your
shift key down, click in the transparent part
inside the image. Then from the menu above choose
selections and invert. Then choose file, and cut,
and then paste as new image. Do this for the
other two images as well.
Then with your first image selected, choose the
magic wand tool again and click inside the frame.
Select your art image, and choose file, and copy,
and then selecting your image one, choose file,
and paste, paste into selection. Immediately choose
selections, select none, or deselect. Save as
image1.psp to your desktop.
Click with the magic wand inside image 2. Then
simply choose again, file, paste, paste into
selection. Selections, select none and save as
image2.psp onto your desktop. Do the same steps
with the last image. Close your image art.
Now go to Animation Shop and click on the 1st
icon in the menu strip above, which looks like a
drum. This is the animation wizard. A window will
pop up. Settings are:
Same size as the first image frame, should be checked.
Click next. Transparent should be selected in the
next window. Click next. Upper left corner of the
frame should be selected and 'with the canvas color'.
Click next, and 'yes repeat the animation indefinitely
should be selected, and for this use 10 for how long
you want the frame to be displayed.
Click next. The next window is where you select your images.
Choose add image, and find your 3 images which
should be on your desktop. Hold your control key
down, and select backwards, image3, image2,
then image 1. This way they will be in order from
1 down to 3. This is important.
Click open and next and finish. Your frames will
pop up with the artwork contained therein.
Choose View from the above menu and then choose
animation. You will see your new creation
animated. Then close and save all three frames
with whatever name you choose, as a gif file
of course. Just click, next, next, finish and you
are done.
artwork that you created!
| | Main View Window Tool palette and three toolbars. Buttons on toolbars are user adjustable. OpenGL viewer: wireframe, colors, textures. Parallel and perspective views. | |
| | Open File With Options Select type of 3D file to read. Modify all input file parameters. | |
| | Batch Convert Read a list of files and save to the same file format. | |
| | Save File With Options Select file format type for saving. Set output scale factor and all other parameters required for saving the file. | |
| | Segments Per Arc Set the number of segments per arc size for DXF entities. | |
| | Color Map Set RGB colors for background, DXF drawing pens, avatars and OpenGL drawing pens. | |
| | DEM Landscape Color Map Set the RGB parameters for all colors used when displaying and editing landscapes. | |
| | Select Layers Select and deselect individual layers for export. Blocks are selected similarly. | |
| | File Extensions File extensions for reading and saving the various file formats. | |
| | Layer Attributes Set material attributes for each layer. | |
| | Align Surface Normals Adjust surface normals to make all triangles visible in one sided rendering. | |
| | Merge Duplicate Vertices Option 1: merge vertices that have exactly the same X, Y and Z coordinates. Option 2: merge vertices that are close together using a user specified distance for the X, Y and Z axes. | |
| | Extrude Text Select TrueType font and text. Set extrusions, facing, points, etc. | |
| | Extrude Dialog Control bevels and extrusions using text entry. Load, edit and save bevels. | |
| | Extrude Using the Mouse Controls for editing bevels and outlines displayed in the view window. Use mouse to make changes in view window. | |
| | Avatar and Animation Set tags and build hierarchy. Set and test joints for avatars. Create animations. |
Making Pics in Paintshop Pro
| First thing you gotta do is find the picture you want |
| Once you get the picture you want to work on opened, if its |
| Now here is where you resize the pic whether it be larger or smaller. Make |
| Now you can sharpen the pic here after youve resized it. |
| Now youre ready to load the palace palette . If you get the message |
| |
| This is the menu that appears when you click Load Palette. |
| Now you are ready to save the pic. Save it to your c:\programfiles\communities.com\Palace Server\palace\media |
| I want to add one final thing here. If this is a prop youve made instead of a roompic, once you get it all sized and palace ready by applying the palette, click Edit, Copy (shortcut: hold down ctrl and press C), then come into palace and click Edit, paste multiple props (shortcut: hold down ctrl and press Q) and that will put the prop in your propbag ready for you to edit it in palace. |
1-Open the template, right click & choose copy
2-Open your other image (one you wish to make an icon out of)
3-Right click on this other image & choose paste
remember to select the cut out tool & "transparent" first - see image:
4-Drag the template around until its in the right place then
5-Click on the cut out tool again to merge both images
6-select round the template, cut it out & paste it on the template image (that you kept open earlier)
7-save as your new image: you can either choose to save it as bitmap & then make it into a gif with giffy (transparent the pink areas)
This is what mine looks like after a bit of editing (see the paint tutorial for more)
Transparented gif versions of the loveheart templates
____________________________________________________________ ______________________
First, fire up Spazz3D and edit your avatar. Use the animation wizard to animate each of the legs, just like you animate anything else. Note the options for the animation wizard.
You'll probably want to fine-tune the animation.
Now check the "Triggers" tab on each of the animation groups, and set the trigger for each animation to "CoCi Walk"
Finally, use the "complex avatar" wizard to save it as a VRML file.
____________________________________________________________ ______________________________________________
MORE LAST ONE
| This tutorial was written using PSP8. For this tutorial you will need the following: PSP 8, A Font If you would like to use the font I used, you can download it here 1. Open a new transparent image 400 x 200 or whatever width you need for your name 2. Select your text tool … I have chosen Times New Romance size 60, stroke 2.0, with floating and anti alias selected. 3. Choose white as your foreground and for the background choose whatever colour you want your fill to be. I have used #840452 4. Click inside the canvas and write your text and click apply 5. While the text is still selected, go to Selections in your tool bar, and defloat, then go back to selections, modify, expand and expand by 1 6. Add a new layer and flood fill with your fill colour. Deselect and move this layer under your text layer. This creates a border around the white on the outside of your text. 7. Select your magic wand tolerance and feather both 0. Activate the text layer which should be the top layer and select the inside colour. You'll notice only a small part will be selected. That's OK we'll fix that now. 8. Go to selections, modify, select colour range. Click inside the reference colour sample and move your cursor over to your text and click on your colour and click OK. I have the tolerance and softness set at 10 and add colour range checked. Click OK and now your inside colour will all be selected. 9. Now we want to give that colour a nice inner bevel, so select inner bevel with the following settings or whatever you choose. 11. Deslect and merge visible. 12. With your magic wand at the same settings as before, now select a white section and go to selections, modify, select colour range. Click inside the reference colour sample and choose white. Click OK. The other settings will remain the same. 13. Duplicate this layer twice and close off both duplicates. Make sure the bottom layer is activated. We're now going to add noise to make the white glitter. 14. Select Adjust, Add/Remove noise, Add noise and select 60% Random 15. Activate the middle layer, Select Adjust, Add/Remove noise, Add noise and select 70% Random 16. Activate the top layer, Select Adjust, Add/Remove noise, Add noise and select 80% Random 17. Deselect and save as a psp file. 18. Open Animation Shop and open your file. Click the animation button and save. Click customize and select the following settings 19. Click OK then next, next, next and finish … I hope you enjoy the tutorial and if you need any help, please let me know.
| ||
HOPE ALL THIS HELPS IF U WANT MORE HELP PLEASE PM ME FOR TUTORIALS.


 Naagin 7
 Cricket
 Suggestions / Comments
 Health and Fitness
 Kyunki Saas Bhi Kabhi Bahu Thi 2


850