Page
of
1
Mannat Har Khushi Paane Ki: Episode Discussion Thread - 27

Yeh Rishta Kya Kehlata Hai Sep 11, 2025 EDT
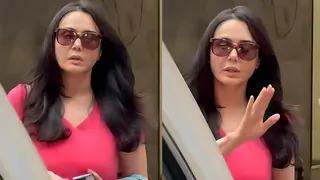
KIARA EXPOSED 11.9

🏏T20 Asia Cup 2025- BD vs HK 3rd Match, Group B, Abu Dhabi 🏏
Yeh Rishta Kya Kehlata Hai Sep 12, 2025 EDT
HUM JEET GAYE 12.9

Is it just me or…

MAJOR REVAMP TIME FOR STAR PLUS
Bigg Boss 19 Daily Discussion Thread - 12th Sept 2025

Patrama Prem ~ A Gosham SS ~ Chapter 4 on pg 2
🏏T20 Asia Cup 2025- Pak vs Oman 4th Match, Group A, Dubai🏏
Anupamaa 12 Sept 2025 Written Update & Daily Discussions Thread

The 71st National Film Awards are September 23 in Delhi

Sorry i dont know 😊
http://www.india-forums.com/forum_posts.asp?TID=110354
ask here please 😊
i will try to find something for u 😊
------------------
| Manipulating Images - Includes instructions for: cropping, adjusting brightness and contrast, adding a caption, selection tool, move tool, flipping, rotating, deforming, adjusting image colors, applying effect filters, photo painting, removing red-eye, and antiquing a photo. | |
| Working with Paint and Text - Includes instructions for: choosing colors, paintbrush tool, customizing brush tips, airbrush tool, eraser tool, smudge tool, clone tool, creating lines and shapes, filling regions, and working with text, creating filled text, and using the raised filled text effect. | |
| Using Layers and Masks - Includes instructions for: using layers, using masks, and vignetting. | |
| Preparing Web Graphics - Includes instructions for: formatting for the web (GIF, JPG, PNG formats), making a web button, producing web animations (layers and frames, animations, effects), image slicing, image maps, and creating hot spots. | |
| Color and Input/Output Options - Includes instructions for: color concepts (bitmaps, bit depth, resolution, color modes, color mode tips), optimizing images, palettes, dithering, compression, file formats, tips for scanning, advanced printing, scaling and tiling, printer marks, CMYK color separations, using PhotoPlus as an OLE Server, and PhotoPlus keyboard shortcuts. |
-------------------------------------
| Creating a Web Button HANDS ON: Making A Web Button Making labeled buttons is a typical use for text in PhotoPlus. Here, we're going to make a simple "Stop sign" button. The first step is to create a basic Background layer for the button.

 Click OK to create an empty image with a layer called "Background." Click OK to create an empty image with a layer called "Background."
Finally, we'll resize the image to a more suitable size for a Web button.
|
-----------------------

 (if you want to see bigger)


 ), shift+F5 or Alt+Delete to fill the selection with black (your foreground color MUST be black unless you want a "special" tux)


 ).
). ), then press Ctrl+E to merge them.
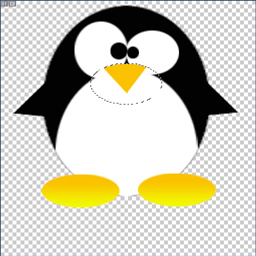
 )
) ) by pressing L a few times.


Originally posted by: Miss.Netherland
Sorry i dont know 😊
http://www.india-forums.com/forum_posts.asp?TID=110354
ask here please 😊
i will try to find something for u 😊------------------

Manipulating Images - Includes instructions for: cropping, adjusting brightness and contrast, adding a caption, selection tool, move tool, flipping, rotating, deforming, adjusting image colors, applying effect filters, photo painting, removing red-eye, and antiquing a photo. Working with Paint and Text - Includes instructions for: choosing colors, paintbrush tool, customizing brush tips, airbrush tool, eraser tool, smudge tool, clone tool, creating lines and shapes, filling regions, and working with text, creating filled text, and using the raised filled text effect. Using Layers and Masks - Includes instructions for: using layers, using masks, and vignetting. Preparing Web Graphics - Includes instructions for: formatting for the web (GIF, JPG, PNG formats), making a web button, producing web animations (layers and frames, animations, effects), image slicing, image maps, and creating hot spots. Color and Input/Output Options - Includes instructions for: color concepts (bitmaps, bit depth, resolution, color modes, color mode tips), optimizing images, palettes, dithering, compression, file formats, tips for scanning, advanced printing, scaling and tiling, printer marks, CMYK color separations, using PhotoPlus as an OLE Server, and PhotoPlus keyboard shortcuts. -------------------------------------
Click here for a
printer friendly
version of this
tutorial.Creating a Web Button HANDS ON: Making A Web Button
Making labeled buttons is a typical use for text in PhotoPlus. Here, we're going to make a simple "Stop sign" button. The first step is to create a basic Background layer for the button.Choose New… from the File menu, or click the New button on the Standard toolbar. (Then if the Startup Wizard is enabled, click on Create New Picture).
- In the New Image dialog, set the size to 600600 pixels and specify a white background.
This is much larger than the finished button will be, when saved as a .GIF file, but it is much easier to work on a larger image. We'll resize it just before exporting as a .GIF.
The next step is to fill the background with a plain color.
- Before going any further, choose Save As… from the File menu and save the image as BUTTON.SPP.
Select a light blue foreground color from the Colors tab (we suggest R=122, G=122, B=122).
Now we'll add a bevel effect to make the image look like a button. Create two new layers, called "Highlight" and "Shadow" respectively.- Select the Flood Fill tool from the Tools toolbar and click on the image to fill with the foreground color.
Next, we'll add a graphical element. We'll put this on its own layer, so we need to add a new layer.

- On "Highlight" layer draw a thick white line along the left and top of the image. Repeat this in black on the right and bottom of the image on the "Shadow" layer. Finally set both Layers to 50% Opacity and you have your raised button.
On the Layer Manager tab, right-click on "Layer 1" and choose New…. In the dialog, name the layer "Shape." Change the foreground color to deep red, then select the Polygon tool from the Shape Tool flyout.
Next, select White as the foreground color.
- Draw a polygon shape. Adjust the left handle so the shape is octagonal, with eight sides, and drag the top handle to rotate the figure into a "stop sign" orientation. Then double-click inside the figure to complete drawing the shape.
- Select the Text tool and click it on the image. In the Add Text window, type the word "STOP" and format it as Arial, Bold, 72 points.
Finally, we'll resize the image to a more suitable size for a Web button.

To preserve the proportions of the bevel effect, choose Merge All from the Layers menu before resizing. Choose Image Size… from the Image menu and resize the image to 5050 pixels.
- Finally, choose Export Optimizer… from the File menu and export the image as a .GIF after checking the options.
-----------------------
Hi, i'm gonna translate overlord's tutorial to make a G1 tux, because the english section of the forum is dying
So, let's start : this tutorial is composed of two parts, one to build up the tux's body and the second one concerns the reflects and the shadows.
Here's a model wich was made by overlord for photoshop beginners (and for the others)
If you want to make a bigger tux, you'll only have to increase the size of the model
Part I : builting up the tux
First of all open the model in photoshop
After that, use the zoom tool
We are now going to create every part of the tux body.
1. Create a new layer by pressing Ctrl+Shift+N, and name it "Body"
2. Select the elliptical marquee tool
Tip: you can see little arrows next to some tools, that means that if you click on them and don't release your mouse botton, a little menu will appear
3. Then make an ellipse like this one :
4. Now go to the select menu > Transform selction and drag the croners to have a selection wich will ressemble to this one :
5. Use the fill tool (
Then make this layer invisible by clicking on the little eye next to the layer's thumbnail
6. Create a new layer, and name it "White stain"
7. Repeat steps 2 3 and 4 to have a selection like on the example, and fill it with white by pressing Ctrl+Delete with white as your background color (or with the fill tool with white as your foreground color)
8. Now Click on the "Body" layer's thumbnail with Ctrl pressed (Ctrl+Click) to have its shape as a selection. Then Invert the selection by pressing Ctrl+Shift+i and, be sure your're working on the white stain layer, press delete. After that, Ctrl+Click on the white stain layer, to have its shape selected.
9. Now double click on your foreground color and enter R:231 j'ai:231 B:231 (or #E7E7E7)
As for the background color enter R:190 j'ai:190 B:190 (or #BEBEBE)
10. Then select the gradient tool (by pressing j'ai). Your cursor must be a little cross now. Click on the top of the ellipse And drag the cross to the bottom
Tip: if you press Shift while doing this the gradient will be straight
You should now obtain this :
11. Create two more layers, the first one will be called "Left eye", and the second one "Left pupil"
12. Repeat steps 2, 3, 4, 9 and 10 for the left eye and repeat steps 2, 3 and 4 for the left pupil witch you have to fill with black.
13. Create two more layers. We will call them "Right eye" and "Right pupil". Then repeat step 12 on them.
14. Now, the body, the white stain, the eyes and the pupils should be created.
You should have this :
We are now going to make the feet and the beak.
15. To make the feet, do the same as you did on the body the stain (etc ...) but you only have to make one foot on one layer, wich will be called "Left foot", because we will duplicate it when it will be finished.
16. Double click on your foreground color and enter these values :
R:250 j'ai:194 B:0 (Or #FAC200)
Then fill your selection (which should represent the foot) with this color.
17. Create a new layer and name it "Glow effect".
18. Change your Foreground color to :
R:241 j'ai:250 B:0 (Or #F1FA00)
19. Then select the gradient tool and choose the gradient Foreground to Transparent (
20. Drag the cursor from the bottom of your selection (it should be the foot) to the top/middle of it.
21. In photoshop CS2 > Link the "Left foot" and the "Glow effect" layers by Ctrl+clicking on their names, and press Ctrl+E to merge them.
In other Versions > Link the the "Left foot" and the "Glow effect" layers by clicking on the little square between the eye and the thumbnail. A little chain should appear (
In all versions > if the "new" layer isn't called "Left foot", rename it.
22. Duplicate the "Left foot" layer by pressing Ctrl+J, or by Right clicking on it and then clicking on Duplicate layer, then rename the new layer "Right foot". Now you have to move the foot so it is over the model's right foot. Now make the body, the white stain, the eyes and the pupils invisible by clicking on the little eyes next to the thumbnails.
23. Create a new layer, and name it "Temp beak", we will delete in a few steps, make a new elliptical selection like this one :
Fill it with any color, and reduce its opacity to 25% (
24. Select the Polygonal Lasso tool (
Make a selection with a shape like this one :
And press delete
25. Ctrl+Click on "Temp beak" (to have its shape as a selection) and create a new layer and name it "Beak".
26. Set R:250 j'ai:194 B:0 (Or #FAC200) as your foreground color and R:241 j'ai:250 B:0 (Or #F1FA00) as your background color
27. Make a gradient on the "Beak" layer from the right tip to the left one. You can now delete the "Temp beak" layer.
28. We are now going to make the wings.
29. Create a new layer and call it "Left wing". Use the polygonal lasso tool to make a selection like this one and fill it with black.
30. Create a new layer and call it "Right wing", and do the same thing as in the previous step
31. Make every layer become visible exept for the model
The tux's body building up is now finished, if you followed the instructions correctly you should have this :-----------------------Pia
thnx alot Pia!!!


 Bindi
Bindi
 Current Affairs

