Post All Tutorials Here #3 - Page 51

Created

Last reply

Replies

1k

Views

198.4k

Users

182

Likes

2.8k

Frequent Posters

Jenny.. thumbnail
15th Anniversary Thumbnail Stunner Thumbnail + 3
Posted: 13 years ago
thanks prats😃
will post more tomo :D ...now workin' on 'em ;)
-Zeenat- thumbnail
15th Anniversary Thumbnail Rocker Thumbnail + 2
Posted: 13 years ago
jennyyy - i love both! savedd:D thanks so much!
Silhoutte92 thumbnail
15th Anniversary Thumbnail Stunner Thumbnail + 3
Posted: 13 years ago
too good work jenny
waiting for more
...shruti... thumbnail
13th Anniversary Thumbnail Sparkler Thumbnail + 4
Posted: 13 years ago
great PSDs and tutorials

jenny love the textures will use n credit😊

awesome PSD kainat👏
RadiantTreasure thumbnail
16th Anniversary Thumbnail Dazzler Thumbnail + 5
Posted: 13 years ago
Hello Friends..
Time for New tut!(Yep sorry for longgg delay)
My last tut was about merging/combining many pictures using ERASER tool..i have shown many methods..

Now we will go further and use the most used option - FEATHER...what is feather used for?
Simply put feather tool helps us in merging the corners of pictures in smooth way making the corners transparent.
The more the number of feather - more the corner of the picture become transparent until u can't see any picture at all and corners become transparent.This way it becomes easily to merge more pics.

Simple example..see this picture ..

1.


How to use feather?There are many ways..
Open a picture and select the part you want using any tool,then right click and select feather and chose a number...now u can see the picture is selected a little less than which u selected..now u can

-Copy the feathered portion and paste it in a new document (CTRL+C and then CTRL+V in new document) or
-Inverse and delete the part and then move on new document or use the same for making a signature.

Both gives us the same result.

Now apart from feather tool in addition to it a an option called "REFINE EDGE"(CS4 n +)..when u right click a picture-generally feather includes in 'Refine edge' options.As the name suggests u can refine an edge easily using options in it..just try playing around...like smooth is used to smooth the edges,contract/expand to increase or decrease the selection.

2.


If u are using an old / new version of photoshop and can't see these ..then u can see them here -

Select>Modify>Border/Smooth/Expand/Contract /Feather.But what we use is just the feather option mostly,other just help us when we generally use to extract a person or thing from the picture .

3.


And this tut may also helps ya..
http://www.twin-pixels.com/the-refine-edge-tool-quick-photoshop-tutorial/


We can use Feather option in many tool's like - Rectangular/Elliptical Marquee tool,Quick selection/magic wand tool,Pen tool,Lasso/Polygonal/Magnetic Lasso Tool,,in short we can use feather using any tool where we can select a potion of pic and want it's edges merge easily.

In all these tools we can Add,Subtract a portion of picture easily using the Menu on top or SHIFT or ALT buttons or BOTH.Like this..

3.5.


I will try to explain using each one now..

FIRST:

a)Rectangular/Eliptical Marquee tool


4.


a)Now select Rectangular Marquee tool..and select the porton of picture u want..(see in pic the selection).Now rightclick>feather>U will get options>Chose as ur wish...i chose feather=12 and also used someother options u may or may not use them.(It becomes easy when u start using them and playing around for changes)
U can see now the rectangle portion has become a rounded rectangle...that happens when u use feather.

5.


Now got to Edit>Copy(or CTRL + C).Now open a new document>I filled it with blue color(or any pattern/texture) and paste the picture in it..U can see the transparent edges...

6.


Now repeat it with other two pictures..u can use MOVE(V) tool or use Edit>Free Transform(CTRL+T) to resize picture and move it ..


7.


This is the final result.

8.


U can also set Feather firsthand and then select using Rectangular Marquee Tool..when u click on tool ..on the top belowmenu bar u can see the choice...select feather = 12 and then select the picture..both will have same result.One is ur using it later and other u are setting it firsthand and then selecting..that's it.

9.


b)Eliptical Marquee tool:It's similar to previous one..but here its in circular shape we have to select instead of rectanglular.

10.


U can use both rectangular and circular for merging many pics as below..

11.


The extreme right picture is done using Rectangular Marquee Tool where as other three using Eliptical Marquee tool..its

ur wish how u do depending on size and placement of pictures.

SECOND:
Quick Selection tool/Magic wand tool.[The symbol of Quick selection is different in PSCS4 and 5 ..please don't
get confused..i used 4 for some n 5 for some]

Both these are used to select a particular selection easily..especially if the background is of similar color or object is easily identified.Before we further proceed i will tell u that when we select we can add/subtract the selections easily.

12.


Here we don't have Intersect option..here is how we can add/subtract..

13.


a)Quick Selection tool: (This option is in cs4 n above only i think):Here i simply try to select the katrinakaif picture in the white background..the back ground is not of importance(but useful) but the picture..so i tried to select ..now if u have missed on selecting something or selected something u don't want (like the white background in between hand part)..u can select 'subtract' from top and click on white part and it will be unselected..now u will have only the Picture.

14.


Now Right click>feather/refine edge and set the options.Now goto Edit>Copy or CTRL + C and paste in new document.Here i pasted in a colorful background.

15.


This tool is useful to extract things easily.


b)Magic wand tool:It is similar to above tool but in reverse it generally is useful when background is of same color.Now here instead of the object i am selecting the background(add/subtract till ur satisfied).Now when u are done with getting all white part selected Inverse it using Select>Inverse..now only the picture is selected.

16.


Right click> Feather/Refine Edge - set the options of feather and others as per ur wish.Now Edit>Copy or Ctrl + C and paste on new document.I pasted on a Pink/White gradient that matches the picture.

17.


U can use it differently especially using many pictures!

18.


Now copy it and paste on the already made sigge..this is the final result using all tools.

19.


Next tut's in line:

- Lasoo and Pen tools (Feather)
-How to make Banner and tips
-Animation using different resources

Any doubts PM me :)
Good wishes...
Sri:-)

Edited by Xx.Sri.xX - 13 years ago
Jenny.. thumbnail
15th Anniversary Thumbnail Stunner Thumbnail + 3
Posted: 13 years ago
thanks everyone for liking the texture🤗
and sri amazing tuts!!😃
Aamna Am thumbnail
17th Anniversary Thumbnail Dazzler Thumbnail + 2
Posted: 13 years ago
hi can anyone pls tell me that how to blend two gifs together like this one pls pls help me:)


anu93 thumbnail
14th Anniversary Thumbnail Sparkler Thumbnail + 3
Posted: 13 years ago
Thanks a lot Sri di😳...Ur tut. helped me a lot
chand1234 thumbnail
13th Anniversary Thumbnail Sparkler Thumbnail + 2
Posted: 13 years ago
thnxxx a lot fr the tut :D hlpd a lot :)
365702 thumbnail
Posted: 13 years ago

Originally posted by: ..first.rain..

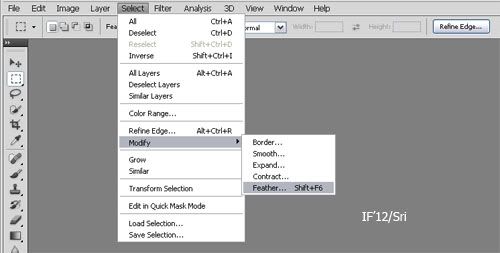
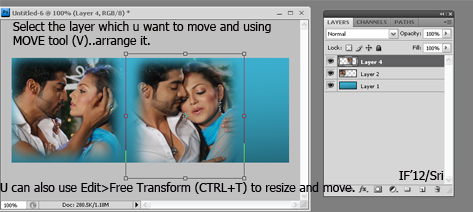
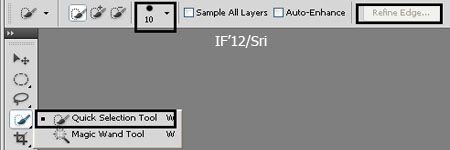
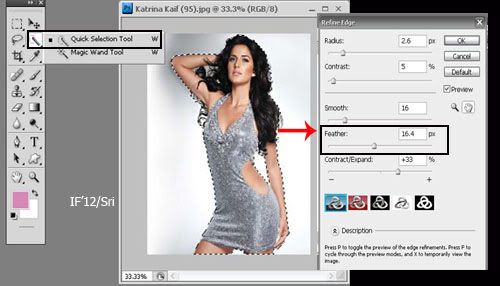
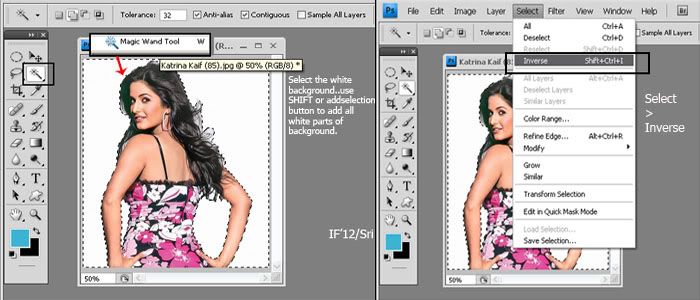
Few of my friends asked me how to stack AVI's. Made a tut for them. Help yourself 😛

Open the Avi's you want to stack.

I'm going to use:

Since they're two, I'm going to open another 100 x 200 one. (the height will depend on number of avi's you are stacking.)

Then, select the first avi press the arrow in animation box on right:


Select:


Go to layers and right click on a layer and select 'select similar layers'


Go back to animation box and select 'copy frames.'


Go to the new image opened. There in the animation box, select 'Paste frames.'


A dialogue box opens and select 'Replace frames' -> ok.


Then it'll look like this:


Do the same with next avi. But a slight difference. Make sure the frames of second avi match the first avi's. Create new frames or delete few if needed. Follow copy/paste steps. This time, select 'Paste over selection' and 'Link added layers'


It will come on top of the first on. Now select any one layer of second avi :

and select 'Select linked layers' by right clicking on it.


Then move it to the desired location.

Final result before saving:


Play the animation once to make sure the frames are working and voila! You're done. Just save it as 'Save for web & devices' and upload.

After upload:

As simple as I can make. If any questions or confused, feel free to pm me. 😳


-Khushi


Simply Awesome and Helpful Tutorial ..😉 Thnxx a Lottt Hun 🤗

Related Topics

Top

Stay Connected with IndiaForums!

Be the first to know about the latest news, updates, and exclusive content.

Add to Home Screen!

Install this web app on your iPhone for the best experience. It's easy, just tap and then "Add to Home Screen".