
Bigg Boss 19 - Daily Discussion Topic - 7th Dec 2025 - Season Finale

ABHIR KA BABY 7.12
TINGA IS OUT 6.12
GK kya karega ? GK tropy le gaya - 🏆
Bigg Boss 19 Finale Updates
FAMILY vs BHAI 8.12

CID episode 101 - Episode Discussion

Sanjay Gupta exposed Deepika and Ranveer’s unreasonable demands
Dhurandhar Continues With Inflated Numbers - BOI
Baby gender prediction poll ✨ + names discussion

Seher Hone Ko Hai Chat club thread #1
Gaurav Khanna Wins BB 19
Agastya Nanda vs. Ahaan Pandey (eye candy)
CID Episode 102 - 7th December
Jitesh Pillai openly disses the ‘sore loser’ Ranveer on Instagram

Santa’s Missing Words! 🎅🏻✨ - Sign Ups Open

oh yeah!...i juz saw it!..loll..but simi u can try the colour balance and channel mixer tingy...its great too!😛
Image filled text
Statutory warning: I spent hours making screen shots and preparing and writing the tut, so do not just go copying the writing claiming the tut as your own.
Done with PSP VX2, will work with lower versions too. as basic features have been used.
Today we will start with creating an image filled picture. There are many tuts available but we will do it really easy. I do it using this way and it ensures the text font, position and size as we want.we are working on the principle that any picture open on the corel desktop appears in the pattern region of the material pallete.
So here we go
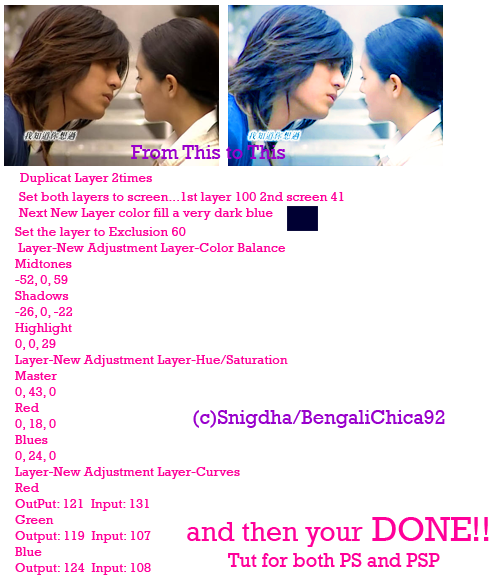
This will be our image. 
These are the two sample image filled text.

Step1:
This will be the image that will fill our text. As we see, this image is too big and to capture the maximum of the image in our text, we crop this image as small as possible. This is a high quality image, so we can do a lot of cropping. I cropped it to 130 by 130.minimize the image

Step2:
Now take a look at the image filled texts once more. We want to see a image filled text-so we must make sure that the image can be understood from behind the text.
Here we find the image is not clear right but check the second
The image/picture is clearly seen and understood.
Hence our trick is to choose a bold, spaced font and at a proper big size like at least 70 so that the picture fill is worth our effort.
Step3:
Next it is time to set our picture fill. Now if you want a border, then click the foreground region and set the border color to whatever color you want. I prefer to keep transparent border, so I clicked transparent. In the background region, click pattern,and select all patterns.

Step4:
Now at the top region of all patterns you will find our background image as one of the pattern. The picture may be rotated by some angle and set to some default scale as found suitable by PSP.so its your turn, to rotate the pic by the angle which you will want and set it to a scale of your choice. I wanted the picture to come out straight just as the ay it was, i.e. just like this
But I want to set the scale to something less than 100%, so that many small thumbnails can come in same region, I love the pair.

Short recap:
We took the background pic we want to fill the text with, then we cropped it , next we went to background patterns and selected the pattern angle and scale of visibility.
Step5:
Click on text tool, its time to act now.
Chose a font, font size, thickness, anti alias checked everything. And write whatever you want too.

Clicks apply to apply the text. Move it wherever you want, increase or decrease its length, width as you want keeping it selected.
Step6:
My initial text filled picture was this
Obviously I am not happy the way my text turned out now, it hardly shows the picture. so I want to change the text font and size. There is a very easy way to do this. Easier, sureshot than the whole process of layer>>edit text stuff.besides it always pays to learn a new technique.
We know texts, preset shapes etc are created as vector object right?
So see the vector layer where you have written your text. It shows something like this, with a plus sign beside the layer.

Step7:
Click on the plus sign, it will show something like this

The initial vector layer shows what is inside, the sub layer containing the text.
Step8:
Now double left click on the text, i.e. the Aaryyan and Bhairavi part. The text selection box with the text selected comes up.

Step9:
Now the text is selected, so you edit the text this time selecting a suitable bold fond. I had chosen gill sans ultra bold and set the font size to 85.( thanks to jenny IB Serenity who taught me how to deliberately select a font size even if it is not present in the drop down box) just type the font size you want, if drop down box shows less.
Step10:
Click apply, I am happy the way the text turned out. It is showing the picture within it clearly at least clearly than before.
Check for yourselves once again
Now your text selection is done, its time to save. Before that again recap what we have done
I. We took the background picture we want to fill the text with
II. We cropped the image to a suitable small size so that the picture can fully be visible and with everything in patterns region
III. Next we chose to set the picture at a desired angle and at a desired scale.
IV. We clicked on text tool and created a text of our choice.
V. After applying the text we are not happy the way the text turned out the picture is hardly shown. So we click on the plus sign of the vector, double click on the text and select it once again and edit the text font, size etc.
It is Time to save the picture now.
if we just click save as and save as a jpeg or gif image format PSP will automatically assign the text a default background color say white. like this

But suppose we want a transparent background? Nothing at the back ground? For this we have to save the image as a gif image. Jpeg image even if we optimize and save it will take a default background
So we will optimize and save our image now.
Step11:
Click on file and click on export image, click gif optimizer.

Step12:
While optimizing the image, click transparency and click what area you want to keep transparent, click existing image or layer transparency ,click okay, follow the steps and save it in any name you want.

And we are done now; hurray our image filled text is there
We have a text we want and the most beloved image we wanted was shown from within the text,
So guys what you waiting for? Open your PSP and start immediately


This is a thread where you all can share everything anything, be it be a Tutorial, PSD, Suggestions, Textures, Animations, etc Try and avoid too...


 Cryptocurrency
 Cricket
 Music Corner


850