


Posted:
How to make a signature Like Chamkilli.
*I had come up with this method on my own and would appreciate if you didn't use this tutorial then make another one saying this is your method.
What you will be needing.
- Photoshop
- A texture to use as the base.
First off open your photoshop. Personally I use cs5, but it really doesn't matter. Now press CTRL+O to browse through your folder. Open up a texture according to your preference to use as a base for your siggy(I recommend one that is black). Or use the one I provided. Here.
Now open up some pictures,again CTRL+O or just google them. Then copy (CTRL+C) and paste (CTRL+V) if you're googling them.
Next let's adjust the gradient tool. If you don't see the tool, you should be seeing the paint tool,right click and choose the gradient tool.
On the top you should see this.
Make sure the settings are like as seen above.
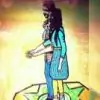
Now go ahead and drag your first picture. Adjust it,resize it. This is optional but if you want you can go to the blending mode layer panel at the left and set it to lighten.
Click on the gradient tool again, then go to your layers panel on the right and click the layer mask. your layer should look like this.
Make sure the layer mask is selected as above. With your gradient tool, place it at the bottom of the first image, left click, hold on and drag upwards.
It will now look like this.
Taking the brush tool start erasing. Make sure it's on 0% hardness. Repeat the steps for the other four images. Your image should look like this.
If you don't like the way your images are blended or doesn't look so good so far, now don't sweat it. We're getting there ;')
Now it's time to color your images. Go to the adjustment panel. So for my psd I have a curve, gradient map, selective coloring, brightness/contrast, color balance, and another gradient map. If you want my psd. Pm me.
So it should look like this now.
We are still not done. 😆 Now click new adjustment layer. click solid color
The color code is #322929. Okay so set this to lighten as well. Where it says opacity and fill in the layer panel, adjust the fill to 42%. This makes the blending a bit more subtle. Now we are going to go ahead and add a bokeh texture. Here Set this to lighten as well. Adjust the texture to your siggy.
So the bokeh is covering some of the images' faces, and we don't want that so pick up the eraser tool and on the top it will say opacity, set it to 10-15% Start erasing over the places where it's covering the image, ever so lightly erase.
Time to add text. Add your own or if you are feeling lazy like me you can use a lyrical texture. Here. You can leave it like this or you can add a action, sharpen it or whatever to make it look more hd. I won't be sharing the action I'm using.
So layer>>flatten image. Then open up your action panel, click on your action, then press play.
So layer>>flatten image. Then open up your action panel, click on your action, then press play.
Final result.
I sorta like this effect too, can't choose between the two 😛
^^ If you want a tutorial on how to do this effect. Let me know.
And we are finally done. I'll get all the awards for giving such a long and detailed tutorial 😎


 Kyunki Saas Bhi Kabhi Bahu Thi 2
 Geet - Hui Sabse Parayee
 Cricket

