You can download this very easily and for free by clicking here: , then clicking on the blue "download now" button.
Once you've downloaded Windows Movie
Maker to your computer, just follow the instructions for installation
and you'll be ready to start making your Movies!
Section I: The Main Screen
This is the layout from WMM. The author put letter for explanation
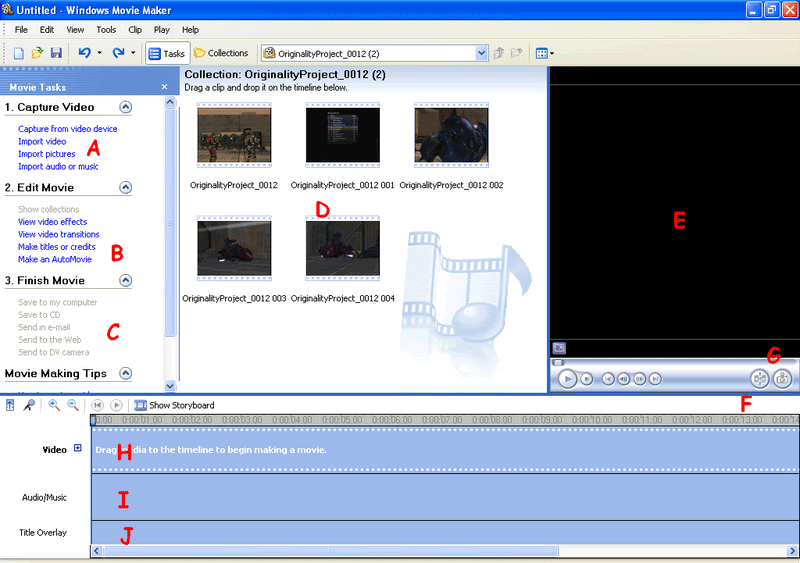
A) Capture Video
This
section of the program allows you to get everything you want so you can
edit, including pictures, music, and of course video.
-Capture from video device- This
is the first button you click if you're recording from a capture card
or other capturing device you may have. That process will be explained
later.
-Import video- This is used
for browsing through your computer for video files that you would like
to use to edit. By default, you start in your "My Videos" folder.
-Import pictures- This is
used for browsing for pictures that you like to insert into your movie.
By default, you start in your "My Pictures" folder.
-Import audio or music- This
is used for browsing for audio files in your computer - whether they be
songs or otherwise that you would like to use. By default, you start in
your "My Music" folder.
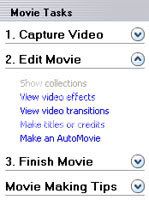
B) Edit Movie
This
section allows you to add titles, effects, and transitions to your
movie and individual clips. I won't go effects and transitions, but
later I'll show you how to do titles.
C) Finish Movie
In this area, you can render your movie with ease. That'll be covered later.
D) Collections
Here
is your main area. It's kind of like a databank, where all of your
imported files appear. This is also where your captured video appears
when you finish capturing. Often times, video files that are in this
area automatically cut themselves up into clips. I'll explain how to
solve this later on.
Audio and picture files, however, stay intact, and can be easily moved into place.
E) The Video Screen
This
screen is where you get a preview of your edited video so far. Down in
the lower left are the basic Play, Pause, Stop, and Frame
Forward/Backward buttons. The Frame buttons allow you to advance or
back a single frame in the video.
F) Split Button
This
tool is a very valuable asset to the experienced editor. As you edit
videos, you will notice a blue bar over where you are paused or where
in the video you are playing. It will pass over your video, audio, and
titles. When paused, if you click the Split Button, whatever is
selected be that a video, audio, or title, only one can be selected at
a time that clip will split into two parts. This is especially useful
for trimming the beginning and ends of clips in which often nothing is
happening (right before or when you say "action" if you're filming
actors).
G) Screenshot Button
This
button takes a screenshot of whatever is on the screen at the time you
click the button. You can save it to your computer, and then the
screenshot will also show up in your Collections for using in the film
if you wish. Here's an example of a screenshot:
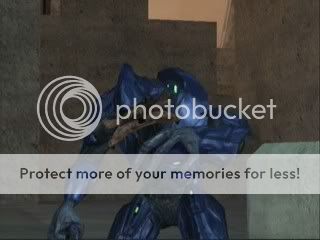
The famed gangster Elite seen here rapping.
H) Video Track
Here
is where your video is inserted into the timeline. Once it has been
inserted by right clicking or dragging, you can manipulate it in
several ways that will be explained later on. A video clip can be in
the Video Track or in Collections and be cut with the Split Button.
I) Audio Track
This
is where your audio and music clips are inserted into your movie. Once
here, you can right click on them to adjust their volume settings. They
can also be split with the Split Button.
J) Title Track
Here, all of the titles you create are added. Later on, you'll see how to edit them in several ways.
Other important buttons include the
normal Save, Open, and New File options. However, for editing purposes,
some useful buttons can be found to the top left of the Timeline area.
They include Audio Balance, Views, and Zoom.
-Audio Balance- You can
usually do this manually, however this feature allows you to adjust the
balance between the sound from the video, and the audio or music. It's
best to leave the video volume at normal level, so instead you can just
right click on an audio clip to adjust its volume.
-Views- The Timeline view is
the only view for which this tutorial is intended and the only view for
which WMM is excellent in editing. The Storyline view is the other
option.
-Zoom- Use this option for
fine tune editing, such as titles and audio. Sometimes, when you want
to Split at a certain frame, you have to use zoom to get smaller frames.
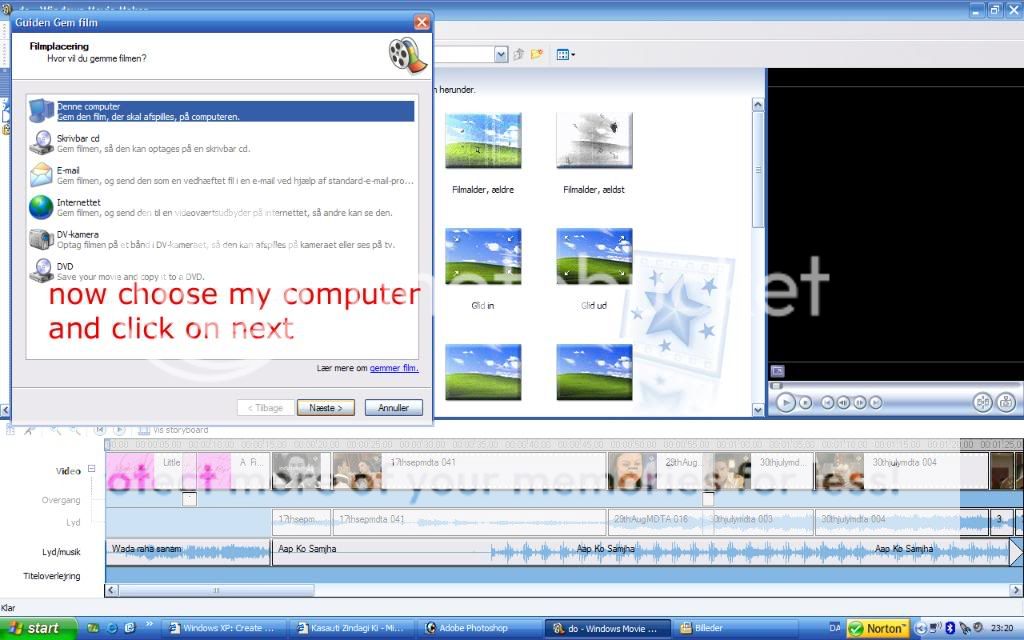
Section II: Capturing Video
I'm assuming most of the people who
are going to see this are video game moviemakers. Throughout Section
II, capturing will be explained by picture references. By clicking
'Capture from video device', you will get the following box. Below the
picture are references to the key parts of the first step.
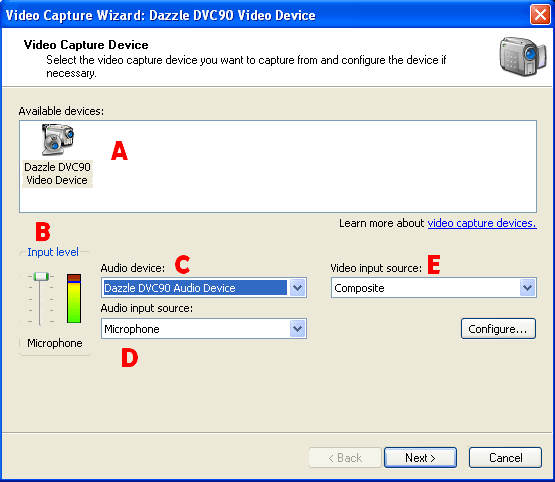
A) As you can see, I have a Dazzle 90
capture card. In this area, all of the available capturing devices are
displayed. Make sure you choose your capture card or desired video
device. Other devices may include a camcorder or a webcam if they are
connected to your computer.
B) For maximum audio quality and
volume, always have the Input Level setting to its highest level.
Always make sure you test your audio input device; you can see if it's
working by looking at the meter next to the slide button. You can test
it before filming by simply turning on your Xbox or blowing into a
microphone; whatever you're capturing.
C) The audio device is where your
audio will be captured from. For me, it's my capture card. Others might
include your computer microphone.
D) If you select your audio device, it
should automatically choose an audio input source. To make sure the
source is the right one, look at the audio input meter on the left, and
see if its level corresponds with the volume of whatever you're
capturing, such as what your Xbox is showing on the TV.
E) Video input source decides what
cables it's getting video from. If you have an S-video cable set up to
where you're capturing from, you want S-video to be selected. Composite
is the default video input source.
Once you are done, click Next, and you will be taken to this second screen.
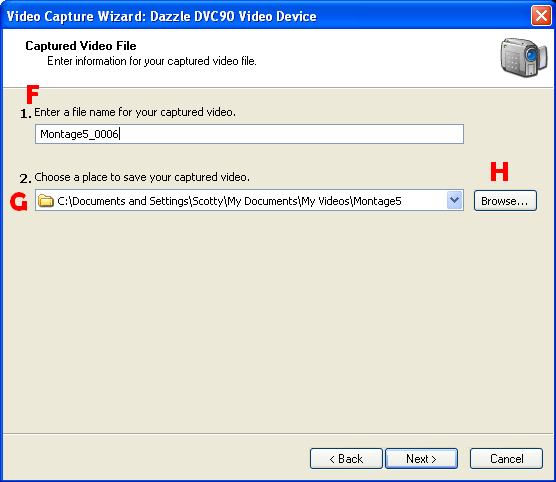
F) By default, the file name for the
video you are about to capture is untitled. However, if you have a
project open, the file name may name itself after the project title. It
may also automatically name itself after the folder that you save it in.
G) This is where you choose a location
(folder) to save your captured video file. You can choose almost any
folder that is on your computer, but by default it saves to your 'My
Videos' folder.
H) By browsing, you can find any
folder on your computer to store your captured video file, or create a
new one if it's a new project.
After you've determined what your video file name will be and where it will be saved, click next to go the following third step.
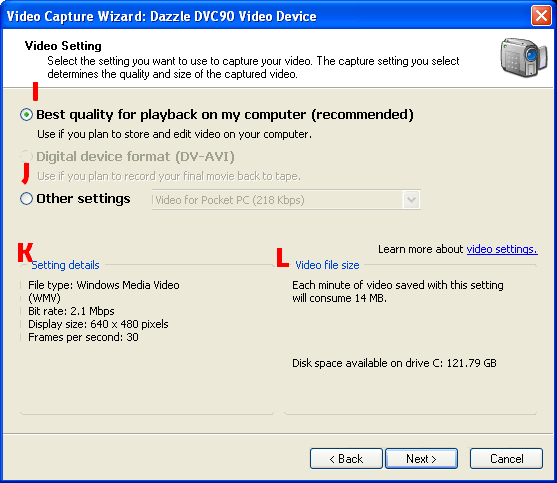
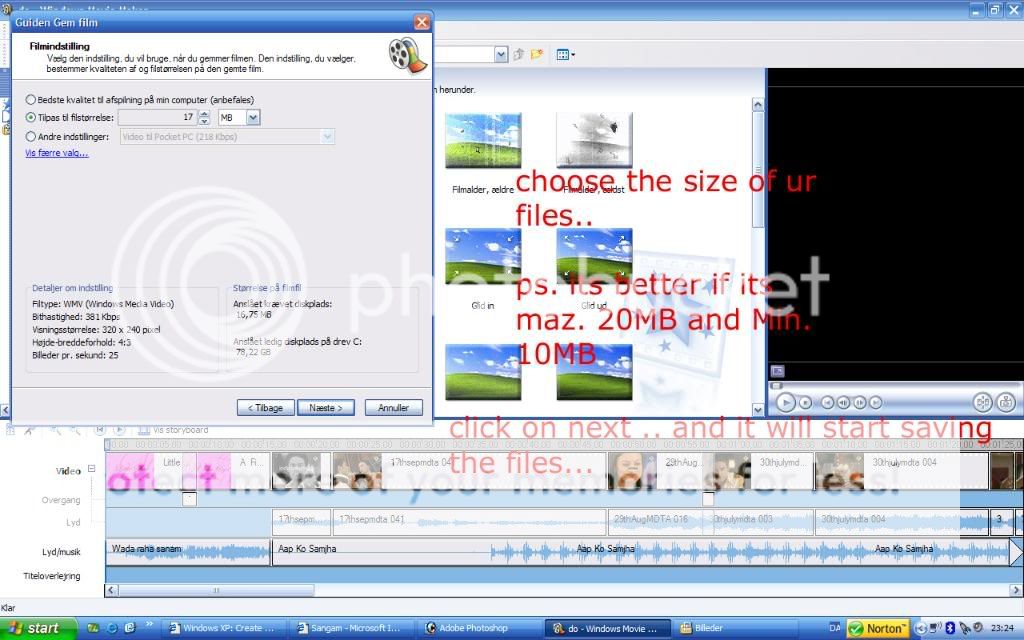
I) At the highest setting for
playback, one minute of video is a total of 14MB, or 14 megabytes.
That's a lot! Don't worry, I'll tell you later had to compress your
video. This setting is the default, and I would also recommend it
unless you don't think your computer is fit enough to handle large
video sizes.
J) In the Other Settings drop down
list, there are numerous options for file sizes and what they are fit
for. Take a look and change your video settings only if you're sure you
know what you need.
K) This area tells you how your video
settings are affecting your video. Because I'm at a high setting, each
second of video will be 2.1MB, and the video will be recorded in the
standard WMV format, which is recommended. It also gives me the best
viewing size and FPS..
L) This is a short summary telling you
how big each minute of video will be, and how much space you have on
your computer. If your harddrive has less than 20GB, you might want to
record at a lower setting.
Finally, the last step can be found
below. It is advisable to only get to this step when you are ready, as
keeping this step open for a long time could cause the program to
freeze.

M) These two buttons are the Start and
Stop Capture buttons. Once you are ready, you click the Start Capture
button to begin recording video to your computer. Once you are done,
click Stop Capture, and it will stop recording.
N) This tells you how long you have
captured, and how big the video file will be if you decide to finish.
It is recommended that you only record one clip of video at a time, or
around 14MB.
O) These are options not normally
used, but are there if you want to use them. Create clips when wizard
finishes means the program will cut your video file into separate clips
when you are done filming. This usually gets a little hectic when you
try to edit. Muting your speakers is simply for if you are recording
from a computer microphone or other computer device, because your
speakers may produce sound while you're recording and may be uninvitely
recorded. Capture time limit will cause your recording to stop at a
preset time if you select it.
P) This is a small video screen where you will see a preview if you are recording video.
Q) The Finish button is for when you
are done filming a movie file. Once again, this is recommended after
you have one minute of filming in a video file. Click finish, and you
will be able to immediately edit that clip if you wish.
Section III: Basic Editing
Throughout this section, I'll take you
through the editing process. I'll explain the basic process, and
hopefully you'll be able to expand your abilities as you edit
more.
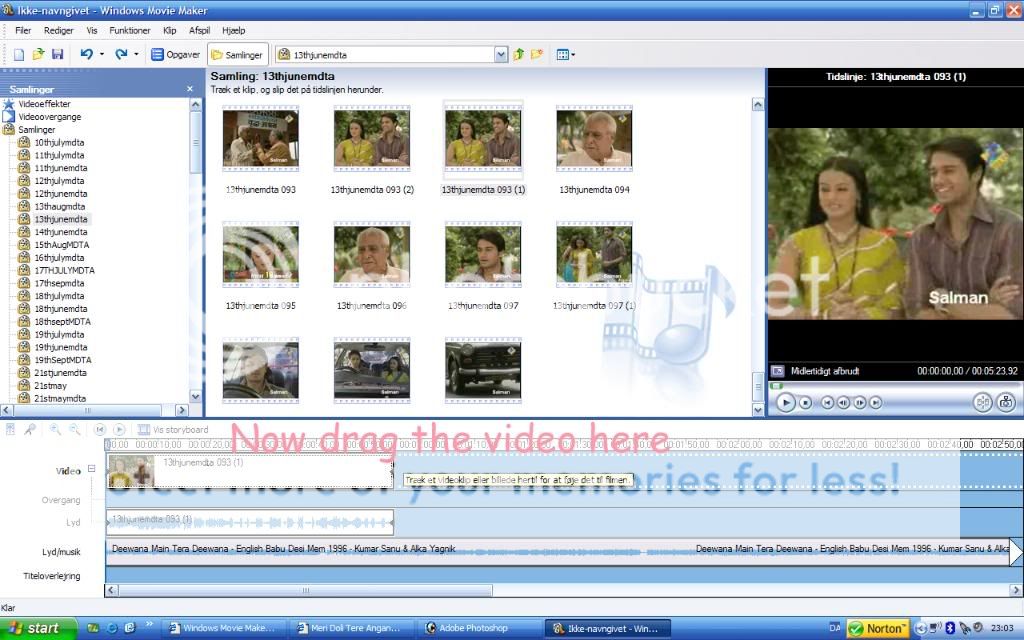
Selecting and Dragging
To get your movie going, you need
media within your timeline. The best method of doing this is selecting
and dragging. To do this, select a media piece in the Collections area
that you want to add to the Timeline. While holding down the mouse
button, move the mouse cursor to the spot on the Timeline that you want
that clip to be placed, and release the mouse.
On the video track, everything
automatically shifts to the left. On the audio and title tracks,
however, you can move around clips. To do this, select the media and
drag it left or right along the track, and release when you have it
where you want it. Below is a beginner's course on editing.
Let's say we just filmed this clip that is sitting in Collections:
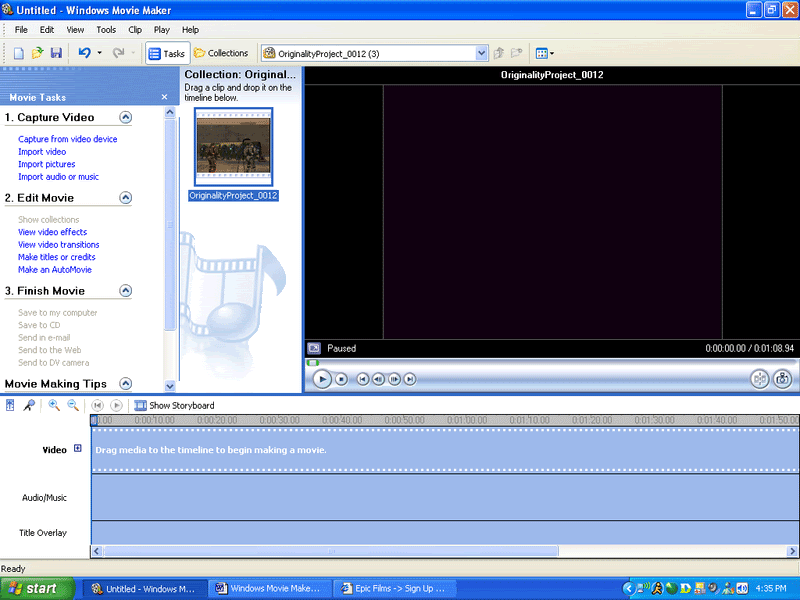
Adding to the Timeline
Now, I'm going to pretend this is the
beginning of a movie. To edit it nicely, I should first have the clip
in the timeline. You can simply right click and add it, or you can drag
the clip into the timeline. Now I have this:
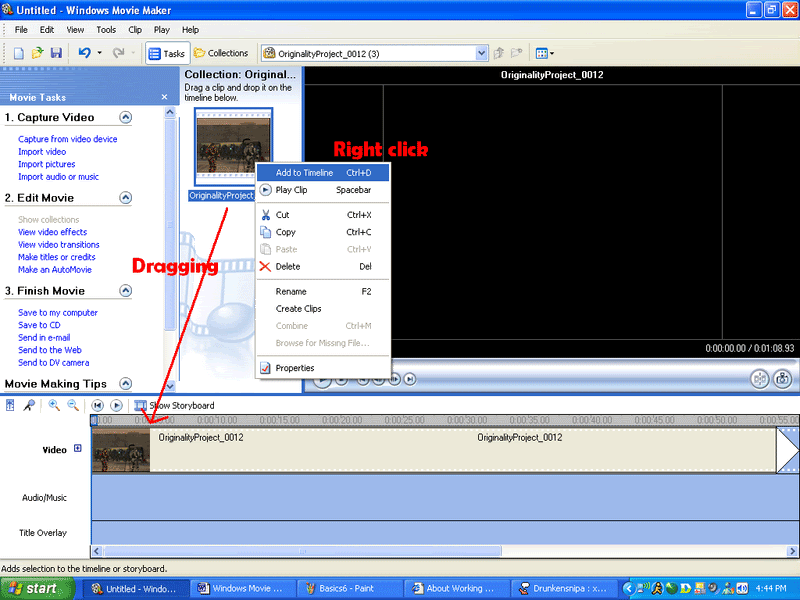
Splitting
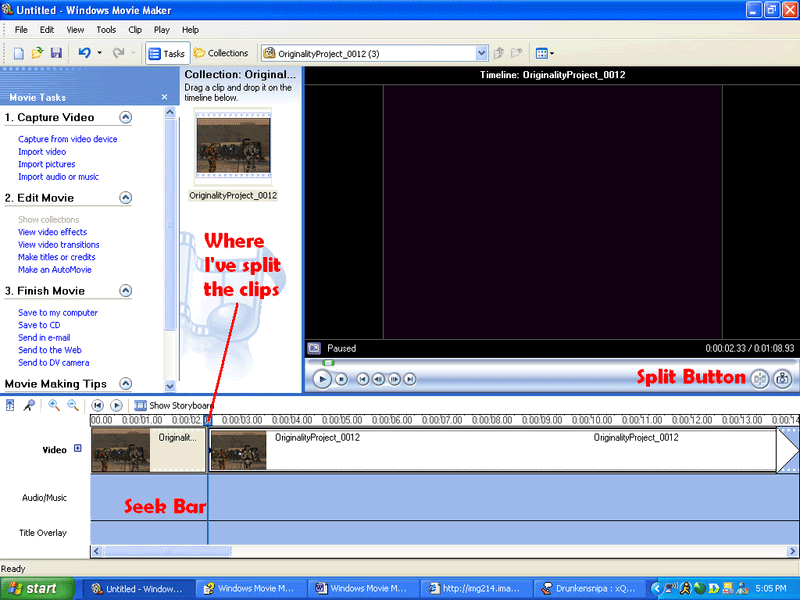
I want the action to be going as the
movie starts, instead of the scene standing still. This happened
because I started recording a little bit before the action started.
I've placed the Seek Bar (Blue bar) where I want to start the film, and
by using the Split Button, I can now cut the whole clip into two. There
is a little clip in the beginning that I don't want, and now the rest
of the big clip. I've zoomed in to more accurately edit and use the
Split Button:
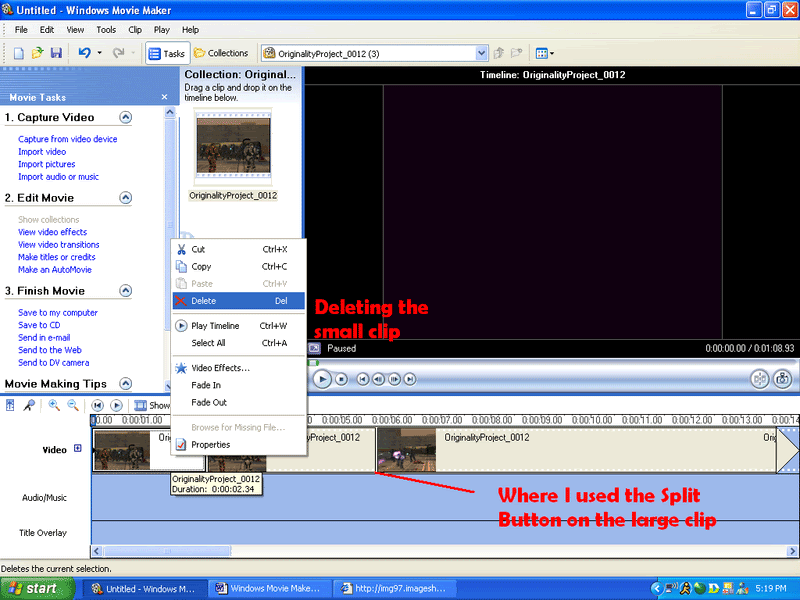
Now, I'm simply going to right click
on the small clip to delete it. Now, I'm going to let the movie play to
where I want it to stop. There, I will simply use the Split Button
again to separate the two pieces of film.
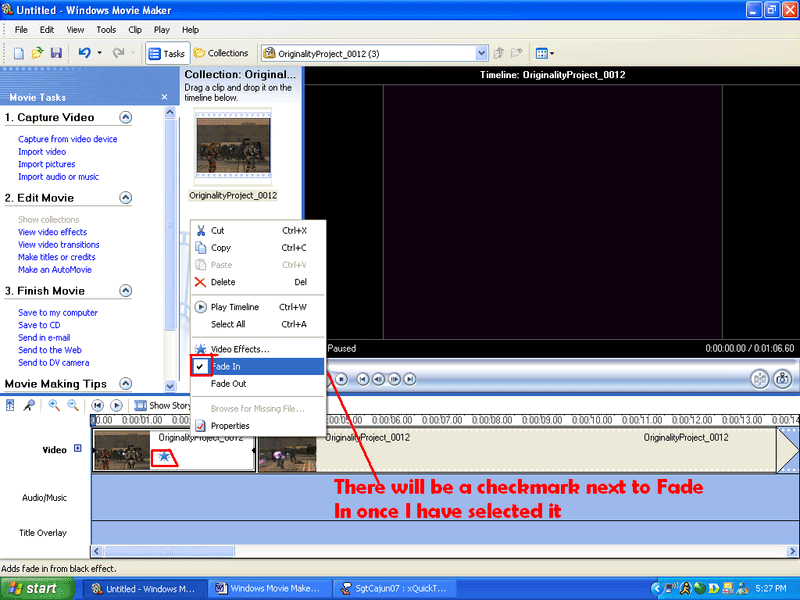
Fading
To make the beginning of the film look
nice, I will right click on the first clip and click Fade In. This will
cause a black fading transition at the beginning of the clip. If I
wanted to, the Fade Out transition can also be used for a black fade
transition at the end of the clip. Fading is good to use between
scenes. If you use Fade Out on a clip that is not the last in the
movie, make sure the next clip has Fade In. Note the blue star on the
clip:
Getting Rid of Unwanted Clips/Footage
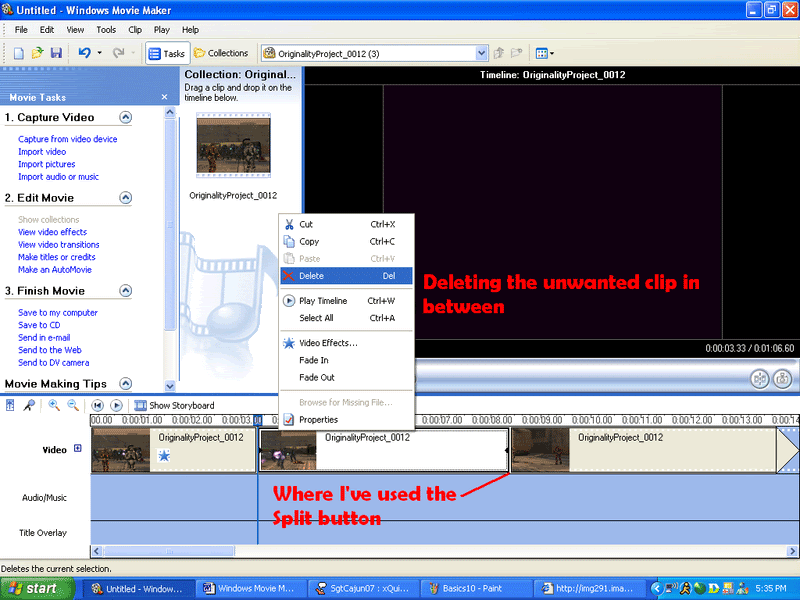
Okay, so I've got the first clip done.
Now I can move on to the second. I cut the large clip because my
character died, so I want to stop just before that to get maximum
footage. I've cut where I wanted to, so now I'm going to play the
movie, then pause and use the Split Button where I want to start again.
Imagine it like a piece of tape. It's like cutting off pieces and
throwing them away. There is now a useless piece in the middle, and I
can use the Delete feature to get rid of it:
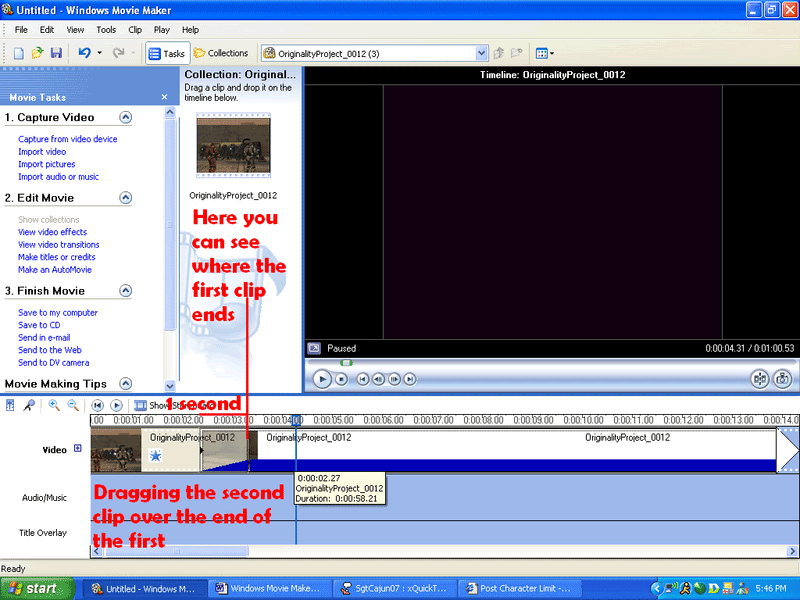
Melting
There's a neat effect that looks good
in almost any movie, and it's known as melting clips. Pretend two clips
are right next to each other. If the two clips are melted, clip 2
starts before clip 1 ends. In the video track, they look like they are
overlapping. At the end of clip 1, it starts to fade out at the same
time that clip 2 fades in, causing the viewer to see both clips at once
for a short time.
To do this, simply grab the second
clip that is going to be used in the melting effect. Then, drag the
cursor with the second clip over the first clip, (the clip before it).
An angled blue line will appear. The farther you drag, the longer the
effect will occur, and the narrower the line will appear. The best
melting effect is second to 1 second.
The vertical red line is even with
where the first clip ends. If you look at the tip of the blue line,
you'll see where the second clip starts. The horizontal red line
indicates a length of about 1 second for the transition/effect to take
place. This is what it looks like when you're dragging it:
Finished Video Editing
Now, I'll edit the rest of the video using splitting, deleting, fading, and melting. Make sure you save often! This is the result (zoomed out now so the whole movie is seen:
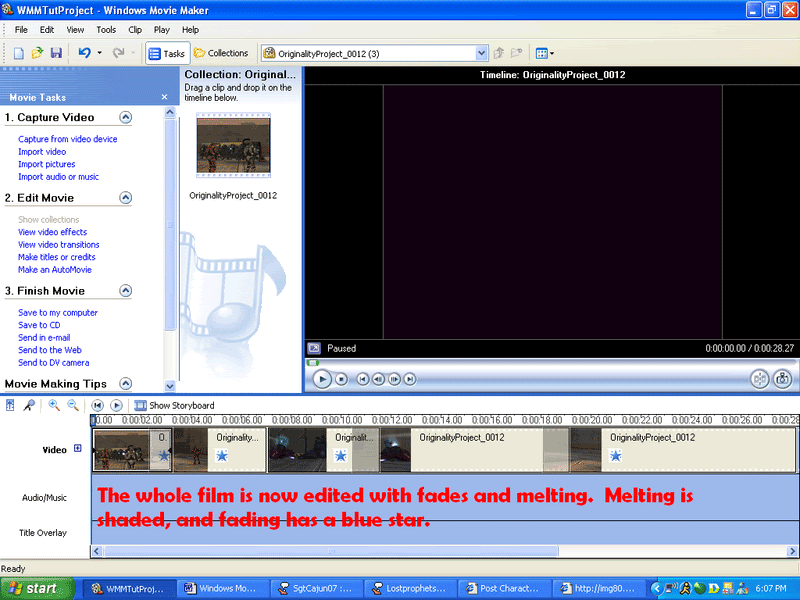
Okay, the video editing is complete!
In the future, you'll unlock the secrets of Window Movie Maker's more
interesting effects and editing methods. You just have to explore and
try out new things for yourself, and you'll get the hang of it. To add
any of some dazzling and great video effects, right click on a clip and
select 'Video Effects'. Effects go from slow motion, to film aging, to
black and white!
For more transitions, click 'View
video transitions' on the left side of the program to choose from
several dozen different and awesome transitions.
However, just the video doesn't make a good movie. Adding titles and audio is essential!
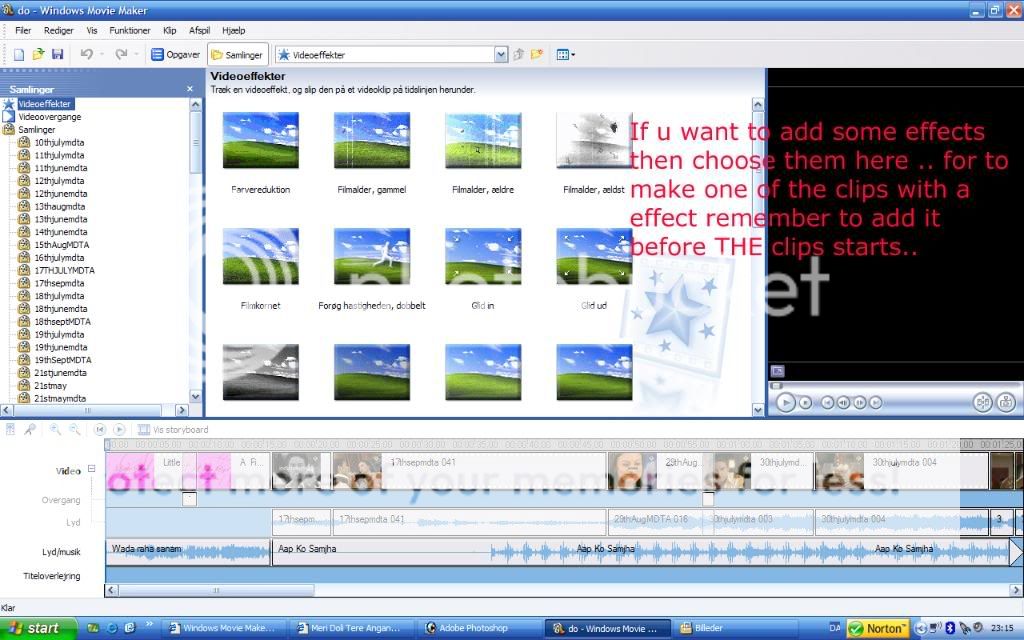
Adding effects with Windows Movie Maker
Once you have your clips in the
sequence you want, you can start adding effects and transitions. In
order to do this, you must be in "storyboard" mode. To make sure you're
in this mode, look near the bottom left of your screen and you'll see
this:

1) In the "Movie Tasks" column on the
left hand side of your screen, under Edit Movie, click on the blue
"View video effects" link.
2) This will now show a wide choice of
effects in the middle pane. Some examples of effects are Blur,
Brighten, Darken, Fade In, Fade Out, different types of zooms and even
a Hue effect.
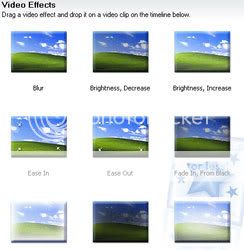
Tip: You can preview any effect you'd like by clicking on the effect and then pressing the "play" button on the preview player.
3) Click on the effect you'd like and
"drag and drop" your selected effect onto the clip you want it to
appear on. Your video clip will now have the effect added to it.
– Repeat the steps above for each video clip you'd like to apply an effect to.
Adding transitions with Windows Movie Maker
1)
In the "Movie Tasks" column on the left hand side of your screen, under
Edit Movie, click on the blue "View video transitions" link.
2) This will now show a wide choice of
transitions in the middle pane. Some examples of transitions include
bars, a heart, circles, checkerboard, dissolve, fade, flip (my personal
favorite), mirror, grayscale, sepia, slow down (half speed), or speed
up (double speed - fun for driving videos)
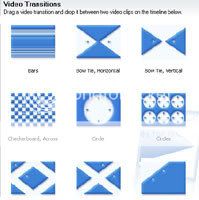
Tip: You can preview any
transition you'd like by clicking on the transition and then clicking
the "play" button on the preview player.
3) Click on the transition you'd like
and "drag and drop" it between the two clips you'd like to transition.
You now have successfully added a transition between two clips.
– Repeat the steps above for each transition you'd like to apply between video clips.


 | Settings|


comment:
p_commentcount