


Posted:
text tool called Color Change
It animates a list of colors that you pick.
1. Open the Draw -> Text Tool or the T in the toolbar on the left.
2. Enter your text as normal.
3. Then just list the colors you want in the Color option. You can pick the "Color Change" in animation option.

(notice you will NOT get a preview of your colors. sorry)
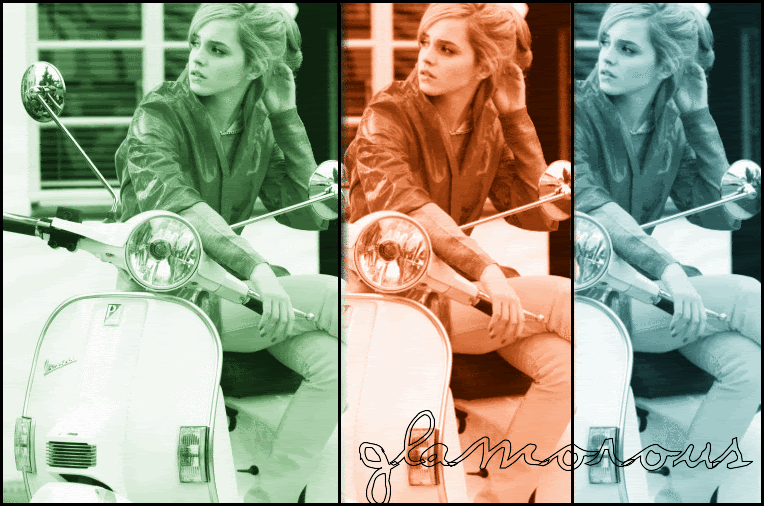
4. Here is what you'll get after your click "Apply Text"

Pretty easy, huh? I'm hoping to support lists of colors in other areas of the site as well.
It animates a list of colors that you pick.
1. Open the Draw -> Text Tool or the T in the toolbar on the left.
2. Enter your text as normal.
3. Then just list the colors you want in the Color option. You can pick the "Color Change" in animation option.
(notice you will NOT get a preview of your colors. sorry)
4. Here is what you'll get after your click "Apply Text"
Pretty easy, huh? I'm hoping to support lists of colors in other areas of the site as well.
| another tut |
Animated Wink / Blink
What to make someone wink at you? Check this out. I'll show you how to do it in a few steps.
This tutorial is updated with the new advanced animation editing tools. now even easier
For the animation, you need two frames, the original, and the wink.
1. Upload the image to work with, I used a sample image of a cheeta.
2. Animation -> Edit Animation Settings
(choose EDIT on the single animation frame)

3. Draw -> Cosmetic Surgery
We'll make the eye wink by using the extreme reduction in the size of the eye.

Select "Reduce in Size Extreme" from the options list.
Select an area larger than just the eye, this will move the muscles around the eye to make it look like a real wink.
Click "do operation". Undo and try again if you don't like it.
(You could make both eyes close for a BLINKING effect instead of WINKING)
It should come out something like this:

(You could actually do other effects here as well to create all sorts of other animations)
4. Now we put together the animation by going back to
Animation -> Edit Animation Settings
You can choose the speed of the animation, I slowed mine down a little.

click (Save Change) to create the animation
It should turn out something like:

5. You can also speed up the winking frame by using "frame timing"
Animation -> Frame Timing
I used 100 and 20 for the two frames. You can change this if you want for a faster wink /blink
What to make someone wink at you? Check this out. I'll show you how to do it in a few steps.
This tutorial is updated with the new advanced animation editing tools. now even easier
For the animation, you need two frames, the original, and the wink.
1. Upload the image to work with, I used a sample image of a cheeta.
2. Animation -> Edit Animation Settings
(choose EDIT on the single animation frame)
3. Draw -> Cosmetic Surgery
We'll make the eye wink by using the extreme reduction in the size of the eye.
Select "Reduce in Size Extreme" from the options list.
Select an area larger than just the eye, this will move the muscles around the eye to make it look like a real wink.
Click "do operation". Undo and try again if you don't like it.
(You could make both eyes close for a BLINKING effect instead of WINKING)
It should come out something like this:
(You could actually do other effects here as well to create all sorts of other animations)
4. Now we put together the animation by going back to
Animation -> Edit Animation Settings
You can choose the speed of the animation, I slowed mine down a little.
click (Save Change) to create the animation
It should turn out something like:
5. You can also speed up the winking frame by using "frame timing"
Animation -> Frame Timing
I used 100 and 20 for the two frames. You can change this if you want for a faster wink /blink
n this tutorial, I show you how to do a black and white image with colored eyes. I also add animation steps to cycle through colors.
An easier, non animated version of this tutorial is available here: viewtopic.php?f=5&t=4063
1. Upload an image to work with. I selected a sample image of an owl.
2. Adjust -> Black and White

3. Animation -> Edit Animation Settings
(choose EDIT on the single animation frame)

4. Select the Scissors tool from the tools menu.

5. Draw around the using either a circle or a freehand if the eye is not round.
- Select Color Tint
- Choose a color and apply the tint

6. Repeat STEP 5 for the other eye. Your image should now look like this:

7. To do another color set of eyes,
REPEAT STEPS 3,4,5,6 but use a different color
8. Reassemble the animation by returning to :
Animation -> Edit Animation Settings
delete the first frame that has no eye coloring:

8. After saving, your image should look like this:

__________________
biggest fan of SELENA GOMEZ >3 WOLD DIE TO MEET HER:)
An easier, non animated version of this tutorial is available here: viewtopic.php?f=5&t=4063
1. Upload an image to work with. I selected a sample image of an owl.
2. Adjust -> Black and White
3. Animation -> Edit Animation Settings
(choose EDIT on the single animation frame)
4. Select the Scissors tool from the tools menu.
5. Draw around the using either a circle or a freehand if the eye is not round.
- Select Color Tint
- Choose a color and apply the tint
6. Repeat STEP 5 for the other eye. Your image should now look like this:
7. To do another color set of eyes,
REPEAT STEPS 3,4,5,6 but use a different color
8. Reassemble the animation by returning to :
Animation -> Edit Animation Settings
delete the first frame that has no eye coloring:
8. After saving, your image should look like this:
__________________
biggest fan of SELENA GOMEZ >3 WOLD DIE TO MEET HER:)
Sel_Gomez  Slambook Testimonial
Groupbie
Slambook Testimonial Joined: 25 October 2012
Posts: 56
Direct Link Posted: 06 November 2012 at 12:21pm | IP Logged
1. Go to Draw > Text Tool.
2. Where it says "Color" type in "Transparent".
3. Where it says "Border Color" type in whatever color you want. Then, apply the text.
That's it, simple, huh?
Example Result:
2. Where it says "Color" type in "Transparent".
3. Where it says "Border Color" type in whatever color you want. Then, apply the text.
That's it, simple, huh?
Example Result:
WED SITE LunaPic.com


 Kyunki Saas Bhi Kabhi Bahu Thi 2


850