
Kyunki Saas Bhi Kabhi Bahu Thi 2: EDT # 6

BANTWARA CUT 21.12

Dhruv Rathee to bring another 100cr for Dhurandhar
New Entrant - Swati Sharma of YHC fame
Meethichuri Bani Vamp
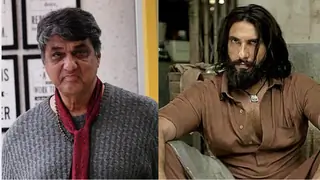
“Akshaye Khanna overshadowed Ranveer in Dhurandar”
The Post leap episodes have been very disappointing

🏏India U19 vs Pakistan U19, Final ACC Men's U19 Asia Cup 2025🏏
Kangana Ranaut Praises Dhurandhar
KRISH AT THREAT 22.12
🏏India Women vs Sri Lanka Women, 1st T20I S L W tour of India 2025🏏
Originally posted by: laughingpearls
^Mariam, please add CuteStrawberry too. And letter 'R' is not typed in the word 'Establisher' Please check. Rest all is good. :-)
- I am using these three pics 1, 2, 3
- I also choose to work with a texture in the background. You can choose to work with a background texture or eliminate it if you don't wish to use it. THIS is the one I used.
- You can also copy and paste it using CTRL-C & V.
- Also to make the picture small you can press CTRL-T and will get a cursor to make it short and don't forget to click on Maintain Aspect Ratio which is on the top between width and height.
This is how mine looks:
Like this:
- Then with the Global Reinforcement play with Smooth and Feather to make the edges smoother...I don't usually play with the edges so won't recommend you for it, but if you want you can play around with it.- Like this:
Without text.
With Text
1. File...save or save as
2. Go to format and change PSD to JPEG and Click save and then OK.
3. Change you Image Option to Maximum 12 (this is how I have mine setup, yours might be different)
4. Format option should be check as Baseline Standard. (this is how I have mine setup, yours might be different)


After being disappointed at Abhinav reception, never thought we'd get to see this... Thanks to Debina for posting the original photo. It's good...


 Anupamaa
 CID
CID


4