//SplashDesigns\\ - Tutorials - Tutorial #2 at Page #1

Posted: 6 years ago

I thought about it. Thought about it for a very long time and then decided that graphic designing tutorials and my graphic shop together won't work.πŸ˜†It will be a mess so I have opened this separate thread. Here I will be posting tutorials on graphic designing ranging from the most basic ones to the most complex ones😳

I make a variety of graphics for IF, Wattpad and other forums as well. Following is the list of graphics that I can make:

1. Simple Image Manipulation (Just one pic edit)

2. Non-animated Banners/Siggies

3. Animated Banners/Siggies

4. Non-Animated Icons & Icon Packs

5. Animated Icons & Icon Packs

6. Fanfiction Banners

7. Minimal, Simple and Manip Book Covers

8. Minimal, Simple and manip Book Jackets

9. Non-Animated Picspams

10. Animated Picspams

11. Typography

12. Simple HTML Threads (Wattpad)

13. Layout Threads (Wattpad)

14. Pure Image Threads (Wattpad)

15. Wallpapers

16. FB Graphics (Cover and DP)

17. Story/Book/Fanfictions Ads (Wattpad)

18. Character Layouts (Character Description Siggies)

19. Non-Animated Tags

20. Animate Tags

21. GIF Tags

22. Slideshow Siggies

23. Others (Those who I am not able to remember right nowπŸ˜†)

I am gonna tell you how to make the easiest graphics firstly and then slowly move towards the complex ones. I will teach you the same way I learnt how to do this stuff.😳 I will also share with you the videos and tutorials that helped me and I hope those things and my tutorials will be able to help you people.

Following is the index

Edited by dmegha - 6 years ago

Created

Last reply

Replies

15

Views

2084

Users

11

Likes

97

Frequent Posters

Posted: 6 years ago
INDEX

Intro :: Page #1 :: Post #1

Important Links :: Page #1 :: Post #4

Tutorial #1 :: Let's Start, Let's Play!! ::  Photoscape :: Page #1 :: Post #5

Tutorial #2 :: Introduction to PS's Cousin :: GIMP :: Page #1 :: Post #6

Tutorial #3 :: The "T" of Graphic Designing :: Typography :: Page :: Post

Tutorial #4 :: One Image Army :: One Pic Edit :: Page :: Post

Tutorial #5 :: Come Let's Twist :: One Pic Picspam :: Page :: Post

Tutorial #6 :: The Art of Mix & Match :: Merging Two Images :: Page :: Post

Tutorial #7 :: A Game of Tag :: Create A Simple Tag :: Page :: Post

Tutorial #8 :: I See You :: Create A PNG Cut-Out :: Page :: Post

Tutorial #9 :: The More The Better :: Picspam - One Level Up :: Page :: Post

...
...
...
...
Edited by dmegha - 6 years ago
Posted: 6 years ago
INDEX #2

res for index in case previous post gets filled up completely
Edited by dmegha - 6 years ago
Posted: 6 years ago
Important Links


Splash Designs Tutorials :: My Blog (here I will be posting wattpad graphic tutorials as well which I am not gonna post here at this thread)


Megzie Tutorials :: Imgur Albums (to avoid making the pages too heavy to load, I will be posting step by step images for my tutorials here)


Tutorials Q & A :: Post your queries (about the tutorials or anything you wanna know about graphic designing etc)

FB Page

...


...


...


...
Edited by dmegha - 6 years ago
Posted: 6 years ago

Hey people! I am here with my first tutorial on graphic designing for beginners. I am gonna start with some fun (yet unnecessary and I am not sure if that's gonna be any fun πŸ˜†) talk about the stuff I am going to tell you about.

I joined IF in September, 2012. That time my main focus was writing fan fictions and reading written updates of television shows that I liked. Me being an ArSh fan started looking for their fanfictions and that's how I came to know about Sameera (sameera_12, she's a FF Graphicer). She always used these banners for every fiction of hers and every chapter of that fiction. She not only inspired me to write but also inspired me to design. Earlier designing to me was just make photographs look beautiful πŸ˜† but it was months after joining IF that I decided to give equal preference to graphic designing. 

You know the first thing I did? I started using online image editors but it don't always give you the result you want, there is something amiss most of the times. So I googled some software's that I can download and the first thing that came up was Photoscape.

If graphic designing is all about magic then Photoscape is your Hogwarts letter πŸ€£ You can download it for free from here >> Click Here

As I said that I will start from the very basics that's why I am gonna start with giving you an intro about Photoscape and tell you about its features and some more stuff.

Photoscape offers a variety of features and tools for graphic designing. You can edit pictures, make non animated picspams, take screen shots, make GIFs and a few other things as well. I have described the basics about the features that Photoscape offers you. (Open in a new tab to enlarge)


Now let's get to what you have to doπŸ˜‰ What? You thought I was going to start telling you how to make stuff in the first tutorial? πŸ˜† Nah! That will start from the second one, for now you will have a simple task to do.  Following are the steps:

Step 1 > Download Photoscape

Step 2 > Explore it on your own. Try doing whatever you want, use all those tool as you like.

Step 3 > Create a mess out of it πŸ˜† No, seriously. Pick an image of your choice and apply whatever filter you want and make a mess.

Now, is that ^^ hard? Nahi na! πŸ˜ƒ You see it is a fact that you learn it better by exploring it on your own. I may have knowledge but what matters more is experience. So I am giving time to explore the editor on your own and from next tutorial I will start telling you about other stuff.

So I will meet you next time with another tutorial or maybe I will post an update for my shop first. Till then bye!!

Posted: 6 years ago


Hey again people! I am back with a new tutorial and as I have said before this one is as well going to be a basic introductory tutorial. In my last (& the first tutorial) I introduced you Photoscape, your Hogwarts letter πŸ˜† and I hope you are experimenting its features as I told you to. 

Today I am going to introduce you to Photoshop aka PS's cousin, GIMP (GNU Image Manipulation Program). But let me first tell you as to how I got to know about GIMP. You see Photoscape is a very effective image editor but it has its limits. It can help you blend two images but you can't merge them using Photoscape. While "blending deals with mixing two or more images using opacity tool, "merging on the other hand deals with combing two or more images in one frame.

Years ago I used to post my fan fictions at another forum, a blog that was specifically made for Star One show Dill Mill Gayee. There I met Punam Di, she's a write and a graphic designer as well and she used to do what I wanted to do the most πŸ˜†. You see I wasn't aware of how to merge two or more images together so I tried many things to achieve the desired result (which are so embarrassing that I ain't gonna tell you. Ssshhh...)

So people at IF are advanced and used PS which I looked for online and you had to buy it which I couldn't that time and I wasn't aware that someone had put a link at A&S forum from where you can download it for free. So I was just looking for alternatives and everybody I asked at IF, searched youtube vids and did other stuff and found nothing except PS, PS and PS. So when I saw Punam Di making those merged siggies and talking about GIMP and how does she do that and stuff, I remember she said, "VK (that's my name πŸ˜†) GIMP is very difficult to work with and I am telling you that you won't be able to make stuff using it. And what I did was narrowed my eyes at my PS screen as I typed the message, "No worries, I'll manage. Just tell me about it.

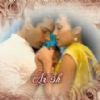
Hence I got to know about GIMP. I downloaded it and as I did with Photoscape I did a number of experiments with GIMP as well. Following is my first ever (the first that looked nice and presentable 🀣) merged siggy/banner that I created for my SS ::


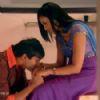
And this is the what I can do with GIMP now ::


What I am trying to tell you is that more than tutorials, knowledge about image designing and a good image editor, what you need is experience, desire to experiment and the determined attitude of "to hell with the complexities! I can do it! Ending my Ram Katha (the Diwali fever I tell you), I present you brief details about GIMP, your Hogwarts A History book.


It might (I think it will) take few minutes to set up because there's a lot happening as you open GIMP for the first time. The installation, setting up data files, plug-ins, downloading the preset tools, brushes, patterns and other stuff. So it will take time when you first open GIMP. At first it is gonna look like this >> (the coloring is my work, I had to highlight the areas so you will be able to understand it better)

Click here to open the image

Of-course you can customize is as you prefer. Like I have done with mine :: Click here to open the image

So I am gonna help you take the baby steps with this ::

Step 1 :: At the top of your image work area there are some options. Click on "File >> Click here to open the image, the said "file option is rounded in a red circle

Step 2 :: A drop down menu will open, select the option "open from it. More details are in this image >>Click here to open the image

Step 3 :: I selected the image I wanted to work and it will appear like this. Here I have selected and opened one image only, you can select multiple images and they will open in separate windows. That and how you can merge two or more images together and do other edits with it, I will tell you all that in another tutorial but for now I want you to concentrate on just one image.
Here's how it looks like >> Click here to open the image

Step 4 :: Experiment with all the tools and filters. Do anything you want to with the image and of-course as mentioned in my previous tutorial >> CREATE A MESS πŸ˜†πŸ€£

Step 5 :: In order to save your "mess πŸ˜† you have to click on File >> "Export As

IMPORTANT >> Do not click on "Save or "Save as that will just save your edit like a PSD, an XCF file in GIMP's case. Which will open in GIMP and is saved so that you can do some more editing on it later. But for saving the final image that you wanna share and do other things that you want, you have to follow Step 5.

But before that I think I should tell you what the tools in the toolbox do, just a brief summary. But then I thought why should I write the whole thing when it's available here πŸ˜† >> Click here

The above mentioned link will take you to a wiki page where the tools that GIMP offers to work on graphic designing are given with a description about what they do and the short-cuts.

The next tutorial, as mentioned in my index will be on the easiest siggy that you can create that is "Typography, we will be dealing with the most basic and most easiest ones in that and with every passing tutorial as the complexity will grow I will tell you about how you can create the gorgeous yet a little complex typography siggies as well. In that tutorial I will also tell you from where you can download fonts and in which folder you have to save them, how to load them in your GIMP etc. etc.

But for now I suggest you play with GIMP tools and filters and create something whatever it is gonna be, just make it. Just do it. And I hope you are working on the Photoscape mess as well and I really really hope that by now you must have learnt a few things about how Photoscape works.

And yeah, if you have some questions regarding anything about Photoscape, GIMP, or in general graphic designing, then please post your query here at this thread >> Click here, Click me!!

Till then good bye and best of luck for this new task. And please comment if you liked the tutorial or not, whether it was helpful or not and any other suggestion you have.

And please mention if any link or any image isn't working.πŸ˜ƒπŸ˜³
MsChanadlerBong thumbnail
Anniversary 9 Thumbnail Group Promotion 6 Thumbnail + 5
Posted: 6 years ago
Congratulation for the shop. πŸ˜ƒ Looking forward to some great advices and learning some new skills. 
Sonserina_Reina thumbnail
Anniversary 10 Thumbnail Group Promotion 5 Thumbnail Networker 1 Thumbnail
Posted: 6 years ago
congratulations for tutorial thread Megha...πŸ€—
looking forward to your amazing tutorials, to learn graphics...
Tumpa12 thumbnail
Anniversary 10 Thumbnail Group Promotion 5 Thumbnail Networker 2 Thumbnail
Posted: 6 years ago
Looking forward to learn something new
ajuswa19 thumbnail
Anniversary 8 Thumbnail Group Promotion 5 Thumbnail + 5
Posted: 6 years ago
I was once juggling wd this! 
GIMP toh I had downloaded 
Earlier...But I found it confusing
Here, now I think now I wud
Learn it!😳