


Posted:

Tutorial#17
How to use Actions
Hello everyone,
Here is how you can use Actions.
Firstly download an Actions. It's probably packed and needs to be unpacked. You can use the program "WinRAR" to unpack them. Packed files are RAR or ZIP files. If you read any of them then you can be sure that you iwll have to unpack them first after downloading.
Actions are "atn" files. So the file must be atn!
How to upload Actions to Photoshop. It's very easy actually.
1. Click on "Window" which is on Top of PS.
2. click to Actions

Then the Action window will pop up. Click to the button which is red marked then click to "Load Actions"

Search for the action file and upload it.
When you upload it you will see it in there.

this one which is marked "F9" means only the key which you can only click on your keyboard to make the action load. You don't need that. You can even click to the Layer which you want to sharped and then click to the action (not folder) and then click to this button which is marked

then the action will work.😳
I always do it this way:
1. Upload the Video (File => Import => Video Frames to Layers)
2. Select the Video and select the part (I mostly click to "Limit to every 2 frames" and write there 2!)
3. As PS makes it hard to select the parts you want by Importing I select the part always after it gets uploaded.
What I do after the Video gets imported:
1. I first add the Layers in Group!
2. I select the Frames I want and copy the Frames (if you don't know how to do it, just lemme know)
3. Then I open a new document with the SAME SIZE as the video! My videos are mostly 1920x1080 so I open up a new document with that size and then paste my frames there. Do not delete the other one if you want to take other parts of that video. I do it like that coz firstly I don't want to upload the Video again and again it takes more time than making the GIFs and secondly by deleting Frames you are not deleting layers! It will make the GIF look noisy with many layers!😳
4. I select all Frames and then right click on the time delay which is under every frame and thne click to "Others". If I clicked to "limit to every ... frames" then I should change the delay according to that. I always write 0,9 seconds delay when I limit the frames to 2.😳
5. If on the bottom it write "once" I click to it and select Forever (to make the GIF play forever)
READ HERE CAREFULLY if you dont know how to use timeline.
1. click to timeline

2. I click to "Filter" and then "Convert to Smart Filters" BUT you have to have clicked the "grouped" Layers of the GIF.. that should be converted na😛
if it looks like this then you did right😃

I then make my document smalled because it's big na because of the Video.😛
Click to "Image" then "Image size". I always write Width: 500 pixels and then the other one gets changed aswell. (don't worry.. you can crop your animation as you like to.. I'll explain it too but first make it smaller that you can work better on it and faster). To zoom in I click to "Control" and "+" to zoom out "Control" and "-".
then the only thing you have to do is to click to "F9" (for example) and then the sharpen action will be automatically added to your GIF😃 You can always change the key by double click on the Action. If you use my Action then you'll see that there is one more Layer added. It's the sharpen one.😊
If you find the sharpen too strong on your GIF or want to add more sharpen then you can even edit it easily.

double click on the one I've marked above. Then the settings will open up.
Leave the Radius like it is and shift the "Amount" to left or right until you like it.
Now, if you want to crop your gif or edit the size then you can by clicking to the "Rectangular Tool"

On top there are settings which you can edit.
Clcik to Fixed Size.

Write the size you wish. REMEMBER: the max size can be the size of the document!
my normal GIF size is mostly 250x175.
if you have written the size then click on the document then your size will be placed. You dont need to make it on it's place. (Trust me😆) Leave it like it is and click to IMAGE and then CROP.
Your gif would be on that size you wished for.
Now to get rid of the lines over your GIF then you must have to change it again to "NORMAL" from fixed size and then again click to yur document. Then the lines will be gone.
Now click to "Move Tool". and add your coloring / psd to your GIF.😃
Have the "move tool" selected and select both of the GIF layers..

Then you can see that you can move your GIF make it bigger.. smaller.. as you want..

I don't like the video to get stretched.. it doesn't look real to me that's why I always have "shift" key clicked while I make my GIF bigger or smaller.Have shift key clicked and click to one edge of the line and change it how you like to.
Add your copyright if you like to.. now you are finished actually 😛
Now go to file and save your GIF.😃🥳
REMINDER!
It mifght be possible that PS still wants to show your GIF only once even if you have edited it on past steps. Don't worry.. it's because you have changed your GIF to timeline. Just don't forget always to check if it's "Once" or "Forever" written when you save your GIF. Edit it always to "Forever" and then Save. 🥳
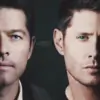
This is the GIF I did while doing this Tutorial.😳

Take care! If you have questions then don't hesitate and bombard me with questions😆
Have fun! :)


 Yeh Rishta Kya Kehlata Hai

