


Posted:

Tutorial#15
How to do GIF's with Timeline
Hello everyone,
I have seen, I have posted a Tutorial on How to do GIF's long time ago.
I thought it's high time to post one more Tutorial on the same but "with timeline".
Have fun! :)
PS:-It's very detailed and good for beginners.
Using: Photoshop CS5 Extended Version
(Download Link on first page!)
Step 1: Open Video on Photoshop
So, for making GIF's you will have to open Videos on Photoshop but for that you'll need to Download and Install "QuickTime Player Version 7.1" -Link given on first page.
You need QuickTime Player to open Videos on Photoshop. I won't explain why, here and straight begin with the Tutorial.
Open Photoshop. Go to "FILE" on top. And select "IMPORT" and then "Video Frames to Layers." If this window pops up then you have successfully installed QuickTime Player. (Picture Below)

Great. As it already writes down which type of Videos you can Upload, I will write it down here aswell. MOV, AVI, MPEG, MPG, MP4.
I mostly use MP4. If a video is wmv or flv, then I convert them easily with aTube Cather to MP4.
So, select any Video you want for a great start to this Tutorial. When you have selected a Video which is on the Format it's accepts then this Window will pop up.

So.. The Video is shown right of the Window and on the left side we have some options which can select. First one is "From Beginning To End", if you have that one clicked, Photoshop can make a GIF on the whole Video. But maximum of Frames and Layers are 500. So that means, Photoshop will take only first part of the Video until it reaches 500 Frames. So I don't suggest you to have that option clicked.
The second one is "Selected Range Only" That means, you can select any part of the Video. When you select that one. the line under the Video will automatically be from dark grey to lighter grey and on left is one sign (Picture Below)

When you have that red marked sign (picture above) clicked. Then you can move it from left to right and from right to left. The is the sign where the video starts. With the play button you can play your Video and on right side there are buttons which shows to left (backward) or to right (forward). You can click to the backward button and it will automatically take the video to one Frame back that you can select the Video better clearly. Now, when you have selected where the Video has to start but want to select the end of the animation? Then you have to hold Shift Key while you are choosing.. And then it will look like this: (Pic below)

The part which is dark, is the one which is selected for the Animation. When it's right then see the left side again. There is one more option I haven't explained you yet. And that is been called "Limit to every 2 Frames. That option is meant for making a part of a Video in less Frames than it actually would have. When you select that one it will divide your Animations Frames to 2. But when you want it more less than you can even write instead of 2 you can write 3 or 4. But I would suggest you to divide only to 2. If you divide it to more than 2 then it will be too fast and some Frames will be automatically deleted. I always use that option and make the delay of the Frames longer than before to have the actual delay of a Video.
If you got what you wanted then click to O.K. It will take a while to load. When it says "it may take long" then just ignore it and click to OK. When it says "It will restrict to max. 500 Frames." then the part after 500 frames won't be uploaded.
Step 2: Add your Layers to Group

(We do this part to switch to timeline.)
When your Animation completely loaded, it will look like this . (Picture above) On right side are the Layers and on the bottom of the document/video/animation are the Frames. But for now, look at the yellow marked parts. I have marked the "last" Layer because we have to click on the last layer. In this case, I have 76 Frames and Layers-so the last one is 76th. After that, click to the "Group" Button on bottom of the layer which is marked aswell. Whne you have that one clicked. It will look like this.

Maybe you have noticed, the Group is added to the Layers but has non of the Layers in that Group. So we have to add the Layers to the group. For that. click on any Animations Layer (click on only 1 layer.) Then right click on mouse and then there will be many options to click to.

Then click to the "blue marked" option which says "Select Similar Layers". Photoshop will select for you all the Animations Layers.

Then the only thing you have to do is to drag the Selected Layers into the Group. And then all the Layers will be in Group. Whatever you had to do with layers is done now. Now it's time to change some things on the frames.
Step 3: Frames (delaying the Animations perfectly)
Now coming to the Frames.
Under the Pictures on Frames there shows the delay of the Animation. For me it shows 0,04 seconds.. it's too less if you have the "limit to every 2 seconds" option clicked before. It should be min. 0,09 sec. For changing it, click to the red marked button (pic below)

And then many options pop up. select the red marked (pic above) which says "Select all frames". And then all your frames will be selected.. now you have to right click right on where it shows the seconds. Like this one below:

And then select the "other" button. Then a Window will pop up and you can write the seconds how long a frame should take until it switches to next frame.

Write 0,09 there and then click to OK.
Step 4: Timeline
So, to add Sharpening Effects , we have to switch from Animation to Timeline. And here is how to do it.
Click to the Timeline button.. marked red on picture below.

And then timeline will open. But for working properly with timeline we have to make the group into Smart Filter. For that one you have to have the "group" layer click on the right side. Then go to "filter" on top.. and then click to "Smart Filter" how it's show on next picture.

And then your group will be edited to Smart Filter.. It is just one layer now. You cant see the Animation Layers anymore.
And then I have added my own Sharpening Effect. I have explained how to do it on this Tutorial Click here
And then you can crop your Animation properly.. With fixed Size.. I have explained how to do that here on this Tutorial
You can add PSD Colorings or make your own colorings without even selecting the first Frame and Last Layer as you have made it Smart Filter and we are using Timeline which makes us do our GIFs even easier and faster. :)
And without even writing your copyright on every single GIF, I have made a Tutorial on that aswell.. Here
I hope I could explain you all.😳
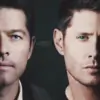
This is the outcome I have made while doing this Tutorial:


Take care.
-- Violetta.


 Bollywood
 Cricket
 Anupamaa

