


Posted:
Lesson 2: The Rain Effect
Normally we can find those rainy GIFs on google itself, but with this tutorial we'll be able to make them yourself. As a person, with a perpetually disturbed internet, tutorials like this come handy when Net decides to play the hide-and-seek! 😆
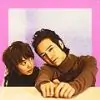
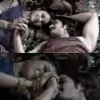
So in this lesson, we'd try to make a graphic like this one,

First, open the palette, and create the non-animated background. No need to pressure yourself to finalize it, for you can always put your layers into a group for changes, if required.
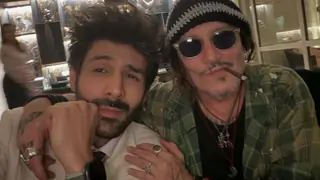
So, I've put it like this,

Now, use <ctrl+shift+N> to create 3 new layers, and fill all of them with black (using the paint bucket tool). You just have to press 'D' to return the FG/BG boxes to B/W. :)

Okay, so this looks stupid, right? So, now we'll go ahead and add some noise to it.
Here's where to find it. 😃

Now, set the noise to whatever you wish. I've used 15 for this one. It's preferable to vary it from 10-25. You see, this helps us control how heavy rainfall we want. Repeat exactly for all three layers. 😃

Now, THIS is the step where we actually create our rain. We'll have to use motion blur, that you will find here:

Here, we put the angle to 60 degrees, and vary the 'distance' over 2, 3 and 4, one for each of those 3 layers. As before, you can vary these too. I strongly recommend that you play with the noise and the angle to get your perfect rainfall.

Now comes the Animation part. First group these 3 layers. Set the group to "Screen" mode. Click on the button over the Timeline (highlighted in the pic below), and select 'Make Frames from Layers'.

Delete all the other frames that will come up, other than the three layers of rain.
Now, set the time to whatever you think fit (i.e. how fast your rain should be falling). 0.15 secs worked best for me. 😳

Then what I did was, I changed the Foreground colour to a Greyish shade, and brushed over the mask to clear some of the rain over the couple in focus. Using a grey brush on a mask, gives the same effect as the eraser on 50% opacity. 😃
Then, I applied the green texture, put a text, my copyright and I was done!
You can see the final layers' settings in the pic below. 😳

With all this, I hope you found this one interesting. Maybe I could see a creation or two, pretty please? 😳
P.S. this works best for darker siggies/pictures. 😃
P.P.S. if you need any of my resources feel free to PM me since I won't be posting them in this thread. 😳
P.P.P.S. please open the pictures in a new tab for better viewing. 😳
Normally we can find those rainy GIFs on google itself, but with this tutorial we'll be able to make them yourself. As a person, with a perpetually disturbed internet, tutorials like this come handy when Net decides to play the hide-and-seek! 😆
So in this lesson, we'd try to make a graphic like this one,
First, open the palette, and create the non-animated background. No need to pressure yourself to finalize it, for you can always put your layers into a group for changes, if required.
So, I've put it like this,
Now, use <ctrl+shift+N> to create 3 new layers, and fill all of them with black (using the paint bucket tool). You just have to press 'D' to return the FG/BG boxes to B/W. :)
Okay, so this looks stupid, right? So, now we'll go ahead and add some noise to it.
Here's where to find it. 😃
Now, set the noise to whatever you wish. I've used 15 for this one. It's preferable to vary it from 10-25. You see, this helps us control how heavy rainfall we want. Repeat exactly for all three layers. 😃
Now, THIS is the step where we actually create our rain. We'll have to use motion blur, that you will find here:
Here, we put the angle to 60 degrees, and vary the 'distance' over 2, 3 and 4, one for each of those 3 layers. As before, you can vary these too. I strongly recommend that you play with the noise and the angle to get your perfect rainfall.
Now comes the Animation part. First group these 3 layers. Set the group to "Screen" mode. Click on the button over the Timeline (highlighted in the pic below), and select 'Make Frames from Layers'.
Delete all the other frames that will come up, other than the three layers of rain.
Now, set the time to whatever you think fit (i.e. how fast your rain should be falling). 0.15 secs worked best for me. 😳
Then what I did was, I changed the Foreground colour to a Greyish shade, and brushed over the mask to clear some of the rain over the couple in focus. Using a grey brush on a mask, gives the same effect as the eraser on 50% opacity. 😃
Then, I applied the green texture, put a text, my copyright and I was done!
You can see the final layers' settings in the pic below. 😳
With all this, I hope you found this one interesting. Maybe I could see a creation or two, pretty please? 😳
P.S. this works best for darker siggies/pictures. 😃
P.P.S. if you need any of my resources feel free to PM me since I won't be posting them in this thread. 😳
P.P.P.S. please open the pictures in a new tab for better viewing. 😳


37