Lesson 1: ColourizationIn this lesson, we'd basically be turning a black and white picture, into a coloured one.
Here's the before/after snap 😎:
So, lets open the B/W picture in PS.
In the Adjustments column (you can find it in the drop down panel from 'windows' in the top-bar) select the Channel Mixer.
Now, as you can see in the following pic, on moving the sliders of 'red', 'green' and 'blue', you can apply different colours to the entire image.
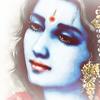
In this picture I've tried to fix the skin colour of the actress. As you can see, it's still looks too red. It is too red for normal pics, but I already had an idea about how the makers had shot this particular sequence, so I kept it as it was. ^_^
Now, the step is,
To erase out the unnecessary areas i.e. the portions that do not need the skin colour.
For this, we need to click on the mask (white portion beside the thumbnail) of the Channel Mixer Layer.
Then, we need to use the brush tool (with black as foreground colour) to erase out the parts.
Tip: Since, in this pic the skin colour is occupying a very small area, we first invert (ctrl+I) the mask (i.e. use the shortcut after clicking the thumbnail) and use the brush with white as the FG colour, to re-paint those parts, instead of erasing the colour from the rest of the face.
Now, we would use new Channel Mixer layers above our current layer to get all the other colours, with values as follows 🤡:
And we would use the same technique to erase the unnecessary parts from the respective masks.
Now, we would focus on the smaller bits(like, the henna on the hands of the actress, or the general redness of her palm). For this, we'd now have to make a new layer and put it on mode colour.
Then, we'd select one of the basic round brushes, pick up a suitable red (Tip: brown shades give you bright colours, and vermillion-y ones give you the pastel; it's same for all other colours), paint the required areas, and ta-daa, you're done!
Here's a quick GIF depicting the process. 😳 ->
Here's the final product (guess the GIF's too fast?),
Some different examples with the same process:
Hope this proves useful for ya peeps! 😃
P.S. with this lesson you can also try surprising your parents/grandparents with some coloured pics of their childhood! 🥳
Edited by rai-kishori. - 6 years ago


comment:
p_commentcount